Itty Bitty Foamie Teardrop Test Build Thread

Canvas covered foamies (Thrifty Alternatives...)

Moderator: eaglesdare

Itty Bitty Foamie Teardrop Test Build Thread

Postby amandacreiglow » Wed Oct 11, 2017 4:07 am

tac422 wrote:Here's my cooler :D
146830 146831
Pink foam, I cut a lip all around the lid so it sets down in the hole.


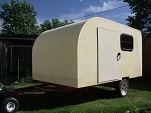
That's so adorable I'm going to die! I'm planning on painting mine like a mini version of my trailer, too, but won't have wheels or wings, and won't be as beautifully curved, so I think that brings it way down on the cuteness factor. Love your build overall, btw.

Fiddlin'Billy wrote:I love the time lapse, but just can't stop watching that wallpaper peel :lol: :R :lol:
You've got some good things going here and I can't wait to see the final product.
My cooler is being made from the pink stuff too. Did you cut the cooler lid to fit or glue two pieces together? Oh wait, I just looked again. Did you glue a lip on there too?


Thanks, the peeling wallpaper always gets me, too. :( If I were to do it again (and of course I will...) I'd pick a permanent wallpaper so it wouldn't be so prone to peeling while it's being heartily manhandled during assembly, rather than the removeable stuff that matched what I put in my room. There's another video of the assembly process that unfortunately hasn't gotten timelapsed and isn't readily accessible atm, but it shows us poking and prodding and twisting and stabbing to get the shelves to go nicely into the side panels. It's a miracle any of the wallpaper is still attached, honestly. :R

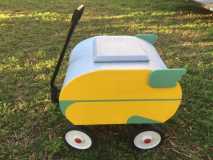
As for the cooler, I think this pic from the cooler progress I made today will help make it the clearest how it's going to fit together:

Image

It's two layers of 1" pink foam, basically a box within a box. That means that none of the seams line up, and gives me the best chance of actually having a consistent, straight lip. Then the lid is one piece cut to the size of the box, with two pieces glued to it so that there are two inches everywhere except where the inner ring comes up. I've tested it and it fits! ... albeit with some cajoling. I plan to take a sander to it when the adhesive from putting the inner box in today is cured.

Overall, I've been on a bit of a break the last week or so. My parents were out of town and I made a good try at resetting my sleep schedule, which looked like it was going to work until I ruined it the day before yesterday.

On a side note, I would advise anyone who spends a lot of their time working in an open garage in the middle of the night when everyone else is asleep NOT to binge-watch four seasons of American Horror Story within a week. It's... not a great idea.

But today I got enough of the electrical done that I could begin the filling/shaping/canvassing process on the exterior. This was a lot harder than it looks. The wires did not want to go nicely around the 45 degree angle buried in the wall, and they took come convincing. But I was able to get the 6 14-gauge wires I think I'll need through eventually, and then realized that I really needed to label which end is connected to which, which was harder than it needed to be since I had them all through already. Then I got the front PVC bits cut, and was able to get the wires through the right angles and straight runs individually. No way I would have been able to if they were all put together already. Lesson learned for next time, for sure.
Image

The reason it was so important to do this was so that I can make some more progress with getting the exterior ready for canvassing it was time for.... FILLER FOAM!
Image

I saw some loctite foam at home depot that claimed to be denser than great stuff (they didn't say it by name, but, I mean, come on). Figured I'd give it a try since I've liked a lot of loctite products. And I have to say, I really like it. It feels stickier than great stuff, and I think it might harden a bit faster. It seems to stay together a bit better, too, which overall means I'm less likely to make a mess. I needed more than the bottle, though, so I broke out some great stuff to finish it off, and the only bits that got on the floor were from the great stuff, not from the loctite stuff. The only thing I didn't like about it, though, was that the nozzle that comes with it is kind of huge, making it hard not to use more than you need when the bottle's fully pressurized. Although it does look like the nozzles are interchangeable with the great stuff cans. All in all, would buy again. Though I'm not sure how price stacks up, with how fast it felt like I ran through the can on loctite. Not sure that's because there's less in the can, or I just used more faster because the nozzle is so big, or I'm just bad at subjectively judging quanitities like this.

I also worked a while on the inner frames for the doors. Realized I'm 3 t-nuts short. :cry: Of course I am. But I think I'll be able to rob peter to pay paul and make it work. Here's hoping the doors saga will soon end... just as soon as I have a canvassed trailer to put them on.
User avatar
amandacreiglow
Teardrop Master
 
Posts: 137
Images: 1
Joined: Sat Jun 10, 2017 8:29 am

Re: Itty Bitty Foamie Teardrop Test Build Thread

Postby GPW » Wed Oct 11, 2017 5:01 am

You’re doing Great !!! :thumbsup:
There’s no place like Foam !
User avatar
GPW
Gold Donating Member
 
Posts: 14912
Images: 546
Joined: Thu Feb 09, 2006 7:58 pm
Location: New Orleans

Re: Itty Bitty Foamie Teardrop Test Build Thread

Postby S. Heisley » Wed Oct 11, 2017 7:39 pm

amandacreiglow wrote:

...But today I got enough of the electrical done that I could begin the filling/shaping/canvassing process on the exterior. This was a lot harder than it looks. The wires did not want to go nicely around the 45 degree angle buried in the wall, and they took come convincing. But I was able to get the 6 14-gauge wires I think I'll need through eventually, and then realized that I really needed to label which end is connected to which, which was harder than it needed to be since I had them all through already. Then I got the front PVC bits cut, and was able to get the wires through the right angles and straight runs individually. No way I would have been able to if they were all put together already. Lesson learned for next time, for sure.
Image

The reason it was so important to do this was so that I can make some more progress with getting the exterior ready for canvassing it was time for.... FILLER FOAM!
Image

I saw some loctite foam at home depot that claimed to be denser than great stuff (they didn't say it by name, but, I mean, come on). Figured I'd give it a try since I've liked a lot of loctite products. And I have to say, I really like it. It feels stickier than great stuff, and I think it might harden a bit faster. It seems to stay together a bit better, too, which overall means I'm less likely to make a mess. I needed more than the bottle, though, so I broke out some great stuff to finish it off, and the only bits that got on the floor were from the great stuff, not from the loctite stuff. The only thing I didn't like about it, though, was that the nozzle that comes with it is kind of huge, making it hard not to use more than you need when the bottle's fully pressurized. Although it does look like the nozzles are interchangeable with the great stuff cans. All in all, would buy again. Though I'm not sure how price stacks up, with how fast it felt like I ran through the can on loctite. Not sure that's because there's less in the can, or I just used more faster because the nozzle is so big, or I'm just bad at subjectively judging quanitities like this.

I also worked a while on the inner frames for the doors. Realized I'm 3 t-nuts short. :cry: Of course I am. But I think I'll be able to rob peter to pay paul and make it work. Here's hoping the doors saga will soon end... just as soon as I have a canvassed trailer to put them on.


I like the way you plumbed in your electrical. Also, those cans of great stuff and loctite should have a contents label that tells how many ounces or grams are inside, so you could probably tell if it is less product or the nozzle (which you might be able to change?) or ...?

Keep going! We're watching! :SG
User avatar
S. Heisley
Super Lifetime Member
 
Posts: 8774
Images: 495
Joined: Mon Sep 17, 2007 10:02 am
Location: No. California
Top

Re: Itty Bitty Foamie Teardrop Test Build Thread

Postby amandacreiglow » Thu Oct 12, 2017 7:17 pm

Thanks guys, I appreciate it. :-)

Making more progress! Hoping to canvas in a few days. I spent aaaages sanding and spackling.

Image
Image

I think I still need to do another coat of spackling after this coat dries, which may take a few days.

I got my canvas out of the box and attempted to wash it.
My parents' washer and dryer is pretty big, so I thought it would fit. Buuuut no dice. Got it washed ok-ish I think, but it didn't get dried. Might take it to a laundromat, or might just wrap it around an 8' piece on moulding and just assume it's going to dry on the trailer in a few days when I get it up. Not sure if I'll end up regretting it if I do it that way.

Also figured out what I'm going for my tongue box. I was originally going to build it, but realized that that was going to be a big-ish task that I'm. It well-suited for and wouldn't end up as sturdy as I'd like.

It occurred to me that deck boxes are around the right size, sturdy, and designed to live outdoors. Ended up picking this one:
https://www.amazon.com/dp/B000CFOW3O/ref=cm_sw_r_cp_api_VHa4zb719GVMK

Should be more than enough storage for my electrical stuff as well as general exterior stuff storage like my towing stuff. The cool thing is that it's meant to be used as a bench, as well. So I'm thinking I'm going to make a few cushions for the top and slightly modify an umbrella to give myself some outside covered seating. Feeling pretty good about that idea, though I'm fighting scope creep and resisting the temptation to try and rig up a removeable table.


Sent from my iPhone using Tapatalk
User avatar
amandacreiglow
Teardrop Master
 
Posts: 137
Images: 1
Joined: Sat Jun 10, 2017 8:29 am
Top

Re: Itty Bitty Foamie Teardrop Test Build Thread

Postby Don L. » Thu Oct 12, 2017 8:29 pm

Nice progress on your camper! Thanks for the updates. I enjoy seeing how things progress.

I just noticed how the lowes branding and printing shows so well and thought I would remind you about sanding or roughing the surfaces that are to be glued and canvassed, in case you don't already know.
I sanded mine with 80 grit, it probably would have been easier to score it with a handsaw blade, but then I don't know how that would affect the outcome.
Link to my foamie camper build viewtopic.php?f=55&t=67321
instagram #don_leister_violin.rva
Don L.
Teardrop Master
 
Posts: 230
Images: 0
Joined: Sat Jan 02, 2016 7:11 am
Location: Richmond, VA
Top

Re: Itty Bitty Foamie Teardrop Test Build Thread

Postby GPW » Fri Oct 13, 2017 4:45 am

I don’t know if we ever agreed on the use of spackling , but when I used it and then removed the fabric material later , the spackling came with it :o … I believe spackling is made for stationary surfaces …

Amanda , are you using a sanding block or just hand sanding ? Just FYI, you can use a belt sander belt cut and glued to a 1"X4” board as long sanding block . It makes sanding easy and produces smooth even surfaces . ;)
There’s no place like Foam !
User avatar
GPW
Gold Donating Member
 
Posts: 14912
Images: 546
Joined: Thu Feb 09, 2006 7:58 pm
Location: New Orleans
Top

Re: Itty Bitty Foamie Teardrop Test Build Thread

Postby ghcoe » Fri Oct 13, 2017 7:34 am

When I applied the spackle to #1, if it were a large area, I would use Gripper between each layer that I applied. Made it a lot easier to sand since the Gripper would not sand easily so you would not accidently sand back into what you already faired out. Took a bit more time since you had to wait for everything to dry, but worked well. When I later had to remove some canvas in a area that I had to fill in the spackle/Gripper section came off too. The fail point was the foam and not in the spackle or Gripper layers. So it made me a believer that it is a viable filler if done right.

I feel some of the areas you are filling in, like around the PVC in the middle of the front wall, is going to telegraph trough the canvas. The two foams have different expansion/contraction rates. Even though it will look fair now, in different conditions it will change.
George.

Gorrilla Glue, Great Stuff and Gripper. The three G's of foamie construction.

My build viewtopic.php?t=54099
Working with flashing for foamie construction viewtopic.php?f=55&t=60303
Making a hot wire http://tnttt.com/viewtopic.php?f=55&t=55323
User avatar
ghcoe
1000 Club
1000 Club
 
Posts: 1946
Joined: Fri Dec 11, 2009 11:20 pm
Location: SW Idaho
Top

Re: Itty Bitty Foamie Teardrop Test Build Thread

Postby amandacreiglow » Sat Oct 14, 2017 1:44 pm

Thanks guys.

On the sanding, I'm using an electric hand sander which has been a life saver.
Image

The one unfortunate thing about planning on heading out on the road soon is that I'm starting to assemble a list of tools that I'd love to have in a workshop of my own for doing things like this... oh well.

And after reading what was said yesterday, I made sure to go over all the writing that's on the outside pretty thoroughly with some 60 grit. Eventually it starts spreading around the dark pigment, which I think means it's getting down to the letters, and hopefully has evened out the sheet enough that they won't show through the fabric. As a bonus, the 60 grit also leaves the surface of the foam good and roughed up... almost has a fuzzy feeling to it. Feels kind of nice, honestly.

As for the spackling, I'm not sure... I did another coat on it yesterday, after sanding, and will do another sand before canvassing today (wish me luck!). I'm not sure how that will leave me as far as smoothness... there are still a bunch of places that I think are going to show up as raggedy through the canvas. I've made peace with the idea I may have to make the exterior painting design a bit busier in places than I had originally planned, just to distract the eye and draw attention away from the imperfections. But we'll see.

I'm not so worried about the spackle coming away with the canvas if I peel it off. I figure if I'm peeling the canvas off, then I'm probably doing some decently large repairs anyway, so I'm not going to quibble about respackling.

The mismatches in expansion with the weather is a bit more of a worry, but I'm thinking only time will tell about that. Since mine will be on the road constantly all winter, it should give us a sense of weather that's an issue. No way to find out but to find out, I guess. The spackle I got is flexible and specifies that it is for both indoor and outdoor use, so hopefully that gives it a fighting chance of holding its ground versus temperature changes.

The real issue is that I'm not sure what I'd use in place of filler foam and spackle. The filler foam, especially, I'd love if there were something that I could use instead, since I don't care for the final surface of it after cutting it down, it's a mess, and there is so much waste involved. But I just don't know.

Image

Here's a shot of it after the second coat of spackling, taken while it was still wet. It's a few hours now until my brother and sister in law get here to help with canvassing. They're planning on going on a camping trip this coming weekend, and I'd really like to get the foamie put together enough to join them for a test run/maiden voyage. So, over the next week, I need to get it covered, painted (at least in a protective white coat), mounted, finish the doors and back hatch, and get the roof vent put in, even if the fan on it doesn't yet have power. I think that might be doable. Fingers crossed. Anyway, that's going to be my priorities over the next little while. :-)

As always, thanks for the support and input, guys. It's invaluable.


Sent from my iPhone using Tapatalk
User avatar
amandacreiglow
Teardrop Master
 
Posts: 137
Images: 1
Joined: Sat Jun 10, 2017 8:29 am
Top

Re: Itty Bitty Foamie Teardrop Test Build Thread

Postby amandacreiglow » Sat Oct 14, 2017 1:56 pm

S. Heisley wrote:

I like the way you plumbed in your electrical. Also, those cans of great stuff and loctite should have a contents label that tells how many ounces or grams are inside, so you could probably tell if it is less product or the nozzle (which you might be able to change?) or ...?

Keep going! We're watching! :SG


Thanks! As far as the actual quantity on the can, it's identical to the smaller cans of great stuff. Which seemed encouraging, until I remembered that the big advertising push for this stuff is that it is, according to them, four times denser to the. Great stuff. And if it's denser, but the same weight, then it should be less volume... like, a quarter of the volume of the same sized can of great stuff, if their claims are accurate and I've got my basic science worked out correctly. So, that's disappointing.

I also don't like trying to deal with it in its dried state for smoothing purposes. Seems more elastic, and less willing to be cut and sanded smooth even than great stuff. So between that and the volume issues, it may not be a better choice after all. Which is a shame, because it is way nicer and easier to work with.

And it looks like the nozzles ARE interchangeable, as far as I can tell. May test it when filling in stound my roof vent in a couple days...


Sent from my iPhone using Tapatalk
User avatar
amandacreiglow
Teardrop Master
 
Posts: 137
Images: 1
Joined: Sat Jun 10, 2017 8:29 am
Top

Re: Itty Bitty Foamie Teardrop Test Build Thread

Postby ghcoe » Sat Oct 14, 2017 2:02 pm

A couple of tips.

When cutting out for the PVC pipe I used a hot wire to make the cutouts. Once you have the cutouts you can cut back the depth of the PVC/wire and then reinstall the foam over the PVC. Included photos for example.

CAM01095s.jpg
Cut
CAM01095s.jpg (122.62 KiB) Viewed 700 times


CAM01096s.jpg
Glue
CAM01096s.jpg (83.14 KiB) Viewed 700 times


CAM01097s.jpg
Reinstall
CAM01097s.jpg (107.27 KiB) Viewed 700 times


Once dry add a bit of spackle and then sand flush.

Great Stuff and Gorilla Glue is a lot harder to sand than the surrounding XPS foam. In my case I took a dremel tool with a grinding bit and ground the GS/GG below the surface I wanted to make flush just a bit. Then I filled the void with spackle and once dry sanded it flush.
George.

Gorrilla Glue, Great Stuff and Gripper. The three G's of foamie construction.

My build viewtopic.php?t=54099
Working with flashing for foamie construction viewtopic.php?f=55&t=60303
Making a hot wire http://tnttt.com/viewtopic.php?f=55&t=55323
User avatar
ghcoe
1000 Club
1000 Club
 
Posts: 1946
Joined: Fri Dec 11, 2009 11:20 pm
Location: SW Idaho
Top

Re: Itty Bitty Foamie Teardrop Test Build Thread

Postby amandacreiglow » Sat Oct 14, 2017 2:23 pm

ghcoe wrote:A couple of tips.

When cutting out for the PVC pipe I used a hot wire to make the cutouts. Once you have the cutouts you can cut back the depth of the PVC/wire and then reinstall the foam over the PVC. Included photos for example.

CAM01095s.jpg


CAM01096s.jpg


CAM01097s.jpg


Once dry add a bit of spackle and then sand flush.

Great Stuff and Gorilla Glue is a lot harder to sand than the surrounding XPS foam. In my case I took a dremel tool with a grinding bit and ground the GS/GG below the surface I wanted to make flush just a bit. Then I filled the void with spackle and once dry sanded it flush.


Yeah, I think the cleanliness and exactness of the hot wire rig lines makes a huge difference. One of the big things I'd do differently (and that I will do differently for the next one) is making and using those hot wire rigs like you did, as well as a larger version of a styroslicer like this guy made: https://m.youtube.com/watch?v=N2n_EbRzZ0g for the big and angled cuts. I had thought that with a project the small it wouldn't be worth the effort of figuring it that it, but in retrospect it totally would have.

I went with the pvc pipe because somehow in my mind it feels safer than having the wires directly in the foam, plus I wanted to put off figuring out the wiring, plus I wanted to make it possible to pull and re-run the wires easily in the future. But I'm fairly certain that the idea it's safer is all in my head, and when I figure out the wiring shouldn't really make a difference in my design plan, and with the difficulty threading the wires through through the right angles on the front, rewiring would be a bit of a pain anyway, if I needed to.

All that to say that, your method looks really nice. I will say, though, that the spackling and great stuff fill in around the pipes on the interior actually ended up a lot smoother than I thought it would. The lettering on the foam showing through was a much bigger problem and much more noticeable than any unevenness from the great stuff and spackle, so if that doesn't change with temperature, the final result might not end up that different...


Sent from my iPhone using Tapatalk
User avatar
amandacreiglow
Teardrop Master
 
Posts: 137
Images: 1
Joined: Sat Jun 10, 2017 8:29 am
Top

Re: Itty Bitty Foamie Teardrop Test Build Thread

Postby amandacreiglow » Sun Oct 15, 2017 2:37 pm

Ok, so, canvas day is complete! Ended up taking way more time and effort than expected, but I had my brother and sister in law to help me, which was incredibly necessary. It helped that my sister in law is very experienced with smoothing things like this from helping her dad with car exterior stuff, so that was good.

Here it is!

Image

Overall I'm fairly pleased with it, though of course I can only see all the mistakes. We did the body of the trailer in one long piece of fabric, which allowed for no seams on side walls, and the only seams that aren't up on the roof in fact are the two diagonal seams on the front, which I plan to disguise as best I can with the final paint design.

This picture is a bit deceptive, as we ran out of the Childers and I had to use gripper for finishing work, and bits of it got on the finished canvas making it look like there are some ridges where there aren't any.

That said...

Image
I sanded so much! But not enough in that area, apparently. Lesson learned: take like a full eight of an inch off that area if you've got the branding side of a lowe's sheet face out. :-/ I'll definitely have to get busy with the paint design on that side to distract from it.

Image

I feel reasonably happy with how the back came out, though, as well as most of the doors. And the bottom isn't *as* bad as I thought it would be, although I still have to think up some strategies for that.

How long did people leave the undercoat to dry before they primed it? I'd really like to put the primer on today, but don't want to end up bubbling my trailer up...


Sent from my iPhone using Tapatalk
User avatar
amandacreiglow
Teardrop Master
 
Posts: 137
Images: 1
Joined: Sat Jun 10, 2017 8:29 am
Top

Re: Itty Bitty Foamie Teardrop Test Build Thread

Postby ghcoe » Sun Oct 15, 2017 3:42 pm

I can see a pink panther on my build, but I think with some time in the sun these areas will fade out.
George.

Gorrilla Glue, Great Stuff and Gripper. The three G's of foamie construction.

My build viewtopic.php?t=54099
Working with flashing for foamie construction viewtopic.php?f=55&t=60303
Making a hot wire http://tnttt.com/viewtopic.php?f=55&t=55323
User avatar
ghcoe
1000 Club
1000 Club
 
Posts: 1946
Joined: Fri Dec 11, 2009 11:20 pm
Location: SW Idaho
Top

Re: Itty Bitty Foamie Teardrop Test Build Thread

Postby Nodrog » Sun Oct 15, 2017 4:59 pm

Hey Amanda- Thanks for your nice comment on my build- yours is looking good as well! Just an idea, maybe you could order some of the mastic from Home Depot I am using to fair out any rough areas, just get bondo brand plastic squeegees, they come in a pack of 3 sizes, I use the medium. You can put it on really smooth that way, it will sand when dry....I got interested in the stuff when I saw a video on youtube of someone using it on a canvas covered canoe...Speedi something from HD is what I have,it comes really fast to my home because it comes from Kalama? Washington, very near me....I just primed one wall and the front of my trailer and it's verry smooth, pretty easy for low tech stuff....Again, just a thought...Nodrog
Nodrog
Teardrop Master
 
Posts: 119
Images: 0
Joined: Mon Sep 18, 2017 6:21 pm
Top

Re: Itty Bitty Foamie Teardrop Test Build Thread

Postby S. Heisley » Sun Oct 15, 2017 8:23 pm

Beautiful new photo of you, Amanda. :thumbsup:
User avatar
S. Heisley
Super Lifetime Member
 
Posts: 8774
Images: 495
Joined: Mon Sep 17, 2007 10:02 am
Location: No. California
Top

PreviousNext

Return to Foamies

Who is online

Users browsing this forum: No registered users and 20 guests