Itty Bitty Foamie Teardrop Test Build Thread

Canvas covered foamies (Thrifty Alternatives...)

Moderator: eaglesdare

Re: Itty Bitty Foamie Teardrop Test Build Thread

Postby jondbar628 » Thu Oct 26, 2017 7:58 pm

KC.......But just think of the exhilaration of that extra 4" of "hang-time" on your way down! :beer:
Amanda.........Really nice work. Paint job - simple elegance, but super effective. Great idea with the umbrella holder. Like the mason-jar lid hangers, but might want to try to find plastic jars that would fit them - Peanut butter, mayo, etc. Lighter & less of a mess if they vibrate loose.........just my 2cents........jg
jondbar628
Teardrop Master
 
Posts: 170
Joined: Thu Apr 17, 2014 3:32 pm
Location: Palm Coast, FL & Middletown, OH

Re: Itty Bitty Foamie Teardrop Test Build Thread

Postby amandacreiglow » Thu Oct 26, 2017 9:37 pm

S. Heisley wrote:For a lower counter, you could add a pull out counter on drawer glides, underneath the original counter. That would actually give you extra counter/shelf space. Or, you could make a drawer to house your stove. You could even make whatever you decide on perpendicular to one end of the original counter so that your galley area would be "L" shaped. ...Just an idea. :thinking:


Good thoughts, for sure. And I think if I weren't so far along I'd be able to incorporate them or play with things or moved them around. But unfortunately my galley is pretty much planned out to the cubic inch, more or less, with most everything glued or bolted or cut to slot into place. So it's the step platform life for me. ¯\_(ツ)_/¯


Sent from my iPhone using Tapatalk
User avatar
amandacreiglow
Teardrop Master
 
Posts: 137
Images: 1
Joined: Sat Jun 10, 2017 8:29 am

Re: Itty Bitty Foamie Teardrop Test Build Thread

Postby amandacreiglow » Thu Oct 26, 2017 9:38 pm

GPW wrote:And I was thinking , what a decorative fan shroud …. :roll:
it's definitely louder color-wise than normal great stuff! Unfortunately it'll be getting all covered up with trim tonight... a shame, really...


Sent from my iPhone using Tapatalk
User avatar
amandacreiglow
Teardrop Master
 
Posts: 137
Images: 1
Joined: Sat Jun 10, 2017 8:29 am
Top

Re: Itty Bitty Foamie Teardrop Test Build Thread

Postby amandacreiglow » Thu Oct 26, 2017 10:01 pm

Fiddlin'Billy wrote:
If you have trouble with those lids, I suggest adding the metal sealing plate that goes with them. You can just screw into that and it will hold the rings up. My wife did that in the garage for the endless fastener stockpile I build up. Works great. I will probably be using this idea in our teardrop too, I think it will appeal to my wife - she likes to see her stuff.


You weren't to know, but you stumbled into a bit of a debate I had with myself. :-) I went back and forth with whether to screw the inner portion of the lid with the seal attached or to leave it on the jar. In the end, I decided it would probably be best to leave them loose and only screw up the outer ring. Couple of reasons:

1) those seal things can get deformed from pressure (say, from drilling them too tightly too deeply, or from getting some sticky liquid on them and then wanting to come away with the jar but being fixed in the middle or the like) and when they do, the seal can get jenky. Not likely to be an issue with tools or spare parts, by not ideal for food.

2) Then there's them getting food residue on then, especially from anything powdery or liquids... cleaning them would be a nightmare if they're stuck up there, and I'm almost certain to just spread the residue deep into the crevice between the inner and outer lid. Could get gross over time, and just generally not ideal, especially when switching out different things in them.

3) I think the lids are designed so that the inner ring sticks with the jar and rotates tightly into the outer ring for a reason. That way you're not fighting the surface friction between the glass and the as you close, but rather forcing the seal with a nice, even pressure from the rotating action deeper on to the jar. I'd like to preserve the ideal sealing conditions as much as possible, and it will allow me to close them more tightly in the end, I think, which is important in terms of avoiding them rattling open from the vibrations of the road. The way to maintain that with the inner ring being attached to the bottom of the shelf would be to have the outer ring still spinning free, and just dangling off the edges most of the time. But this feels like overcomplicating things, and again increases the risk of the inner ring deforming from the weight pulling down, and the whole thing failing.

4) some of the things I might keep in these could be difficult to tell apart - corn starch, baking soda, flour, enriched flour, pancake mix, that kind of thing. I was going to do this elaborate chalkboard labeling system, but that feels like overkill when most things will be obvious. Having the option to just slip on a label between the inner ring and the wood of the shelf above it seems like an ideal way of not losing track of what exactly things are, but not having to have the label staring me in the face when I don't need it. Not a huge reason, but a nice perk.

As a plus, it also means the inner rings are easily replaceable, and I'd be a liar if I said I'd never accidentally ended up deforming one by prying it off or setting something on it at a weird angle, etc. maybe I'm overestimating the likelihood of this happening, but eliminating possibly fail points is important to the accident prone. ;-)

All that to say that if this turns out not to be strong enough, then that's a way to go. But with plenty of glue and four screws in each one, they feel pretty firm to me. And definitely do put them in there for your wife! Even adding little disks to the underside of the shelf to make sure I had a 1/2" to screw into, this has still probably been the easiest part of this project.
User avatar
amandacreiglow
Teardrop Master
 
Posts: 137
Images: 1
Joined: Sat Jun 10, 2017 8:29 am
Top

Re: Itty Bitty Foamie Teardrop Test Build Thread

Postby amandacreiglow » Thu Oct 26, 2017 10:03 pm

pchast wrote:Had a productive night last night, finally. Got the bolts through the floor of the trailer and into the frame, so it's well and truly mounted. I went with six 3/8" carriage bolts, using spares of the locking nuts from the trailer itself to attach them. Only problem is that the holes are a little too wide for the square part of the carriage bolt to do its job and keep the top still while I tighten the bottom. Any ideas on how to make that work?

Mcmastercarr.com

https://www.mcmaster.com/#torque-washers/=19z1xg7


Those... those are beautiful. Thanks for the info! If my "glue and pray" method turns out to be a bust, I'll pick some up tomorrow.


Sent from my iPhone using Tapatalk
User avatar
amandacreiglow
Teardrop Master
 
Posts: 137
Images: 1
Joined: Sat Jun 10, 2017 8:29 am
Top

Re: Itty Bitty Foamie Teardrop Test Build Thread

Postby amandacreiglow » Thu Oct 26, 2017 10:14 pm

KCStudly wrote:I was thinking the same thing about the mason jar lids. The lids have a nice rubber like seal ring bonded to them around where the jar cinches up; makes a nice soft seal and should keep dust out, too.

Just to share a couple of thoughts about your galley counter height issue; even if the spring under axle arrangement doesn't get you all of the way, it would at least get you half way there, and that would be a big improvement (seems like there is never just one magic solution to most problems anyways, right?). I mean, part of camping out for me is getting good and relaxed with a nice adult cocktail, and I really would not look forward to taking a face plant or header stepping of of some catwalk arrangement after pouring myself another in the relative darkness of the campfire light. If that step was just 4 inches instead of 8 you might not hit the ground so hard, or even lose it at all when missing a step.


See above about the lids -- I'll definitely be using the inner seals, but will keep them attached to the jars rather than fixed into place for reasons of avoiding fail points, preserving the intended action of the jar lid seal, and keeping them clean.

You have a good point with the axle modification... unfortunately. ;-) I think you've changed my mind from "never messing with that" to "might do that if or when I get around to building the drop down, slide out cooking deck". For now, though, the thought of messing with the trailer base in any way, after the nightmare (for me) of getting it together... it's a bit too much. Especially with my plan to leave in a week or so.

In the meantime, I'll just have to make sure to keep my foamistas-approved ballast in the cooler, which is easily accessed (actually, *more* easily accessed, in a lucky twist) from the ground. Should keep me safe so long as I don't get any daft boozy cooking ideas...


Sent from my iPhone using Tapatalk
User avatar
amandacreiglow
Teardrop Master
 
Posts: 137
Images: 1
Joined: Sat Jun 10, 2017 8:29 am
Top

Re: Itty Bitty Foamie Teardrop Test Build Thread

Postby amandacreiglow » Thu Oct 26, 2017 10:24 pm

jondbar628 wrote:KC.......But just think of the exhilaration of that extra 4" of "hang-time" on your way down! :beer:
Amanda.........Really nice work. Paint job - simple elegance, but super effective. Great idea with the umbrella holder. Like the mason-jar lid hangers, but might want to try to find plastic jars that would fit them - Peanut butter, mayo, etc. Lighter & less of a mess if they vibrate loose.........just my 2cents........jg


Thanks! I'm really appreciating the positive reactions people have had to the paint job. Planning on getting the name up on there tonight possibly, too.

As for the jars, you're totally right about plastic being a better logistical choice. Choosing mason jars is definitely a choice made for style reasons, when plastic would be lighter and less prone to breakage. But I just like the feel and look of the glass better. I've done a quick search, though, and it looks like plastic jars that fit the thread pattern and size do exist, so if worst comes to worse and it's not working for me, I can swap them out with something I can be reasonably certain will fit.


Sent from my iPhone using Tapatalk
User avatar
amandacreiglow
Teardrop Master
 
Posts: 137
Images: 1
Joined: Sat Jun 10, 2017 8:29 am
Top

Re: Itty Bitty Foamie Teardrop Test Build Thread

Postby Fiddlin'Billy » Fri Oct 27, 2017 6:33 am

I just remembered (because I opened one) that we switched to the plastic lids for Mason jars. We use the jars for all kinds of utility. Look for them in the same place you get the jars.

Sent from my LG-K540 using Tapatalk
User avatar
Fiddlin'Billy
Teardrop Inspector
 
Posts: 17
Joined: Mon Aug 21, 2017 5:01 pm
Location: Centrally located in Iowa
Top

Re: Itty Bitty Foamie Teardrop Test Build Thread

Postby spacer » Fri Oct 27, 2017 9:20 am

I like the higher nose, something I'd thought about for my HHR, as it's a wagon and I think would do well with a trailer that starts at about roof height and tapers down in back.
I know you aren't quite mobile enough with this yet (to get to a scale, I mean), but I'd love to know how the weight turns out.

My HHR can only do 1000 lbs, with 100 on the tongue. Very sad, but the car's paid off and my Suburban costs a LOT more to drive.
spacer
Teardrop Builder
 
Posts: 45
Joined: Fri Mar 30, 2012 8:04 pm
Top

Re: Itty Bitty Foamie Teardrop Test Build Thread

Postby amandacreiglow » Mon Oct 30, 2017 4:03 pm

spacer wrote:I like the higher nose, something I'd thought about for my HHR, as it's a wagon and I think would do well with a trailer that starts at about roof height and tapers down in back.
I know you aren't quite mobile enough with this yet (to get to a scale, I mean), but I'd love to know how the weight turns out.

My HHR can only do 1000 lbs, with 100 on the tongue. Very sad, but the car's paid off and my Suburban costs a LOT more to drive.


I'm a bit in the same boat as you are, weight limit-wise. While my car can tow up to 3,500 pounds, it can only do 1000 if the trailer doesn't have its own brakes. So if this thing comes in at more than 800, I'll be greatly disappointed. And if it comes in at over 1000 I'll be in real trouble and have some hard choices to make. I have included some heavier things in the build than I was originally intending. So we'll see.

In general, though, with foamies, under 1000 pounds should be eminently doable.


Sent from my iPhone using Tapatalk
User avatar
amandacreiglow
Teardrop Master
 
Posts: 137
Images: 1
Joined: Sat Jun 10, 2017 8:29 am
Top

Re: Itty Bitty Foamie Teardrop Test Build Thread

Postby John61CT » Mon Oct 30, 2017 4:21 pm

Even if I thought I'd be light, I'd still get brakes. Especially if big hills were in my future, just silly otherwise, we're talking life-threatening danger, and not just the driver.

Or at least make sure the hubs were setup for them.

Not that expensive.
John61CT
1000 Club
1000 Club
 
Posts: 1958
Joined: Thu Nov 17, 2016 4:36 pm
Top

Itty Bitty Foamie Teardrop Test Build Thread

Postby amandacreiglow » Mon Oct 30, 2017 4:41 pm

Sorry for the lack of updates -- things have been happening! Although, since my deadline got pushed back a week or so (or flexibly however long I need it to be so to finish everything I need) I have started taking it a bit easier over the last few days.

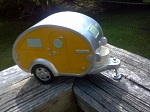
Most notably, this is what the back of the trailer currently looks like:
Image

I've got the name on! I mostly named it Foamie the First so that I can call the second one "Foamie two: Fold-down boogaloo", but I think it looks pretty cute regardless.

I used GPW's trick of printing it out, then doing pinpricks around the edges to create a one time use stencil. I was a little concerned that the paint wasn't going to go through all the way, but it worked well enough.

Image

Just filled in the dots. :) Unfortunately, the only brush I had small enough to do this with was a stencil brush, that had stiff bristles that don't go to a nice point. So the edges are in desperate need of some cleaning up. Hopefully that ends up looking all right. I chose a pattern that had a lot of organic variation in it, hoping that it would make it more ok that I have approximately zero fine motor skills. Overall, I'm pretty happy with how it turned out.

I've also got both the doors put together and attached, which is a big deal with how much they've been hanging over my head and what a nightmare they've been.

Image

They still need to be trimmed down, filled in further, canvassed, painted, and have the handles/latches attached. But they're attached! And that's something.

I spent a while yesterday trying to get the gas struts installed for the back hatch. And I was able to figure out how they're meant to be attached and get them to the point where they should theoretically work... but they were way too weak. Plus, I got impatient and put them up before the glue on the wooden blocks I'd put in the wood as an anchor point had fully cured. So it drooped and dropped and the anchor point blocks twisted out. It was a disheartening moment, but I think the hard work is done, and when the stronger struts come and the glue is fully cured and canvassed over, it'll work as intended. Fingers crossed.

I also got the fenders installed, and while I was down there with the wrench, took the opportunity to try and tighten the carriage bolts now that the glue has set. I was able to tighten half of them, so I'll only need to try the torque washer things on the remaining three.

Then some little things: got the trim installed in the cabin around the roof vent, but the power grab wasn't strong enough to hold it up completely and one side is lower than the other, which is a bummer. I've figured out what I need to do to the umbrella pole to make it work out the way I want it to. I've also decided that I'm going to let my scope creep just enough to mount a table on the tongue so that I have a covered outdoor work/eat space. I *think* I know how I'm going to do it, but we'll see. The good news about it is that the table for my stove that I was already going to bring with me is a pretty perfect fit.

Hitch is installed on my car, which is good. Getting there!


Sent from my iPhone using Tapatalk
Last edited by amandacreiglow on Mon Oct 30, 2017 5:22 pm, edited 1 time in total.
User avatar
amandacreiglow
Teardrop Master
 
Posts: 137
Images: 1
Joined: Sat Jun 10, 2017 8:29 am
Top

Re: Itty Bitty Foamie Teardrop Test Build Thread

Postby John61CT » Mon Oct 30, 2017 4:59 pm

Wow, words fail, can't even express how much admiration I have for that truly stellar work, looks fantastic!
John61CT
1000 Club
1000 Club
 
Posts: 1958
Joined: Thu Nov 17, 2016 4:36 pm
Top

Re: Itty Bitty Foamie Teardrop Test Build Thread

Postby tac422 » Mon Oct 30, 2017 7:55 pm

I used automotive pin striping tape available at any auto parts store to finish off the edges when I painted.
it worked great and has held up well.

121022
User avatar
tac422
500 Club
 
Posts: 639
Images: 224
Joined: Sun Mar 17, 2013 11:39 am
Top

Re: Itty Bitty Foamie Teardrop Test Build Thread

Postby GPW » Tue Oct 31, 2017 5:49 am

Amanda , you’ve done WONDERFUL !!! :thumbsup: 8) :applause:

As it turns out nothing is really a nightmare , but just something more “interesting" to work on … and more rewarding when you’re done and it works … ;)
There’s no place like Foam !
User avatar
GPW
Gold Donating Member
 
Posts: 14911
Images: 546
Joined: Thu Feb 09, 2006 7:58 pm
Location: New Orleans
Top

PreviousNext

Return to Foamies

Who is online

Users browsing this forum: No registered users and 3 guests