Page 2 of 3

Re: Kit & Caboodle Foamie

PostPosted: Sat Jun 30, 2018 3:17 pm
by Joe4Camping
This morning I unscrewed the wall from the subfloor, and I was happy to find that it did not sproing into a bow shape. It stayed flat as could be. Success!

So, I cut out the doorway with a single-razor box cutter, which really made smooth work out of cutting away the glued fabric:

155123

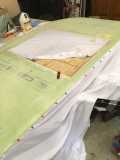
Then removed all of the pushpins holding the fabric while it dried overnight, and cut away the rest of the outline:

155124

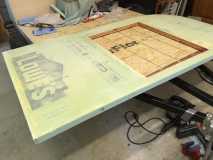
I was surprised how transparent the glued fabric is. Makes me a little worried that the other side of the TD has the Lowes logo facing outwards. I'm hoping many coats of paint/primer will hide that.

I was also surprised to find the glue was still tacky in spots, so I will wait for that to completely dry before painting with several coats of exterior paint. And then the wallpaper, although that won't go up until the TD is assembled.

Re: Kit & Caboodle Foamie

PostPosted: Sun Jul 01, 2018 9:32 am
by GPW
Looking Good Joe !!! :thumbsup: A little primer covers all logos …

Re: Kit & Caboodle Foamie

PostPosted: Mon Jul 02, 2018 7:09 am
by Joe4Camping
Right you are, GPW! Here it is after just one coat of a Valspar paint+primer mistint I bought at Lowes. The mistint rack has great bargains, this $50 gallon of paint was marked down to $9! And it's perfect for a base coat, who cares what the color is! ;)

155148

The door fits just right in the frame, it will get the same coating treatment.

Re: Kit & Caboodle Foamie

PostPosted: Tue Jul 03, 2018 6:13 am
by GPW
:thumbsup: You can mix those paints too ….. with white to make it Lighter colored , or with each other which can get interesting , or turn Green … :lol:

Re: Kit & Caboodle Foamie

PostPosted: Tue Jul 03, 2018 9:36 pm
by Joe4Camping
Thanks for the idea! Wallpaper will eventually cover all sins. :thumbsup:

Exciting step today: erecting the driver side wall.

First, I glued bamboo skewers into the subfloor, to give the foam wall something to dig into and avoid shifting, as the PL3 glue sets:

155162

Then I screwed in some temporary support backer-boards for me to rest the wall against, as I slide it down onto the floor and into the skewers. This is a huge help, as I am working solo. This is where I am really happy that I bolted on a wooden frame around the entire base metal trailer, so I have all of these random attachment points around the perimeter for just such an occasion.

155163

Wall pressed down onto the floor, and also pressed against the back wall, which has been patiently waiting lo these many weeks to be put to use. You can see a couple of 1x2s propped against the towel-covered AC to ensure the wall stays at 90 degrees:

155164

In addition, I screwed in several supporting screws through the back wall (from the galley side) into the foam, to really lock the wall in place in the rear:

155165

Checking tomorrow morning to see how things set up, and gluing up the passenger side if no problems crop up....

Re: Kit & Caboodle Foamie

PostPosted: Tue Jul 10, 2018 8:32 am
by Joe4Camping
The passenger side glued up without a hitch. The join along the rear wall is very solid, so I'm happy with that. Here I am contemplating next steps. The interior is higher than I expected. No claustrophobia here! The clamp along the top will ensure the walls stay square.

155215

Now time to play with curving the roof foam sections. The roof will be 2 layers of 1-inch foam. I got the idea from this forum, but I'm ashamed to admit I cannot recall whose post I first saw it. But a hearty "Thank You" to that Foamie Pioneer. :beer: Here's a test piece, using a hot knife cutter to create the kerfs. The lines were not even, steady or pretty:

155212

and spacing was definitely not an exact science:

155213

But, the test fit snugly on the curve, and the foam didn't crack or complain:

155214

Onward!

Re: Kit & Caboodle Foamie

PostPosted: Sun Jul 15, 2018 9:01 am
by ghcoe
Looking good. :thumbsup:

Re: Kit & Caboodle Foamie

PostPosted: Sun Jul 15, 2018 9:33 pm
by Joe4Camping
It's been a good day. I've glued hardpoints (1" dia oak dowels about an inch long) into the sidewalls to help anchor down the curved roof panels:

155271

And I manually sliced kerfs into the first 1" thick roof section using the hot knife, set to a depth of about 11/16" in. Smelled terrible, but it melted the foam beautifully. The kerfing took about 40 mins. It ain't pretty, but lo and behold it hugged the frame tightly without the dreaded kerr-RACK of splitting foam:

155273

Now it's finally starting to look teardrop-ish!

Here's a closeup if the overlap that is holding the bottom of the curved panel. The outer panel is doing a great job of locking the botom of the panel in place while the glue dried.

155274

On another note, I just want to show the amazing powers of The Mix to repel water. This drop has been sitting on a panel for over 5 hours that had 3 coats of Mix applied. No seepage into the plywood at all! I'm a believer.

155272

Re: Kit & Caboodle Foamie

PostPosted: Mon Jul 16, 2018 5:31 am
by GPW
:thumbsup: … Once you actually see the mix work , you're convinced … 8)

Re: Kit & Caboodle Foamie

PostPosted: Wed Jul 25, 2018 9:25 am
by Joe4Camping
Worked on adding the second layer of 1" foam to the front curve. Performed the kerfing using the hot knife and all went well. Slathered the PL P3 glue all over the existing 1" foam already glued in place, and proceeded to glue on this second panel.

Then, just as I was positioning it in place for glue-up on the camper, a breeze wafts through the garage, pushes the precariously placed panel backwards, and CRACK, the foam board split in half at one of the kerfs. I apologize to any children within a half-mile radius because I let loose many choice expletives.

Working fast, I glued on the lower portion of the broken panel, then placed the upper errant piece in place. Luckily, and with the help of 3" coarse-threaded screws and very large washers, I was able to clamp the upper section in place. I had no idea foam could hold screws so well, but I canted them at an angle as I frantically screwed them in, and thankfully they held the panel in place. Not leaving that to chance, I cobbled together this Rube Goldberg-like jig to brace everything in place as it dried:

155406

With this catastrophe somewhat averted, I attached the stabilizers in the rear:

155407

On reflection, I suppose I should have placed them closer to the sides for more stability, but I tested them by laying down inside and shifting around, and nothing tilted. So hopefully, barring gale-force winds, it will stay upright.

The air conditioner is test-fitted in place in the rear of the cabin. It will vent out and down through a hole in the galley floor. Looking good!

155408

After everything dried and removed braces, the front curved section looks pretty good. I put an extra bead of PL in the gap between upper and lower sections, sanded it down, and it really looks safe and solid. Catastrophe averted!

155405

Re: Kit & Caboodle Foamie

PostPosted: Sat Jul 28, 2018 5:49 am
by GPW
That front top looks just Fine !!!
There’s gotta’ be an easier way of bending foam …all that is so much work for just a simple curve… :thinking:

Re: Kit & Caboodle Foamie

PostPosted: Wed Nov 21, 2018 11:08 pm
by Joe4Camping
After a long hiatus, I'm back to the build.

Completed the roof section that contains the home-made skylight, which is held down with screws atop byutl tape. To make sure it will be water-proof, I also applied a layer of window flashing tape. Then a layer of canvassing both sides before gluing it in place on the roof.

156697

Here it is glued in place, using PL3. I've taped the exposed seams using glued-on canvas and/or bedsheet strips:

156698

Inside the teardrop, I framed a section along the front for a shelf, as well as to hold a padded headboard. You can also see where a sliding window will be placed above the shelf.

156699

And here's the window cutout:

156701

The next roof section is being canvassed in the warmth of my basement office, rather than the frigid garage. Another advantage of doing the roof in sections, so I can continue progress over the winter.

156703

Re: Kit & Caboodle Foamie

PostPosted: Thu Nov 22, 2018 6:34 am
by GPW
Coming along Nicely !!! :thumbsup:

Re: Kit & Caboodle Foamie

PostPosted: Fri Jan 04, 2019 11:56 am
by Joe4Camping
Finishing touches on the rear roof section. I've cut a hole for the fan, and added hard points around the edges to glue and screw in the fan component. Also canvassed and painted the section. So much easier to do when it is detached:

157030

Also created a handy little battery holder made entirely out of foam/canvas/paint, which will be stored in the tongue box. The battery is velcroed in the container for more security. Our dog surveys my progress in the background:

157029

Also started working on the rear hatch. Here I temporarily screw the curved side panels in place, so I can accurately construct the cross members, covering, etc :

157031

Re: Kit & Caboodle Foamie

PostPosted: Wed Feb 20, 2019 10:46 am
by Joe4Camping
Finished up the 120 wiring, and placed the air conditioner into the camper. It rests on supports in the galley area, with a screen-covered cutout in the floor to allow exhaust and moisture to vent downward:

157343

I used FRP for the AC cover, since it is so light and flexible:

157344

And, ya gotta love foam. Here I quickly carved out sides for the vent cover. Glued and screwed in place:

157345

Here's the galley so far, with electrical, counter, AC and cooler:

157346

The view of the AC from the "bedroom" :

157347