TERRA6, Van cab and chassis 7*14, 4" Polystyrene

Canvas covered foamies (Thrifty Alternatives...)

Moderator: eaglesdare

Re: Terra6, Van cab and chassis 7*14, 4" Polystyrene

Postby Projector » Thu Jan 24, 2019 11:16 am

Decking it out.
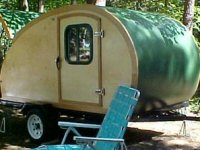
Doubling the plywood added lots of weight but strength as well. It was going to be the attachment point for the walls and subject to chassis flex. Plus I was going to extend the bed so thought it necessary.
Attachments
IMG_20180331_110346-1638x921.jpg
IMG_20180331_110346-1638x921.jpg (558.72 KiB) Viewed 3324 times
Make it so.
User avatar
Projector
Teardrop Master
 
Posts: 159
Joined: Wed Aug 29, 2018 2:13 am

Re: Terra6, Van cab and chassis 7*14, 4" Polystyrene

Postby Projector » Thu Jan 24, 2019 11:28 am

Moving right along, at this stage I had a boxed in rig that should be structurally sound and strong. Ideally, hopefully, maybe. :worship:
It was time for a test.
If I was ever going to run away and join the circus, become one of the famous flying Wallenda brother acrobats, I would have to test my courage and perform a feat of bravery. It was time to walk the tightrope, suspended 10' up in the air.
Could I do it? Should I do it?
Nobody walks on a tent you say? I wouldn't either but hopefully this was a bit stronger than a tent.
Attachments
IMG_20181118_090127-1638x921.jpg
IMG_20181118_090127-1638x921.jpg (303.33 KiB) Viewed 3320 times
Last edited by Projector on Thu Jan 24, 2019 12:18 pm, edited 3 times in total.
Make it so.
User avatar
Projector
Teardrop Master
 
Posts: 159
Joined: Wed Aug 29, 2018 2:13 am

Re: Terra6, Van cab and chassis 7*14, 4" Polystyrene

Postby Projector » Thu Jan 24, 2019 11:31 am

Oh yes, I was going to do it.
Must admit that I was very tentative at first.
Approached this carefully, like one would walking onto a frozen lake for the first time.
If it couldn't pass this test, in my mind it wouldn't withstand the rigors of the road.
This was an extreme example of destructive testing, this could be my destruction if not designed and built strong enough. :(
Attachments
IMG_20181118_090137-1638x921.jpg
IMG_20181118_090137-1638x921.jpg (246.81 KiB) Viewed 3318 times
Last edited by Projector on Thu Jan 24, 2019 12:20 pm, edited 3 times in total.
Make it so.
User avatar
Projector
Teardrop Master
 
Posts: 159
Joined: Wed Aug 29, 2018 2:13 am
Top

Re: Terra6, Van cab and chassis 7*14, 4" Polystyrene

Postby Projector » Thu Jan 24, 2019 11:36 am

I was very cautious just in case, walking along the fully supported edge at first. The seller had stated that he walked on his sheets all the time, supported 24" on center. At this stage, I was only supported 48" on center, at each joint.
A sheer walk of faith and hope. I'm not a big guy, weighing 175lbs. Would 4" 4*8 styrofoam sheets standing on end support the weight of the roof plus my own? Would these same sheets placed horizontally across a 7' foot span have sufficient strength to support a load?
We were going to find out.
I advanced gingerly, first one foot, than both.
So far so good :thumbsup:
Phew.
You can see me walking along the edge at first as there were 1*6 boards under there as well. Should be fine right?
How the hell do you know for sure?
Attachments
IMG_20181118_090142-1638x921.jpg
IMG_20181118_090142-1638x921.jpg (235.96 KiB) Viewed 3316 times
Last edited by Projector on Thu Jan 24, 2019 12:02 pm, edited 1 time in total.
Make it so.
User avatar
Projector
Teardrop Master
 
Posts: 159
Joined: Wed Aug 29, 2018 2:13 am
Top

Re: Terra6, Van cab and chassis 7*14, 4" Polystyrene

Postby Projector » Thu Jan 24, 2019 11:44 am

And voila!
Passing the first stress test.
My design didn't fail and collapse into itself.
It successfully was a load bearing structure now. Yay! :applause:

You can see at this stage that I ventured to the middle of the roof. The only thing supporting it there was my homemade T truss of 1*4" pine board reinforced by a1*2"that was glued and screwed. And they were 48" on center. Plus the glued together styrofoam. That's all that's holding it up and together. And lots of hope and faith.

Plus I made sure to have a very light breakfast that morning. You know, the straw that broke the camel's back thing.

I didn't walk into the middle of a sheet which would be unsupported there. I may be crazy, but not that crazy. Yet.
Attachments
IMG_20181118_090152-1638x921.jpg
IMG_20181118_090152-1638x921.jpg (261.35 KiB) Viewed 3313 times
Make it so.
User avatar
Projector
Teardrop Master
 
Posts: 159
Joined: Wed Aug 29, 2018 2:13 am
Top

Re: Terra6, Van cab and chassis 7*14, 4" Polystyrene

Postby GPW » Thu Jan 24, 2019 1:52 pm

Well then , nothing like testing eh … and it’s what we do around here anyway !!!! Congratulations , we know you’ll be sleeping peacefully from now on … :thumbsup:

"How the hell do you know for sure? “ You get ME to stand on it … 6’3", 240 lb. :o :lol: :frightened:
There’s no place like Foam !
User avatar
GPW
Gold Donating Member
 
Posts: 14911
Images: 546
Joined: Thu Feb 09, 2006 7:58 pm
Location: New Orleans
Top

Re: Terra6, Van cab and chassis 7*14, 4" Polystyrene

Postby Projector » Fri Jan 25, 2019 9:50 pm

So during the planning stages, one of the questions was how to place the sidewall sheets, horizontally or vertically? And the direction or placement of the roof foam sheets.
My first tendency was to stack horizontally but that would give me 4 edges to glue and potential weak spots. And the cross formed from the four joints would be one major weak point in all directions. Not good.
If I placed them vertically, would only have three joints. And a vertical joint had much less length for potential to leak, being only exposed to only one spot instead of the entire length. And looking at commercial cargo boxes, the sheets were always placed vertically. Must be the best way to go if they did it that way.
And the roof, how to place the sheets? Same thing applied there, placed across would be strongest and require the least amount of support for joints. But, I would offset the sidewall joints from the roof joints for increased strength. So a seam would meet the middle of the corresponding perpendicular sheet. Side wall would start with a 2' wide sheet and end with a 4' wide sheet which could handle the 2*2' angled cut out at the back.
For the roof, would start with a complete panel at the front and end with a 2' section at the back which should be fine, as it was supported by a full 4' side panel.
Important little details to give strength on a multipanel foamie build for the design that I had chosen.
Figured this was the best way to place and align the sheets.
Last edited by Projector on Sat Jan 26, 2019 10:45 am, edited 4 times in total.
Make it so.
User avatar
Projector
Teardrop Master
 
Posts: 159
Joined: Wed Aug 29, 2018 2:13 am
Top

Re: Terra6, Van cab and chassis 7*14, 4" Polystyrene

Postby Projector » Fri Jan 25, 2019 9:52 pm

GPW wrote:Well then , nothing like testing eh … and it’s what we do around here anyway !!!! Congratulations , we know you’ll be sleeping peacefully from now on … :thumbsup:

"How the hell do you know for sure? “ You get ME to stand on it … 6’3", 240 lb. :o :lol: :frightened:


Out of curiosity, have you ever stood on yours? What's the most weight placed on your roof?
Think we now need a pic of you standing on yours...
And as you appear to have some software skills from your tracing on my pics, no Photoshop trickery! ;)
So there's the standard to prove your foamie is strong, pic of the builder standing on the roof. Anything else is just hot foamie air. :lol:
Last edited by Projector on Fri Jan 25, 2019 11:01 pm, edited 2 times in total.
Make it so.
User avatar
Projector
Teardrop Master
 
Posts: 159
Joined: Wed Aug 29, 2018 2:13 am
Top

Re: Terra6, Van cab and chassis 7*14, 4" Polystyrene

Postby Projector » Fri Jan 25, 2019 10:00 pm

Didn't know if the glued panels would require seam strengthening. But figured that it would be light, fast, low cost and easy to do so. So I used the same method as drywallers do. Goop, fiberglass tape and cover goop, smooth and coat.
So I used 2" fiberglass drywall tape, three wide per seam and filled with caulking. Wider tape and wider coverage?
Time will tell. Reinforce the joints helps keep them tight and reinforced/glued from stress. How much was needed?
No one knows. Would this work? Hopefully, maybe, possibly.
Attachments
IMG_20181118_104813-921x1637.jpg
IMG_20181118_104813-921x1637.jpg (443.7 KiB) Viewed 3205 times
Make it so.
User avatar
Projector
Teardrop Master
 
Posts: 159
Joined: Wed Aug 29, 2018 2:13 am
Top

Re: Terra6, Van cab and chassis 7*14, 4" Polystyrene

Postby Projector » Fri Jan 25, 2019 10:19 pm

So I was content with the strength of the roof at this stage from my weight test. But this was only a static load test, meaning standing still and no impact forces, torsion or other stresses. This was a very limited, unidirectional force and stress test. Going down the road would have multidirectional and impact forces, increasing them probably double or more. Plus the constant impacts creating multiple shocks throughout the whole vehicle and body. Foam and wood would flex and absorb much but once again, how much?
Any design flaws?
Assembly flaws?
Glue issues?
Telegraphing, whip and torsional flex and stresses would require how much strength and reinforcement?
Only experience and testing would determine this. As they do with experimental aircraft and new designs, build and test to ensure ability to withstand and last.
But even metal and proven planes suffer ongoing stress and fatigue, cracks and failures.
The build phase is the time to add and do it. As stated before, you won't know if you overbuilt but find out probably very fast if you underbuild with cracks and possibly worse.
So the roof.
The roof is still my concern at this stage.
Torsional and cross stresses are major factor when building with blocks, boxes and squares that are moving or impacted. So I added cross bracing to the roof which would not add much weight, but add much strength and transfers loads while giving extra roof support.
All good things I thought given the length of my box at 14'.
Attachments
IMG_20181206_170010-1638x921.jpg
IMG_20181206_170010-1638x921.jpg (246.87 KiB) Viewed 3198 times
Last edited by Projector on Fri Jan 25, 2019 10:51 pm, edited 1 time in total.
Make it so.
User avatar
Projector
Teardrop Master
 
Posts: 159
Joined: Wed Aug 29, 2018 2:13 am
Top

Re: Terra6, Van cab and chassis 7*14, 4" Polystyrene

Postby Projector » Fri Jan 25, 2019 10:37 pm

So along with the name, I developed a logo for TERRA6.
Cut out a stencil, outlined and hand painted onto the sides on a nice sunny day.
She was officially christened.
Attachments
IMG_20190124_163433-1638x921.jpg
IMG_20190124_163433-1638x921.jpg (439.95 KiB) Viewed 3200 times
Make it so.
User avatar
Projector
Teardrop Master
 
Posts: 159
Joined: Wed Aug 29, 2018 2:13 am
Top

Re: Terra6, Van cab and chassis 7*14, 4" Polystyrene

Postby Projector » Fri Jan 25, 2019 11:14 pm

:oops: Access and doors, who needs them?
Kidding of course.
I had a opening from the cab to the back cutout. I intentionally made it just large enough to pass through as the cab had no back wall whatsoever, only a 6" of bent sheet metal all the way around. So I made the front wall with 3/4" ply from floor to roof to reinforce the front of the box and give attachment points for the nose cone, reinforce the cab, chassis and front of the foamie and and impacts from the side extension. The cab was roughly 78" and I decided that I would build the box out to 84" or 7' which would be the widest reasonable amount for a single rear tire axle. Even at this width, was still 3" wider on both sides pass the tires. 8' would have been out of the question, and besides, I wanted narrower for mobility and maneuverability. This was optimal for this chassis, the max/ min of you will.
But another entrance was necessary for utility and emergency. Didn't want a full size door, difficulty to fabricate and the deck was from 26" to 30" from the ground, stairs would be necessary, another complexity and weight addition. Could I develop something better, simpler and lighter?
I had this cutout section at the back, could I make use of that somehow? Hmmmm....
What about...
A drop down back hatch with steps? Airplane or sailboat style?
Something like this
Attachments
IMG_20181207_115446-921x1637.jpg
IMG_20181207_115446-921x1637.jpg (253.85 KiB) Viewed 3175 times
Last edited by Projector on Sat Jan 26, 2019 12:16 am, edited 2 times in total.
Make it so.
User avatar
Projector
Teardrop Master
 
Posts: 159
Joined: Wed Aug 29, 2018 2:13 am
Top

Re: Terra6, Van cab and chassis 7*14, 4" Polystyrene

Postby Projector » Fri Jan 25, 2019 11:20 pm

And then steps could be added like this.
Roger alpha bravo, target identified.
Mobilize for deployment.
Attachments
IMG_20181207_162026-921x1637.jpg
IMG_20181207_162026-921x1637.jpg (299.52 KiB) Viewed 3174 times
Make it so.
User avatar
Projector
Teardrop Master
 
Posts: 159
Joined: Wed Aug 29, 2018 2:13 am
Top

Re: Terra6, Van cab and chassis 7*14, 4" Polystyrene

Postby GPW » Sat Jan 26, 2019 6:45 am

We never stood on the roof… for me , there was no real reason to … I’ve been making foam RC airplanes for almost 50 years now , so I had no worries about the structural integrity … And we’ve tested crashed these Foamies in most every way possible , so are well aware of the Strengths and weaknesses … Here’s an example of advanced Foamie testing … https://www.youtube.com/watch?v=tAh2EW0Hd0M
There’s no place like Foam !
User avatar
GPW
Gold Donating Member
 
Posts: 14911
Images: 546
Joined: Thu Feb 09, 2006 7:58 pm
Location: New Orleans
Top

Re: Terra6, Van cab and chassis 7*14, 4" Polystyrene

Postby Projector » Sat Jan 26, 2019 11:12 am

As you can see from the pictures of the sidewalls, the floor and roof side joints didn't come out smooth nor flat/flush. And no time was spent to do so when I glued the fabric overlap at the joints.
It would have taken me a couple days to do so which I didn't have. At this point, I was 4 weeks past the time that I had asked permission for and overstaying my welcome.
Figured that I could always smooth it out later and could cover it up anyway with trim.
I wanted to add protective rub strips anyway at the high potential impact areas. Like the ones added on cars, trucks, cargo boxes from rubs and impacts. As I would be exploring and from day to day travel, the box width could see some impacts.
I had accidentally impacted and penetrated my PMF skin when a board fell against it, creating a 2*3" L shaped gash. Damn. Easy to repair, just caulked and painted but not impressive in the least. My guess is that my initial TB3 dilution, quantity applied, plus the fact that it was more dilute to begin with, gave me a softer more flexible skin. It wasn't hard and crusty like most others are with the TB2. Pure speculation as I've only seen two other PMF trailers that were PMF over plywood.
So I contemplated what could I use for rub strips that would be strong, durable and cheap to protect my sidewalls. Think Rubber strips would be great but where to find some? Thought about cutting up old tires but that would be a bear of a job and that I would need about 75 feet.
What could I find at HD to do the job? Could use wood and paint it but wouldn't be a durable finish.
So I think I came across a good solution, composite plastic wood boards. Tough, strong, resistant and cheap enough. And it came in two colors, Rusty red and cape cod grey. The red was out of the question but the grey was neutral and would work. At $5 for a 6' board, wouldn't bust the budget and so I glued them on. Looked decent and hide my lumpy seams and give rub protection.
The top side corner edge and front nose cone were especially important from tree branches going down forest roads staking out camping spots. With my roof almost 10' high, was going to meet some branches and this would deflect then off of the PMF.
Ideally, hopefully, maybe. :worship:
And so I bought a bunch and glued them on the corners.
Note in the picture, the circular dent which was made when the wall was blown down by the wind onto a 5 gallon bucket of paint. Would smooth that out with caulk and paint.
Attachments
IMG_20181208_133011-1638x921.jpg
IMG_20181208_133011-1638x921.jpg (359.22 KiB) Viewed 3106 times
Last edited by Projector on Mon Feb 11, 2019 1:04 pm, edited 1 time in total.
Make it so.
User avatar
Projector
Teardrop Master
 
Posts: 159
Joined: Wed Aug 29, 2018 2:13 am
Top

PreviousNext

Return to Foamies

Who is online

Users browsing this forum: Bing [Bot] and 15 guests