Page 7 of 7

Re: Removable Foamie camper. New Build

PostPosted: Sat Aug 10, 2019 3:44 pm
by zzzizxz
That's about what I did for mine, only I cut off my side canvas right at the corner. Since I used regular molding, it isn't obvious where the canvas ends.

As I get more pics and updates, I'll make sure to show what it looks like finished.

Re: Removable Foamie camper. New Build

PostPosted: Wed Aug 14, 2019 8:42 pm
by zzzizxz
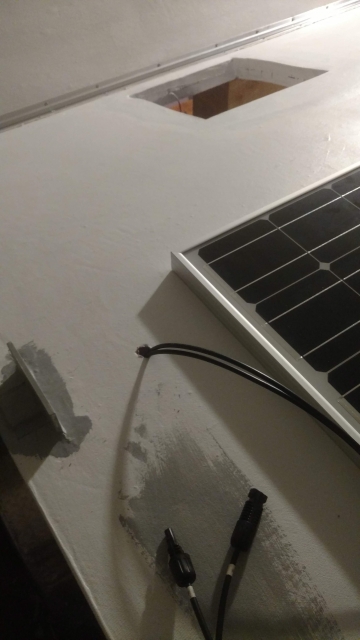
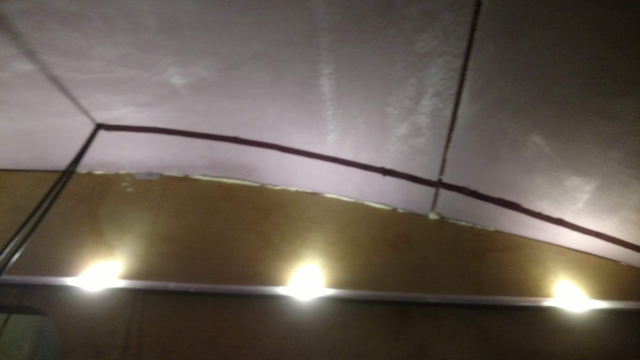
I had been trying to figure out where the wires for the solar panel would go, and my original thought had been to have them go through the roof as close to the battery as possible. That would have left the wires kind of flopping in the wind on the roof though, and I didn't like how that would look. Eventually, I remembered that the roof is made of foam, and I could easily hot-wire a channel in the ceiling from the entry point under the solar panel back to the rear wall, and down to the battery from there.

I felt silly, but even after all this time working with the XPS and expanding foam, I still have to wrap my mind around how easy it is to change things and fix mistakes in the middle of construction!

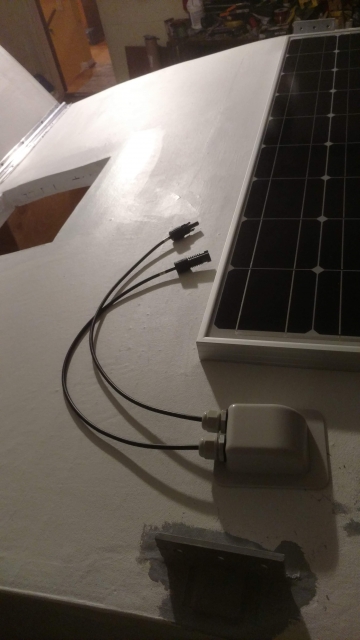
I drilled a hole through, installed the wires and the waterproof wire thingy, and hot wired a channel back!

Image

Image

Image

It was about this time that I started running out of time, and had to really step things up.

I canvassed the first side, which was a pain.

Image

Image

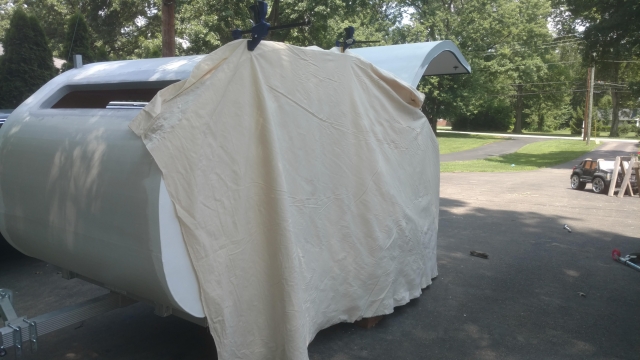
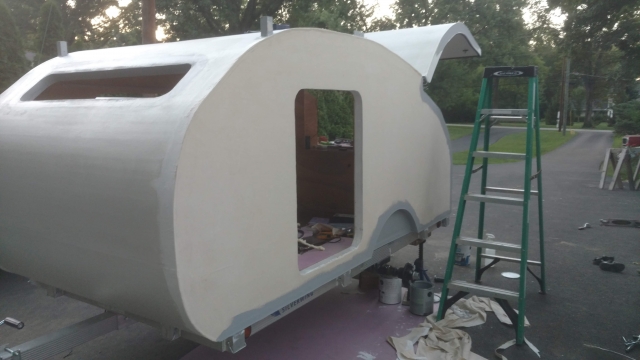
I started from the top, and was trying to work my way down. Paint ended up getting everywhere, and it wasn't sticking right.
Eventually what I did was to paint a thick coat of primer on the trailer, then stick the canvas to the paint. The paint held the canvas in place, while I peeled the canvas off from the side vertically instead of horizontally. Then painted the trailer again, as well as putting a coat on the canvas.
Then, I smoothed the now wetted canvas back onto the trailer, and used a 4" foam roller to keep working the canvas smooth, checking, rechecking, and triple checking for bubbles. Any time I would find one, I used a hat pin through the canvas to open a little hole, and the roller to get the air out.

After it dried, I used a new blade and cut the canvas at the corner, bottom, and at the edge of the door, giving myself nice crisp seams. I already had overlap from the canvas under the trailer as well as the roof, and I had primed and plastered all the edges smooth multiple times, so I wasn't worried about water.

Re: Removable Foamie camper. New Build

PostPosted: Thu Aug 15, 2019 6:02 am
by GPW
" I still have to wrap my mind around how easy it is to change things and fix mistakes in the middle of construction! “ :thumbsup:

Isn’t it wonderful !!! :D 8)

Re: Removable Foamie camper. New Build

PostPosted: Sat Dec 28, 2019 6:45 pm
by zzzizxz
After priming the outside, as well as lots of fiddly bits, I was ready to paint. My plan was to use rattle cans of spray paint to perfectly match the station wagon. I was also going to use a wood-graining tool and gel stain to paint wood grain in the middle area.

Image

I put the first coat on, and it looked nice and green. Too light, but looked good.

Image

A few more coats, and the shade was just right.

Image

Unfortunately, as the paint dried, it started turning this chalky grey color, and looked terrible. It looked so so bad y'all, and I couldn't take it on the road.

Image

I'm sure there's a good reason for the chalkyness, and probably things I could have done to make it work if I had know what I was doing.
I didn't and I was running right up against my deadline. We had a 2000+ mile trip in three days, and I didn't have time to mess with messed up paint. I thought I could get the whole thing painted in a few hours, and the back and forth had already wasted a full day.

I (nearly in tears) went to my local Sherwin Williams store, told them the story, and begged them to help. They looked up the spray paint I had used, verified that it was OK for me to paint over, and color matched the paint on the car.
After a frantic few hours, I was able to get the color on. Y'all have see what it looks like now. For speed purposes, I skipped the gel stain and wood graining, and just painted it to match the car.

Re: Removable Foamie camper. New Build

PostPosted: Sun Dec 29, 2019 3:43 am
by John61CT
pictures please or it never happened

Re: Removable Foamie camper. New Build

PostPosted: Sun Dec 29, 2019 3:44 pm
by zzzizxz
After I got the new paint on, I rushed through the door, window, and fan installation. Once I got it all buttoned up, I was able to take it on it's first test drive. It all handled perfectly, which was great, because at that point we were less than 36 hours away from departure. If issues had cropped up, I could have worked on them, but was glad nothing stood out.

I got it weighed, and dry weight was right at 800lbs. Which, with the trailer alone coming in at about 430, and the cooler weighing 40, I'm very happy with the total weight. I don't know what the two doors, a stargazer window weigh, but that makes for a very light construction.

We loaded up and had a great trip. We drove from Cincinnati to Hot Springs Arkansas, then camped our way north through Missouri and Iowa, before spending a few nights in South-East Wisconsin for my wife's high school reunion.
2600 miles in 12 days, with no problems from either the wagon or the trailer, not even when we did about 30 miles on back roads that were dirt, or only lightly graveled.

Image

Re: Removable Foamie camper. New Build

PostPosted: Sun Dec 29, 2019 4:31 pm
by zzzizxz
When we got back, I started work on some of the things I hadn't had time to do, or add some things I hadn't realized we would need. First was a Lithium Ion battery charger as well as a power port through the wall, so I could charge the battery without having to run an extension cord through the hatch or doors.

I had initially glued up some bedsheets on as the ceiling, but I really didn't like the way it made the interior look unfinished. I also wanted to be able to use the ceiling as storage space, and the sheets didn't provide any support. You can also see I used bedsheet on the front of the shelf under the window. I considered painting that, but decided not to.

I finally found some tongue and groove that I liked . I wanted some that was thick enough that I could put hooks in it, but not so heavy that it would add much weight.

Image

With the right adhesive, the T&G went on easily and immediately looked super professional. I also picked up a package of cedar wall closet boards, and used that on the front of the shelf. It has a decent aroma, but not terribly strong. I'm sure part of it is that I didn't use much of it, but I'm hoping that helps a little with repelling any insects that may get in.

Image

With everything buttoned back up, and the trim installed around the window and fan, I was shocked at how nice it turned out!

Image

Image

Image


I had to have a hook for our lantern, because I learned the hard way that having the old Coleman lanterns on the floor of the trailer leads to shattered globes. I also put the solar panel up there, keeping it out of the way until we need it.

Re: Removable Foamie camper. New Build

PostPosted: Sun Dec 29, 2019 4:40 pm
by zzzizxz
It also felt really good to completely empty our camping box and make a place for each piece of gear in the galley area.

Image

In October, we took our second big camping trip of the summer, this time headed south.

Image

Image

We went through Savannah to Florida, then camped our way through the panhandle, Alabama, Southern Kentucky and then back home. 3000+ miles in 11 days this time.

Re: Removable Foamie camper. New Build

PostPosted: Sun Dec 29, 2019 4:47 pm
by zzzizxz
Here's some detail shots.

Hinge.

Image

A better shot of the two-level seal. This is the wall, looking up toward the hinge. The L-shape fits into the inverse L on the hatch. The system works really well, because i haven't had a single drop of water get in anywhere back here.

Image


As with any project, I still have things I want to do. The big ones on my list are the wiring and lights for the hatch to install, and curtain rods and blackout curtains for the doors and window. Overall though, I'm happy with the way it stands, and am looking forward to a new season camping with it!

Re: Removable Foamie camper. New Build

PostPosted: Sun Dec 29, 2019 9:23 pm
by rjgimp
Awesome wagon! I used to have the Buick version of that platform. Leather seats, rode like a cloud. Wish I still had it. Back end rusted out on me.

Re: Removable Foamie camper. New Build

PostPosted: Mon Dec 30, 2019 6:21 am
by GPW
Great job ZZZ !!! 8) :thumbsup:

Re: Removable Foamie camper. New Build

PostPosted: Tue Dec 31, 2019 7:23 am
by JazzVinyl
Very impressive build! And wow, looks great with it's Tow Vehicle!

Congrats!!