My Overlander Build. Well, woods build..

Canvas covered foamies (Thrifty Alternatives...)

Moderator: eaglesdare

Re: My Overlander Build. Well, woods build..

Postby RJ Howell » Wed May 06, 2020 2:24 pm

Another day and progress! I have the other spot that's hard to get done now! :D

Image

Also managed to get the panel for the gas fill setup and gluing. Here it's just fitted, now it's in the shop clamped till morning!

Image

Supposed to be another good day tomorrow (jinx) and hope to get primed and a couple coats of paint so I can get it back on my truck! :twisted: Thinkin' shaker cans..

With all that's happening as of late, our trip for May into June is postponed.. Also kinda killing our plans to explore deeper into New Brunswick in July... Well, at least I have time to finish this project before we head out anywhere.. anytime soon.. :roll:

Almost forgot... I really thought it would be easier to fiberglass on the flat, but the vertical was actually easier!! What a surprise and a welcome one! I was dreading the sides of this unit when the time comes... not now!
RJ Howell
1000 Club
1000 Club
 
Posts: 1161
Images: 36
Joined: Sat Jul 27, 2019 6:08 am

Re: My Overlander Build. Well, woods build..

Postby tony.latham » Wed May 06, 2020 3:29 pm

How did you do the vertical? Pin the cloth and use a roller? Or a squeegee?

Tony
User avatar
tony.latham
Gold Donating Member
 
Posts: 6899
Images: 17
Joined: Mon Jul 08, 2013 4:03 pm
Location: Middle of Idaho on the edge of nowhere

Re: My Overlander Build. Well, woods build..

Postby RJ Howell » Thu May 07, 2020 5:25 am

Because of the steel cage, magnets to hold it in place, brush to apply and drywall knife to spread. 3" steel knife spreads real well, yet the 5" plastic smooths better. Also like using my hot glue to aline and hold the xps foam in place (not all of it is snug enough to hold it). That little space, the curve on the steel that bother the heck out of me.. Doesn't seem to bother me any more.. LOL
RJ Howell
1000 Club
1000 Club
 
Posts: 1161
Images: 36
Joined: Sat Jul 27, 2019 6:08 am
Top

Re: My Overlander Build. Well, woods build..

Postby RJ Howell » Thu May 07, 2020 4:05 pm

Well, I can prove I'm as human as the next guy.. I glued my gas cap on the panel upside down.. Did the walk of shame back into the shop, sanded/cleaned up and tried again.. :oops: and I was on such a roll...

Cage back on the truck and re-did the gas fill.. This time correctly. :thumbsup:

Image

Next step is to deck the bed, then the wheel wells and start the upper section. That upper section is still a work in progress.. The truck part (as you now see) will have a lap joint on top to weather seal it to the top. I figuring right now of making a 1 1/2" strip with a 5/8" strip glued on it, glued to the XPS foam. My previous experience showed gluing plywood to XPS worked real well. I see this as part of the lap I need and a stabilizer along the span. Hard to explain, but I'll do some pictures as I get there.
RJ Howell
1000 Club
1000 Club
 
Posts: 1161
Images: 36
Joined: Sat Jul 27, 2019 6:08 am
Top

Re: My Overlander Build. Well, woods build..

Postby RJ Howell » Fri May 08, 2020 1:51 pm

Another day and a bit more progress! WHOA :beer:

Plywood bed is on (big step that I've been awaiting), now I can build out the wheel wells and post in the remaining spots I need to do.

Image

Plywood is coated (resin, since I have quite a bit) and adhered/screwed down. I have the frame bolted to the truck, so this could be removed if so required. Weather is changing a bit for tomorrow, so figuring probably not much progress will be made.

Side note: I am playing a bit with the welder and learning how to create curves! :) This is a lot of fun and getting some ideas on creating my rear bumper!! :twisted:
RJ Howell
1000 Club
1000 Club
 
Posts: 1161
Images: 36
Joined: Sat Jul 27, 2019 6:08 am
Top

Re: My Overlander Build. Well, woods build..

Postby RJ Howell » Sat May 09, 2020 2:08 pm

Even with dodging now flurries, I got something done! One of those days in New England (in May) where it's in the mid-40's and a snow flurry happens.. Gotta love it!

First pc is the gas filler which still requires some sanding in, and the wheel well start.

Image

This next pic is the wheel well. I'm a carpenter and much prefer working in wood and for this I'm not seeing why not. I will fiberglass the exposed portions and black out underneath. I look at it and it seems to have a lot of clearance, but really it's only 1" (rake) over the front spacing. I have it extended 2 1/2" from the side wall and when done will look 1" thick. Really debating how I will paint it... Should contrast the sidewall, yet still want it to stealth in the woods. Hmm... :roll:

Image

Since I'm on the edge of glue (and my) tolerance of cold, I'm done for today. Heck, tomorrow is supposed to be 60 and sunny! Ya, May in New England!

P.S. As I write this... the sun came out..

P.P.S. I figured out why the wheel well looks so big.. It wasn't supposed to have those short verticals before the 45° angle.. Man that was bothering me.. Think I can do an easy fix today.
RJ Howell
1000 Club
1000 Club
 
Posts: 1161
Images: 36
Joined: Sat Jul 27, 2019 6:08 am
Top

Re: My Overlander Build. Well, woods build..

Postby RJ Howell » Mon May 11, 2020 12:51 pm

Managed a run to get some more XSP and dry fit lower sides today before the rain came in..

Image

Oh ya, decided to leave the wheel wells as is. They're growing on me..
Interior view, happy about how little the wheel wells protrude! Oh ya, and my hot wire foam cutter! I have mentioned how cool that thing is??

Image

Next is to build out the entire upper wall area. Figure I might have that done over a next few days and start the following 'big' step... The Roof!
RJ Howell
1000 Club
1000 Club
 
Posts: 1161
Images: 36
Joined: Sat Jul 27, 2019 6:08 am
Top

Re: My Overlander Build. Well, woods build..

Postby RJ Howell » Tue May 12, 2020 1:59 pm

Yes, indeed, another day of progress! Upper section of walls glued in and 3 sides with straight tops!

Image

Front yet to be cut straight. Tomorrow project! So what I did was welded in the center post long, stringed it and cut that post in place hoping it would work out right in this phase... and it did! :) So happy about that! I strung it again to cut the XPS and tolerance was spot on! Love it when a plan comes together.

With the uppers in place, I could now glue in the sides. Mostly this was done by using Gorilla glue on the edges. I'm used to this product and it just works well in so many conditions. :thumbsup:

The wife came out to check on progress and busted my balls with "You sure you'll fit up there? Looks kinda tight.." :R 
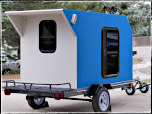
Walked her through the spacing now that you can really see what it is.

Image

Any thoughts about this folks?

Think I may do a mockup and show hers better what I'm seeing.

Yes, I'm hesitating closing in the back.. Been debating how I wish to do this part all along.. :roll: Think I'm closing in on a thought here and it may just be the rear to be removable. If you recall from the design.

Image

I keep looking at this and see a bit more steel welding coming into play to hold the weight of possible water & propane. If I make it as a unit, to be hung on the back, the truck could be used otherwise as well. Just kicking this around in my mind, but need to decide fairly soon...
RJ Howell
1000 Club
1000 Club
 
Posts: 1161
Images: 36
Joined: Sat Jul 27, 2019 6:08 am
Top

Re: My Overlander Build. Well, woods build..

Postby JazzVinyl » Wed May 13, 2020 8:47 pm

Lookin' good, RJ!!
User avatar
JazzVinyl
Teardrop Master
 
Posts: 167
Images: 211
Joined: Wed Mar 27, 2019 2:30 am
Top

Re: My Overlander Build. Well, woods build..

Postby RJ Howell » Thu May 14, 2020 2:24 pm

Going to rain tomorrow so good day for other chores..

Read a post elsewhere where a guy was using bondo to smooth out over XPS. I've had experience before with bondo, so I gave it a try. DON'T do it!! :shock:
It does react with the XPS foam and just enough that you don't really catch it till it's too late. It's like chasing a divot you can't understand how you did it. So much for that experience...

Since I was asked if I used a roller to spread the resin (and I hadn't), I thought I'd give it a go. I found some very tight nap 6" ones I have and went for it. Between those and my 6" knife to scrape, worked pretty nice! I have both large areas of the sides now fiberglassed. I have to say, using the roller made it easier to lay the cloth and keep the amount a bit more even, the scraper knife just adds to this! :thumbsup:

I've added the lip to the upper section getting ready for the roof. I still see this as the next step.

Sorry the picture is as I put the truck away for today. The tape is holding the 5/8" x 5/8" lip I glued on.

Image
RJ Howell
1000 Club
1000 Club
 
Posts: 1161
Images: 36
Joined: Sat Jul 27, 2019 6:08 am
Top

Re: My Overlander Build. Well, woods build..

Postby tony.latham » Thu May 14, 2020 2:28 pm

Looking great.

How much fairing do you think you might have to do?

Tony

p.s. Bondo is just thickened polyester resin and thus its hunger for foam.
User avatar
tony.latham
Gold Donating Member
 
Posts: 6899
Images: 17
Joined: Mon Jul 08, 2013 4:03 pm
Location: Middle of Idaho on the edge of nowhere
Top

Re: My Overlander Build. Well, woods build..

Postby RJ Howell » Fri May 15, 2020 5:26 am

tony.latham wrote:Looking great.

How much fairing do you think you might have to do?

Tony

p.s. Bondo is just thickened polyester resin and thus its hunger for foam.


Well, that depends on what is consider a lot/little.. LOL I thought not that much, but that Bondo thought different... Mainly where the steel and XPS meet.
RJ Howell
1000 Club
1000 Club
 
Posts: 1161
Images: 36
Joined: Sat Jul 27, 2019 6:08 am
Top

Re: My Overlander Build. Well, woods build..

Postby tony.latham » Fri May 15, 2020 8:58 am

Well, that depends on what is consider a lot/little..


I get that. On this last build, the white primer really showed me where I needed to fair.

Image

The pink stuff is auto-body spot filler.

Tony
User avatar
tony.latham
Gold Donating Member
 
Posts: 6899
Images: 17
Joined: Mon Jul 08, 2013 4:03 pm
Location: Middle of Idaho on the edge of nowhere
Top

Re: My Overlander Build. Well, woods build..

Postby RJ Howell » Fri May 15, 2020 1:46 pm

Dong the same, primer to show me where. Though a couple spots are pretty dam obvious! :shock:

Today brought on finishing the upper wall areas over the cab, a bit of fairing and finally a start on the roof. Here's where it's more of a foamie and using the XPS for all it's worth! 8)

With the topper I went 4ft to the strut (1/8" aluminum), but stressed the panel into a slight curve to gain strength. Worked very well. This time I'm placing a 3/16" vinyl strut every 2ft. I will still have the opportunity to do a N/S curve if I deem it required as I build the ends/sides (I think it would look pleasing as well). In all the top will be 5" tall. This gives me a closed cavity of about 8" at the overhead bunk.

I'm trying very hard to keep the top as light as possible. The 'H' braces I intend to make will also help lift the top. I'm very curious if that will be all I need.. :roll:
Image

Good progress for what was supposed to be a rain day!

Image
RJ Howell
1000 Club
1000 Club
 
Posts: 1161
Images: 36
Joined: Sat Jul 27, 2019 6:08 am
Top

Re: My Overlander Build. Well, woods build..

Postby RJ Howell » Sun May 17, 2020 7:35 am

Well, the vinyl has too much flex for my liking, so I'm back to plywood.. Oh well. My 1/8" plywood stock is working fine and will go with that. Another trip to pickup more XPS foam and primer paint is in store for today. Hope to get some more fairing done (going over section at a time) and continue making up the panels for the roof.

Watched the commercial trailer being towed away by the new owners of it! That chapter of life is over and now have the budget in hand to finish this project and build our 'Forever' trailer. :twisted:
RJ Howell
1000 Club
1000 Club
 
Posts: 1161
Images: 36
Joined: Sat Jul 27, 2019 6:08 am
Top

PreviousNext

Return to Foamies

Who is online

Users browsing this forum: No registered users and 19 guests