My Overlander Build. Well, woods build..

Canvas covered foamies (Thrifty Alternatives...)

Moderator: eaglesdare

Re: My Overlander Build. Well, woods build..

Postby RJ Howell » Thu Jun 04, 2020 5:26 am

Every once in a while, a plan comes together! :D 
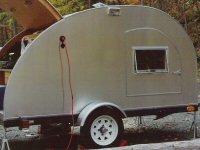
It fits in the garage!

Image

Three sides painted and attention to the back storage/entry is in full swing now. Entry door is on the horses all clamped up, details being worked through on the storage bins and working out entry steps. :twisted:

Image

I originally wanted a full length lift hatch to second as a quick cover, but at my age having clear head room at the entry was more important. Backup plan is to set an awning/fly off the back side. I had to reorder more gasket material for the entry/storage hatches and my latches are on order (both here by Saturday I hope). I ended up buying a 70qt portable 'chest refrigerator, by dimension works out to about the same size as our old upright. Only with this one we can open the lid and nothing will fall out!!

I've also redesigned the lift bracket to something much simpler. Looking at making up the first one today and giving it a go! I'll post a picture if all goes well.
RJ Howell
1000 Club
1000 Club
 
Posts: 1163
Images: 36
Joined: Sat Jul 27, 2019 6:08 am

Re: My Overlander Build. Well, woods build..

Postby RJ Howell » Thu Jun 04, 2020 2:02 pm

Well, today was fun in that the lift works! :thumbsup:

First was the prototype to see if and what I gain..

Image. Image

That was a 22" lift and kinda tight for the overhead, yet 6'-3" for the interior and very close to design. Okay.. Let's up it a bit.. Literally!!!

Image. Image

OMG! Is that nice inside! 6'-11"... Ya baby and so easy to raise! That upped the overhead to just over 36"!! :D Since that's my spot, I'm liking! Now I can make up the front lift, sand seal, rout and really mount it. :twisted:

The plywood 'H' bracket in it's self is lose to the weight of the roof.. That surprised me! I'm very happy with the design and the piano hinge works as I hoped. I have my aluminum ones coming mid-next week. I hoed I could do a over-extend on the bracket to hold it in place, which it does, yet thinking wind... I need something more. Thinking a 'U' channel to slip over the joint to hold it in place. :roll: Has to slide out of the way to fold and easily lock into place, or just remove and place (which with me will get lost). Hey, at this point what's another minor challenge? :lol:

Good day! I like what happened and how my thoughts came to be. Doesn't always play that way.. So recognize the days it works and grab a beverage! :beer:
RJ Howell
1000 Club
1000 Club
 
Posts: 1163
Images: 36
Joined: Sat Jul 27, 2019 6:08 am

Re: My Overlander Build. Well, woods build..

Postby GPW » Fri Jun 05, 2020 5:02 am

:thumbsup: :applause:
There’s no place like Foam !
User avatar
GPW
Gold Donating Member
 
Posts: 14912
Images: 546
Joined: Thu Feb 09, 2006 7:58 pm
Location: New Orleans
Top

Re: My Overlander Build. Well, woods build..

Postby RJ Howell » Sat Jun 06, 2020 1:47 pm

Not a time for my mind to wander... :roll: Getting all these thoughts of how to proceed... :twisted: Stop it please!! :?

I have both lifts in temp place and making decisions on changes (if any). Biggest item is, as I knew, N/S sway and how to compensate. I love the height and the fact that I can sit up (barely) in my bunk (topside). E/W sway is gone with the H brackets, figured so, yet N/S is a bit more than I thought, especially during raising. Once up, that angle brace does the trick.

Image. Image

The height is sweet! ;)

I sit here now thinking how I could make the sides as flip up foam panels and eliminate that brace, have some real windows (awning style) and such a cool factor.. :?
Lord help me with my thoughts and keep me on the path of finishing this! I can see so many possibilities, but I want this high and dry very soon. Changes my come!
RJ Howell
1000 Club
1000 Club
 
Posts: 1163
Images: 36
Joined: Sat Jul 27, 2019 6:08 am
Top

Re: My Overlander Build. Well, woods build..

Postby RJ Howell » Sun Jun 07, 2020 8:46 am

One of the final items with the roof lift is that side brace and how to make it work through the lift. I am finding lifting the front first is smart (especially with the brace mounted forward) and snap on the 3/4" C channel (will be replaced with something deeper like 1" plus). I worked the brace by clamping it to the side (at the metal upright of the cage), made a mark at that point and lifted. Then slowly re-clamped till I had it straight up, marked again. Looks like the travel is about 4" on the brace, shorter that I expected. Thought is to make a slot between these points and using a 'wing nut' lockdown be able to set it for lift, then move it to straight up. Even better would be if I can just lift and let it slide in the slot.. Guess we'll see how well it works out.

Still do believe I will require one on each side for stability in wind.. Just that one brace really does lock it in real well!

Image

Heading over to my Uncle's in a hour or so to go over the system and get his thoughts. If you wonder where all this madness comes from, blame him. He's my mentor of madness! 8)
RJ Howell
1000 Club
1000 Club
 
Posts: 1163
Images: 36
Joined: Sat Jul 27, 2019 6:08 am
Top

Re: My Overlander Build. Well, woods build..

Postby GPW » Mon Jun 08, 2020 4:54 am

RJ, Don’t show this to your hunting buddies , It sure reminds me of a portable pop up Blind !!! Camo already ... 8) Just a thought .. :thinking:
There’s no place like Foam !
User avatar
GPW
Gold Donating Member
 
Posts: 14912
Images: 546
Joined: Thu Feb 09, 2006 7:58 pm
Location: New Orleans
Top

Re: My Overlander Build. Well, woods build..

Postby OP827 » Tue Jun 09, 2020 7:41 pm

That is one sweet design you have and you did great job with 3D model and planning upfront, that saves a lot of time. I will follow with interest.
Thanks for sharing! :thumbsup: :applause:
Oleg
User avatar
OP827
Donating Member
 
Posts: 1555
Images: 405
Joined: Fri Apr 25, 2014 7:27 pm
Location: Bruce County Ontario
Top

Re: My Overlander Build. Well, woods build..

Postby RJ Howell » Sat Jun 13, 2020 3:46 pm

The back is getting done! Well, sealed..

Image

I't hard to see the gasket, yet it's there and I think pretty good! Color of the trim will blend at some point, just working on seal right now.

Image

I lost the flip cover once I found the door opening was too short for me to get into.. Sucks getting old.. I'll work on something simple for a quick cover as I proceed. I like the way the Z-bar is working for the seal and as it's painted should blend nicely. I will seal the bar in as I continue (probably silicone) especially along the bottom.

Okay, I'm trading time between Striper fishing and working on this. Reality is, I need to get it done so I can spend some time out there on the correct tides! Shorts (schoolies) only so far. Still fun on a fly rod!
RJ Howell
1000 Club
1000 Club
 
Posts: 1163
Images: 36
Joined: Sat Jul 27, 2019 6:08 am
Top

Re: My Overlander Build. Well, woods build..

Postby Terra6 » Sat Jun 13, 2020 4:10 pm

:thumbsup:
Looking good.
You're going to be tickled pink with it when you're done.
As in Dow corning pink happy. :lol:
Couple questions.
What glue did you use to adhere xps to your steel frame?
What about considering folding hard sides for the roof to wall on the pop up section? There's a Toyota Tacoma popup in aluminum that a young guy built like that. If interested, could try to find a link.
Do you have a fiberglass overall cost Or estimate that you might be able to share in per square foot basis? What about adhesion to xps? Do anything special?
Any idea on shell weight so far?
On the road to Shambala...
User avatar
Terra6
Teardrop Master
 
Posts: 139
Joined: Sat Jun 13, 2020 4:31 am
Top

Re: My Overlander Build. Well, woods build..

Postby OP827 » Sat Jun 13, 2020 6:39 pm

RJ Howell wrote:One of the final items with the roof lift is that side brace and how to make it work through the lift....
... Heading over to my Uncle's in a hour or so to go over the system and get his thoughts....


If you are still thinking about the roof side brace, how about adding similar H brackets in the middle on both sides to get the front-to-back bracing resolved and delete the brace. I would try lifting the roof from the middle (easier access than front) at the same time with these H brackets and then lock front and back H brackets after that. Does this make sense?
Just an idea ... :thinking:
User avatar
OP827
Donating Member
 
Posts: 1555
Images: 405
Joined: Fri Apr 25, 2014 7:27 pm
Location: Bruce County Ontario
Top

Re: My Overlander Build. Well, woods build..

Postby RJ Howell » Sun Jun 14, 2020 4:46 am

Terra6 wrote::thumbsup:
Looking good.
You're going to be tickled pink with it when you're done.
As in Dow corning pink happy. :lol:

Couple questions.
What glue did you use to adhere xps to your steel frame?
Original Gorrila Glue, works great!

What about considering folding hard sides for the roof to wall on the pop up section? There's a Toyota Tacoma popup in aluminum that a young guy built like that. If interested, could try to find a link.
Would love to see the link! Always interested in what someone else has done. Debated that quite a bit and basically couldn't work through the system cleanly. Biggest issue is height of the loft area and keeping overall height down to fit in the garage.

Do you have a fiberglass overall cost Or estimate that you might be able to share in per square foot basis? What about adhesion to xps? Do anything special?
Any idea on shell weight so far?
Just over $300. Glass came from http://fiberglasssite.com and Resin came from http://store.raka.com/3gallonepoxykit.aspx Used 30yds and almost all the Resin. I'm coating/gluing other areas/items with just resin since I have it.


Weight, I did not weigh with the bed of the truck off.. Wish I had. I did do overall weight and rear axle weight before starting in. Always felt I'd have a weight when I scraped the bed. What I can say is I've only added 80lbs at this point in time. My guess is 450-500lbs.
RJ Howell
1000 Club
1000 Club
 
Posts: 1163
Images: 36
Joined: Sat Jul 27, 2019 6:08 am
Top

Re: My Overlander Build. Well, woods build..

Postby RJ Howell » Sun Jun 14, 2020 4:58 am

OP827 wrote:
RJ Howell wrote:One of the final items with the roof lift is that side brace and how to make it work through the lift....
... Heading over to my Uncle's in a hour or so to go over the system and get his thoughts....


If you are still thinking about the roof side brace, how about adding similar H brackets in the middle on both sides to get the front-to-back bracing resolved and delete the brace. I would try lifting the roof from the middle (easier access than front) at the same time with these H brackets and then lock front and back H brackets after that. Does this make sense?
Just an idea ... :thinking:


I've begun the fabric sides now. The hard side option was discussed as was doing the H brackets on the sides (with or instead of the N/S positions). The side positions don't give enough length (?) to lift a side and makes it mandatory for the whole top to go raise as one. That means mechanicals of some sort, I figure.. With it being N/S, I can lift one part (easily), set the brace (in the slot) and raise the other end. The top is pretty darn lite, it's mainly XPS foam (1/4 ply as a band around it IS/OS).

Trying to lift it all by hand becomes a two person game. Not because of weight, but needing to hold it up and reach the brackets to lock them in. This may change once the fabric is on. I have the brackets so they over bend a bit (go past straight) thinking they might hold, but so far not really. Even with the center hinge locked into place, the entire bracket can still move due to the hinges on the top & bottom. The fabric will stop either side from folding outwards, yet not inwards (I think).

The side bracket works pretty good with being able to un-hook it and swing it up out of the way of the fabric when lowering, or so goes the theory.

Love the input folks!
RJ Howell
1000 Club
1000 Club
 
Posts: 1163
Images: 36
Joined: Sat Jul 27, 2019 6:08 am
Top

Re: My Overlander Build. Well, woods build..

Postby Terra6 » Sun Jun 14, 2020 7:46 am

Here's the link to the hard sided popup on a Toyota Tacoma, all aluminum. Nice design.
https://www.overlandkitted.com/four-whe ... uck-camper
On the road to Shambala...
User avatar
Terra6
Teardrop Master
 
Posts: 139
Joined: Sat Jun 13, 2020 4:31 am
Top

Re: My Overlander Build. Well, woods build..

Postby OP827 » Sun Jun 14, 2020 10:09 am

RJ Howell wrote:
OP827 wrote:
RJ Howell wrote:One of the final items with the roof lift is that side brace and how to make it work through the lift....
... Heading over to my Uncle's in a hour or so to go over the system and get his thoughts....


If you are still thinking about the roof side brace, how about adding similar H brackets in the middle on both sides to get the front-to-back bracing resolved and delete the brace. I would try lifting the roof from the middle (easier access than front) at the same time with these H brackets and then lock front and back H brackets after that. Does this make sense?
Just an idea ... :thinking:


I've begun the fabric sides now. The hard side option was discussed as was doing the H brackets on the sides (with or instead of the N/S positions). The side positions don't give enough length (?) to lift a side and makes it mandatory for the whole top to go raise as one. That means mechanicals of some sort, I figure.. With it being N/S, I can lift one part (easily), set the brace (in the slot) and raise the other end. The top is pretty darn lite, it's mainly XPS foam (1/4 ply as a band around it IS/OS).

Trying to lift it all by hand becomes a two person game. Not because of weight, but needing to hold it up and reach the brackets to lock them in. This may change once the fabric is on. I have the brackets so they over bend a bit (go past straight) thinking they might hold, but so far not really. Even with the center hinge locked into place, the entire bracket can still move due to the hinges on the top & bottom. The fabric will stop either side from folding outwards, yet not inwards (I think).

The side bracket works pretty good with being able to un-hook it and swing it up out of the way of the fabric when lowering, or so goes the theory.

Love the input folks!
RJ, when suggesting this idea I was actually thinking that there's space for H brackets on the sides for a full swing and roof is light enough to lift in one vertical motion. You don't need to be standing in between the brackets when lifting, they can be in front of you as long as you can hold the handles and lift both of them up. If not, then this option is out. Tensioned fabric could add more stability, but not much of structural integrity. Still need some braces in the sides.

Sent from my Moto G Play using Tapatalk
User avatar
OP827
Donating Member
 
Posts: 1555
Images: 405
Joined: Fri Apr 25, 2014 7:27 pm
Location: Bruce County Ontario
Top

Re: My Overlander Build. Well, woods build..

Postby RJ Howell » Sun Jun 14, 2020 3:05 pm

[/quote]RJ, when suggesting this idea I was actually thinking that there's space for H brackets on the sides for a full swing and roof is light enough to lift in one vertical motion. You don't need to be standing in between the brackets when lifting, they can be in front of you as long as you can hold the handles and lift both of them up. If not, then this option is out. Tensioned fabric could add more stability, but not much of structural integrity. Still need some braces in the sides.

Sent from my Moto G Play using Tapatalk[/quote]

Hmm.. Have to think about that a bit. I kinda get what you're saying.. It actually has my mind going with using a folding handle and.. Let me think on this before I go any further. Interesting direction! :twisted:
RJ Howell
1000 Club
1000 Club
 
Posts: 1163
Images: 36
Joined: Sat Jul 27, 2019 6:08 am
Top

PreviousNext

Return to Foamies

Who is online

Users browsing this forum: No registered users and 18 guests