Page 2 of 4

Re: Atma Travelear, with Aluminum Frame

PostPosted: Fri Nov 28, 2014 6:32 pm
by Debraizhot
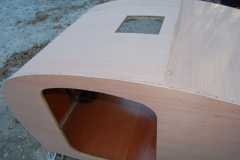
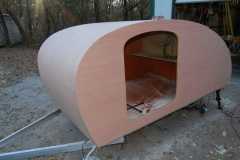
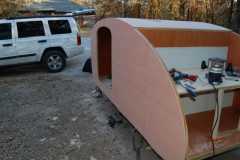
Nothing out there worth standing in line for so we finished the roof and skinning one wall. Also cut out the hole for the roof vent.
126652
126651
126653

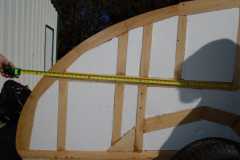
Before we put the skin on I took some milestone photos with a tape measure in case I ever had trouble fining one of the rails.
126654
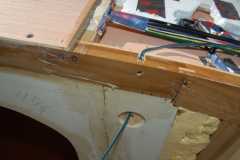
Also I did not have the budget for the very nice flush LED porch lights. So I just made a cavity and hid the wire. I will get some of the low cost euro style lights that "Li'l Bear" has.
126655
Will finish the other side tomorrow.

Re: Atma Travelear, with Aluminum Frame

PostPosted: Sat Dec 06, 2014 9:40 pm
by Debraizhot
We got both sides skinned with ply and are starting on the hatch. For the hatch we are using still focusing on very light weight. That poses a couple of problems because the curves in the hatch tend to allow a lot of bending moments to distort the structure. To address this we are using beam construction with torque tubes. Once I got a master hatch profile, we routed these out of 1/2" spars of HW ply. Then we screwed all 6 together, and planned/sanded them to match. Then match drilled holes that would accept 1" EMT conduit. You can see them lined up below.
126838

There will be two EMT cross pieces. These will span at the top and bottom. The EMT will be cut to size and at the two ends and the middle, it will be cross drilled to accept a 5/16" X 8" long bolt. The bolt will sit in a cavity between one of the spars and another layer of ply. The cavity will have a clear hole drilled. Once I get the framing in place with the cross bracing it will be clammed into place on the back of the galley and the cavities will be filled with epoxy. This will lock the structure into place to match the form of the galley. You can see one side of the cavity in this photo.
126837
The will be another piece of play, with a similar opening that will be screwed on to complete the cavity.
You might notice that the cavity for the cross bolt looks rough, it is. I want there to be plenty surface for the epoxy to bite into, for a good strong joint.
126836
This is very much like the construction of an aircraft wing to resit twisting moments.
The perimeter and the spans between the spars will be be boxed in normally.
Should lead to a nice stiff, light hatch that will be very resistant to twisting.

Re: Atma Travelear, with Aluminum Frame

PostPosted: Fri Dec 12, 2014 12:04 pm
by Debraizhot
FYI: I just received my order from L'il Bear Tagalongs for the hatch hinges. Really impressed with the outstanding packaging, fast shipping and very reasonable pricing. He even included the cover strip for the screws. Other suppliers charge for this.

Re: Atma Travelear, with Aluminum Frame

PostPosted: Sat Dec 13, 2014 5:27 pm
by Debraizhot
Quick paraphrase of Proverbs 16:9 came to mind today- 'We plan but the Lord decides...' With the new hinge I went ahead and got the struts all fastened in place. I used a gauge with the ply and some 0.40" metal to set the clearance for the front mounting rail.
126953
Then I fastened the struts. While doing so I learned that my issue near the hinge line was not twist but shear. So I abandoned the torque tubes at the front and used triangle gussets.
126952
Across the middle you will see a brace. Trying to hold everything in place until the glue sets tight.
I still intend to use the torque tubes at the bottom. There the need to resist twist is much greater anyway.
We shall see.
126955

Re: Atma Travelear, with Aluminum Frame

PostPosted: Sun Dec 14, 2014 9:03 pm
by Debraizhot
The installation of the torque tube went pretty well. I welded a washer to the top of the bolt to keep the bolt tight with only one nut at the bottom.
126983
Then when the bolts were installed they fit very well. I installed a couple of ply barriers on each side of the bolt and then sealed the whole mess up with aluminum HVAC tape.
126984126986
The top edge was left open. Now to get the resin into the fixture I used some 60ml saline syringes.
126987
The syringes worked great but as you might imagine, still pretty messy.
Filled the cavities in two steps. The first injection was with resin that was a few minutes away from gelling. This was in hope to help seal the cavities.
The second was with resin right after mixing and still thin. I plan to use the rest of the week to finish bracing, and get the hatch ready to skin it this weekend.

Re: Atma Travelear, with Aluminum Frame

PostPosted: Sat Dec 27, 2014 12:00 pm
by Debraizhot
Between getting ready for Christmas and enjoying time with the family and now the weather, I have not had time to complete much work. I am just way too old to enjoy bending wood in 40 degree weather. I don't think the wood likes it either. However, I did get the inside skin on yesterday before the cold front came through.
127330

Re: Atma Travelear, with Aluminum Frame

PostPosted: Sun Dec 28, 2014 9:31 pm
by Debraizhot
On Saturday my LED lights for the galley came in.
127351
These are called "5050" modules. They are completely waterproof and put out ~70 lumens each.
With 40 total, they are VERY bright. You see these all the time in signs. They have almost completely killed off using florescent or neon in signage.
Plus-they are cheap. On ebay you can get these from China for ~$0.50 each including shipping.

There are two sets in the photo-one is white light, the other is yellow/amber.
To light the galley, I am going to build a fixture in the hatch with a diffuser lens and with these LEDs as the lighting.
I will interleave them so there will be one white and one yellow and operate them from two switches. They work directly from 12V so they are a snap to wire.
You can even have banks where you light fewer with one switch and more with another switch for an easy way to adjust brightness.

Re: Atma Travelear, with Aluminum Frame

PostPosted: Wed Jan 21, 2015 9:17 pm
by alaska teardrop
Progress report? :pictures:

Re: Atma Travelear, with Aluminum Frame

PostPosted: Mon Apr 06, 2015 7:10 pm
by Debraizhot
The winter was cold (for Texas). I got back on the trailer in December/January and have taken the week off this week in an effort to make some serious progress.
0.040" aluminum glued up on the sides. I used HH-66 for all the glue work on the skins.
I was able to get 4'X10' sheets from Trident Metal in Dallas with the PVC coating for ~$2/lb.
For the roof I could not find any 5'X10' sheets in 0.40" I had to use 0.060" Found the 5' sheets at Discount Steel in Saginaw TX.
130368
130366
For a clamp to hold the front down, I use some EMT and a 2X4 with a socket to fit the EMT. The 2X4 presses on the jack and you just twist the EMT to roll it up to increase the pressure.
130367
I got the flashing on the hatch and should have the ply and aluminum on by this time tomorrow-or early Wed...

Re: Atma Travelear, with Aluminum Frame

PostPosted: Mon Apr 06, 2015 8:20 pm
by Shadow Catcher
Our tear is all aluminum frame and the first one we owned failed with the second owner. Aluminum has a finite modulus of elasticity and it failed at the front of the frame where it went under the body of the trailer. We own the seventh and last tear made by the company and when I heard of the failure of #1 I had ours reinforced. This frame had too much flex and it was MIG welded, (should have been TIG).

58160

Re: Atma Travelear, with Aluminum Frame

PostPosted: Mon Apr 06, 2015 9:11 pm
by Debraizhot
Totally understand the failure point. The lever arm has so many forces focused at that point. The more I looked at aluminum the more I became terrified with the prospect of welding and having a failure in the HAZ at the weld points. I have very hopeful/prayerful that it will hold up with rivets and glue. We shall see... I will tell you that my plan "B" was to leverage the fact that the A frame with the doublers is bolted on to the main frame and tongue box. If it does fail, I can unbolt it and swap the A-frame for a steel one (after addressing the cathodics) or a larger aluminum a frame.

Re: Atma Travelear, with Aluminum Frame

PostPosted: Mon Apr 06, 2015 9:40 pm
by Shadow Catcher
#1 had a good bit of bounce in the tongue as did #7, until I had it reinforced.
#1 failed catastrophically, both sides failed fortunately at low speed in a small town. That owner found some one who TIG welded fish plates on both sides of the break.
I do not have much experience with Rivets others than those I have encountered on aircraft.
A weld done properly is stronger than the metal it welds.

Re: Atma Travelear, with Aluminum Frame

PostPosted: Fri Apr 10, 2015 5:37 pm
by Debraizhot
For the last couple of days I have been attaching the ply skin to the outside of the hatch. Tried steaming the wood but the curve at the bottom was just way too tight. By the time I got one edge flexing enough the other edge was dry and stiff. Stuck the sheets in the shower on hot for ~20 minutes and they came out ready to attach. No problem at that point.
130497130496
130498

However, it seems that no matter what-there are never enough clamps. Ever.
I put the trim in the door ways and then moved to get the aluminum skin on the outside.

130500130499
I am attaching the first steep arc and letting it set overnight. The hope is that tomorrow it will just roll over for attaching the remaining skin.
Using 0.060" thickness is very tough. But in the end it should be like a tank.

Re: Atma Travelear, with Aluminum Frame

PostPosted: Sun Apr 12, 2015 8:43 pm
by Debraizhot
I was able to get the wood elements of the doors built. As soon as I get the hatch done and back on the trailer I will have room to cut and attach the aluminum skin.
130615130616
130614
I used the 5mm ply for the gasket face. I was going to use the Wide T molding but could not get 12' lengths shipped to Texas and there was none locally.

I am also modifying a DeLonghi - Pinguino heat-pump. You can these type units from craigslist for ~$200 or less. This model has a single hose that transfers the heat from a room out a nearby window. I am reversing that setup to the output of the unit will vent into the trailer; providing both heating and cooling.
130617130618

Re: Atma Travelear, with Aluminum Frame

PostPosted: Sat Apr 25, 2015 9:10 pm
by Debraizhot
So this weekend we got some momentum up. We were able to:
-Install the hatch
-Get the edge trim onto the right side
-Get the left door complete and mounted
-Get the fenders primed and painted

131028

131026

Our anniversary is May 22. I am trying to get it complete so we can take it out that weekend. We shall see.