Benroy style dutchie (campable)

...ask your questions in the appropriate forums BUT document your build here...preferably in a single thread...dates for updates, are appreciated....

Re: Benroy style dutchie

Postby teddy » Wed Aug 27, 2014 4:16 am

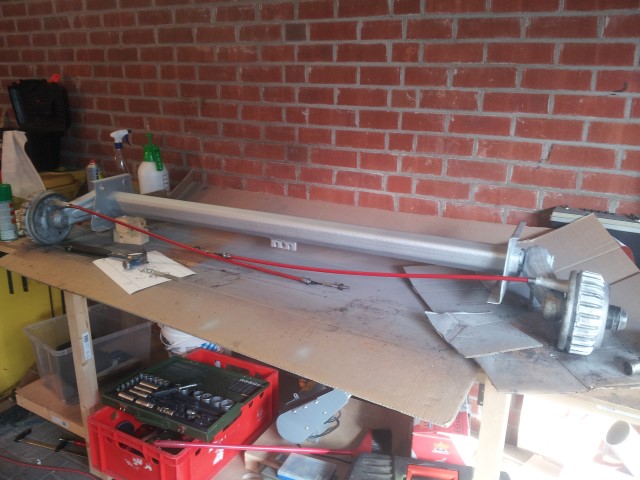
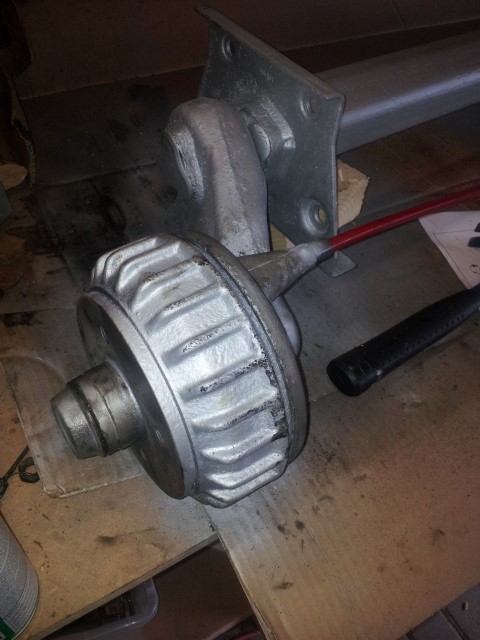
Painted the axle, replaced the brake cables with shiny new red ones, checked all the bearings, repacked them, now im hoping i did it all correct, as ive never done something like this before.

Image

Image
Image
User avatar
teddy
Donating Member
 
Posts: 93
Images: 187
Joined: Tue Jul 08, 2014 4:37 pm
Location: Holland

Re: Benroy style dutchie (now rebuilding the chassis)

Postby teddy » Tue Sep 02, 2014 5:15 pm

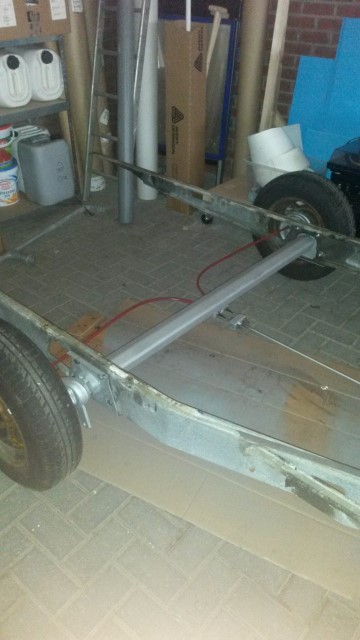
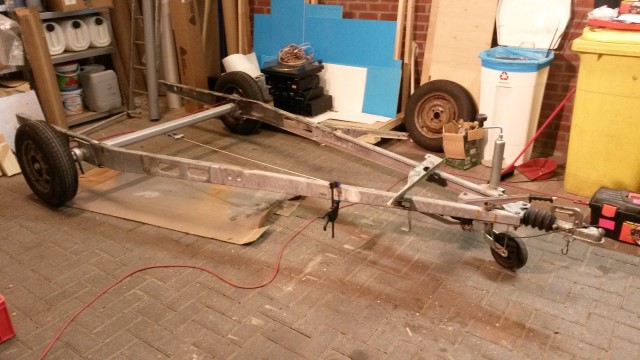
Last saturday i had some time to place the axle back on the chassis, yay, it rolls again!

Image

Yesterday evening i did some boring stuff, cleaning small bits and pieces, painting them etc. pieces ill never see again, but its easy to do now, and i might regret it later on if i didnt make them pretty.
This evening i took a big step and chopped 21 inches of the back of the chassis, no turning back now! But it looks like a TD frame now with the wheels at the rear! :D I also drilled the holes for the new position of the stands, about 20" forward, so the'll be at the front of the new deck, instead of somewhere in the middle. You can see the driversside mounted already, the other one lies on the front, where the tonguebox will be, the clamp marks the front of the deck.

Image
Image
User avatar
teddy
Donating Member
 
Posts: 93
Images: 187
Joined: Tue Jul 08, 2014 4:37 pm
Location: Holland

Re: Benroy style dutchie (now building the floor)

Postby teddy » Thu Sep 18, 2014 2:08 pm

Last week the floor arrived, 3/4" coated plywood, 10 x 5', we call it "betonplex" or concreteplex as you would say, usually used to build reusable concrete pouring moulds.

Image

Today i cut it to size (woohoo, first sawdust!)

Image

Marked and drilled all the holes to bolt it to the chassis,

Image

and coating the sides and holes with CPES.

Image
Image
User avatar
teddy
Donating Member
 
Posts: 93
Images: 187
Joined: Tue Jul 08, 2014 4:37 pm
Location: Holland
Top

Re: Benroy style dutchie (now building the floor)

Postby teddy » Sat Oct 04, 2014 3:38 pm

Finished early with a clients car this morning, and suddenly i had the whole afternoon off!

So i printed an mounted the profile,
Image

trimmed it,
Image

and i couldn't resist to see what i would look like. What do you think?
Image
Image
User avatar
teddy
Donating Member
 
Posts: 93
Images: 187
Joined: Tue Jul 08, 2014 4:37 pm
Location: Holland
Top

Re: Benroy style dutchie (now building the walls)

Postby KCStudly » Sat Oct 04, 2014 4:48 pm

Looks great! I'm sure you wll find it very helpful to have done such careful planning right from the start. I have found it very useful on my build to be able to jump around and work on different things, while still knowing that everything will (should) fit when it comes together.

Good job. :thumbsup:
KC
My Build: The Poet Creek Express Hybrid Foamie

Poet Creek Or Bust
Engineering the TLAR way - "That Looks About Right"
TnTTT ORIGINAL 200A LANTERN CLUB = "The 200A Gang"
Green Lantern Corpsmen
User avatar
KCStudly
Donating Member
 
Posts: 9611
Images: 8169
Joined: Mon Feb 06, 2012 10:18 pm
Location: Southeastern CT, USA
Top

Re: Benroy style dutchie (now building the walls)

Postby rebapuck » Thu Oct 16, 2014 10:34 pm

Looks good to me. Keep us posted.
Judy
1966 VW camper
1967 VW singlecab
Image
User avatar
rebapuck
.
 
Posts: 2243
Images: 1
Joined: Thu May 14, 2009 1:55 pm
Location: Chapel Hill NC
Top

Re: Benroy style dutchie (now building the walls)

Postby dales133 » Sun Oct 19, 2014 4:27 am

Looks like a great design.
I'm in the process of building mine but keep changing track on body design(just finishing s ranch building my trailer)
Couple of questions .How wide is yours overall and are you installing guards or are your wheels tucked under like a more traditional caravan.
And I'd love a copy of your side plan to have a look at and show the minister of war and finances for approval if it isn't to much hassle.
Keep up the good work! Cheers dale
User avatar
dales133
4000 Club
4000 Club
 
Posts: 4605
Images: 1
Joined: Mon Oct 13, 2014 5:26 pm
Top

Re: Benroy style dutchie (now building the walls)

Postby teddy » Sun Oct 19, 2014 5:44 am

Im not doing much work on the TD at the moment, time is scarse, just a bit of sanding here and there so the router will follow nice and straight, and buying parts and materials. So no huge updates at the moment.

Dales133,
I've posted a full scale PDF here for you
The with overall will be 192 cm (6' 4"), with of the body 150 cm (5 feet) Length overall about 410 cm (13' 5") and a bodylenght of 294 cm (9' 8")
The wheels will stay outside the body like in the picture, but a fender will be atached. The image in my first post i made in this thread is still quite acurate, except for the arc in the rear, which accounts for the extra 14 cm (6"). If you need other images or more info, don't hesitate to ask.
Image
Image
User avatar
teddy
Donating Member
 
Posts: 93
Images: 187
Joined: Tue Jul 08, 2014 4:37 pm
Location: Holland
Top

Re: Benroy style dutchie (now building the walls)

Postby dales133 » Mon Oct 20, 2014 6:14 am

Thanks for the response! I'll check out your p do.
I just posted my trailer build pics today.. I'm excited [WHITE SMILING FACE]
User avatar
dales133
4000 Club
4000 Club
 
Posts: 4605
Images: 1
Joined: Mon Oct 13, 2014 5:26 pm
Top

Re: Benroy style dutchie (now building the walls)

Postby teddy » Sat Oct 25, 2014 12:50 pm

Off to the store today, and got me some plywood for the interior sidewalls.

After a short fight involving a hammer i got my router to do as it's told, and presto!
Image

(I needed the hammer to convince the routerbit it would fit in the collar made for 6 mil, as my bit had a 6.3 mil shaft)
Last edited by teddy on Sat Nov 01, 2014 5:09 pm, edited 1 time in total.
Image
User avatar
teddy
Donating Member
 
Posts: 93
Images: 187
Joined: Tue Jul 08, 2014 4:37 pm
Location: Holland
Top

Re: Benroy style dutchie (now building the walls)

Postby teddy » Sat Nov 01, 2014 5:08 pm

Stickframing the other way around.

Image

All out of clamps now, maybe ive got some time to continue next week, and get some more clamps. :-)
Image
User avatar
teddy
Donating Member
 
Posts: 93
Images: 187
Joined: Tue Jul 08, 2014 4:37 pm
Location: Holland
Top

Re: Benroy style dutchie (now building the walls)

Postby teddy » Tue Nov 04, 2014 5:26 pm

Woohoo, more clamps!

Image

And 2 coats of CPES on ther interior side of the first wall.

Image

It looks a lot better now, the woodgrain really shows, and its a lot warmer. But im wondering, do i need to varnish it? Its inside, so not really any sunlight.
Image
User avatar
teddy
Donating Member
 
Posts: 93
Images: 187
Joined: Tue Jul 08, 2014 4:37 pm
Location: Holland
Top

Re: Benroy style dutchie (now building the walls)

Postby noseoil » Tue Nov 04, 2014 8:02 pm

Hi Teddy, I'm curious about the thickness of the wall. What is the outside skin going to be & it looks like you will be using something like 20mm insulation? Total wall thickness? Thanks, tim
Build log: viewtopic.php?f=50&t=60248
The time you spend planning is more important than the time you spend building.........

137905
User avatar
noseoil
1000 Club
1000 Club
 
Posts: 1820
Images: 669
Joined: Sun Apr 27, 2014 8:46 am
Location: Raton, New Mexico, living the good life!
Top

Re: Benroy style dutchie (now building the walls)

Postby teddy » Wed Nov 05, 2014 4:55 am

Hello Tim, Its going to be a total thickness of around 30 mm. 5,3 mm inside skin, 22 mm insulation and frame and on the outside 3,2 mm aluminium sandwich panel.
Image
User avatar
teddy
Donating Member
 
Posts: 93
Images: 187
Joined: Tue Jul 08, 2014 4:37 pm
Location: Holland
Top

Re: Benroy style dutchie (now building the walls)

Postby teddy » Tue Dec 23, 2014 2:55 pm

time for an update, it's been a while, but im still around, time was just a bit scarce lately.

I wasn't happy with my plan to bolt the stands directly to the floor, afraid it would sag sooner or later, so i made a beam to go underneath the floor and chassis, so most of the upwards force would be done to the chassis instead of the bolts holding the floor to it.

Image
I routered the thickness of the chassis off the plywood, and made a channel in it to fit the lip of the chassis in.

Image
While is was at it, chamfered the visible edge of the beam.

Image
Fits like a glove, just temporary, i need shorter bolds and it needs a bit of sealant to prevent moisture and dirt getting stuck between the layers.

Image
the first beam that did not fit too well ( the router bit slipped out of the collar, resulting in a way to deep cutout) turned in a stand so i could work at a much more comfortable height.

Image
Then i made 2 fake wall pieces so i could make the roof spars exactly to length,

Image
with this little setup i ensured every spar was exactly the same length.

Image
I also build a styrofoam cutter for the insulation of the walls and roof.

Image
and both sidewals are done, without all the mess you get when cutting foam with a knife.

Slowly but steady i'm getting there, although my timetable is quite messed up already, May is rapidly coming closer now, but as long as the frost keeps away from my part of the world i might make it. Anyway, happy hollidays everyone! :beer:
Image
User avatar
teddy
Donating Member
 
Posts: 93
Images: 187
Joined: Tue Jul 08, 2014 4:37 pm
Location: Holland
Top

PreviousNext

Return to Build Journals

Who is online

Users browsing this forum: bdosborn and 12 guests

cron