Our first build - a vardo

...ask your questions in the appropriate forums BUT document your build here...preferably in a single thread...dates for updates, are appreciated....

Re: Our first build - a vardo

Postby Big Pavel » Sun Feb 28, 2016 1:46 pm

Very very beautiful! Has done a great work on the trailer. Bravo! :applause:
User avatar
Big Pavel
Teardrop Inspector
 
Posts: 20
Joined: Wed Feb 24, 2016 4:25 am
Location: Belarus, Minsk

Back to work!

Postby lgatlin » Thu May 26, 2016 12:03 am

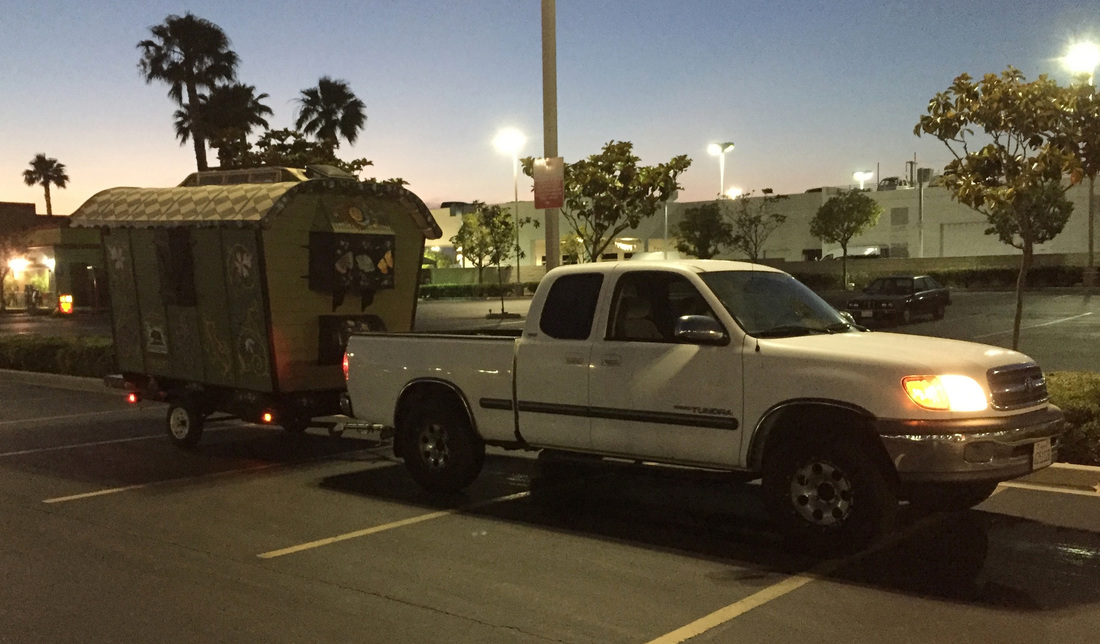
yikes - it's been awhile since we updated -- haven't been working on the vardo because I've been terribly busy at work and my husband Dale has been having a lot of medical issues. So other than using the vardo to store our patio cushions on rainy days - :) -- we haven't done much. But we got working again this week.

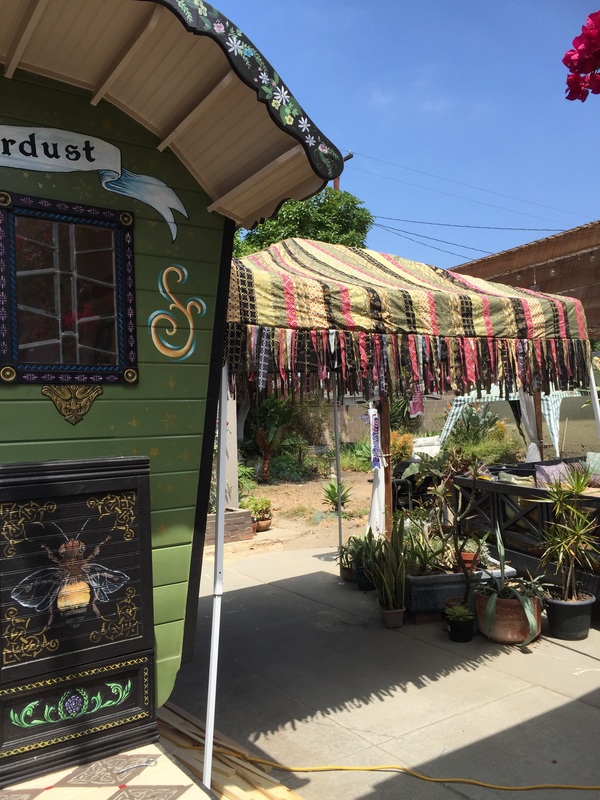
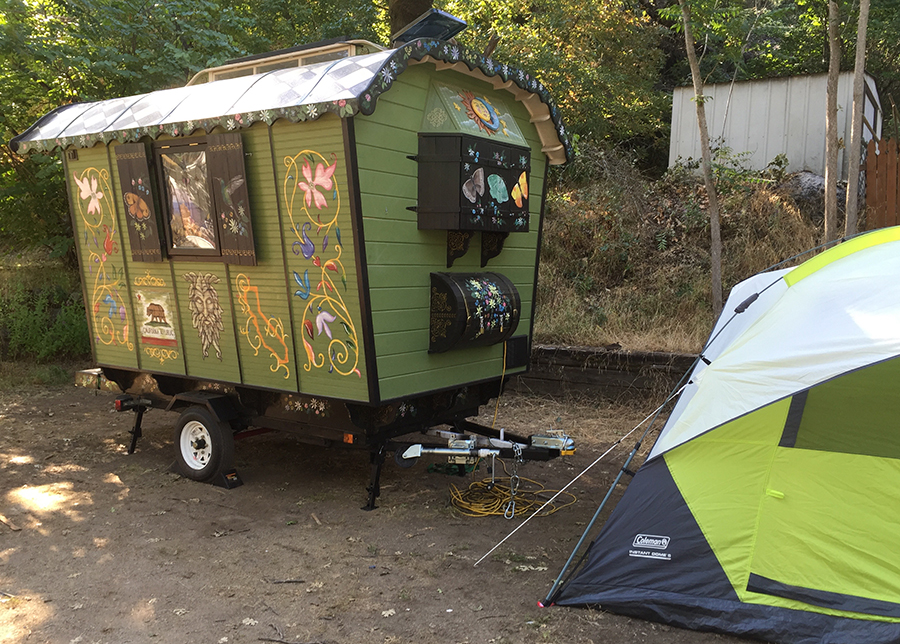
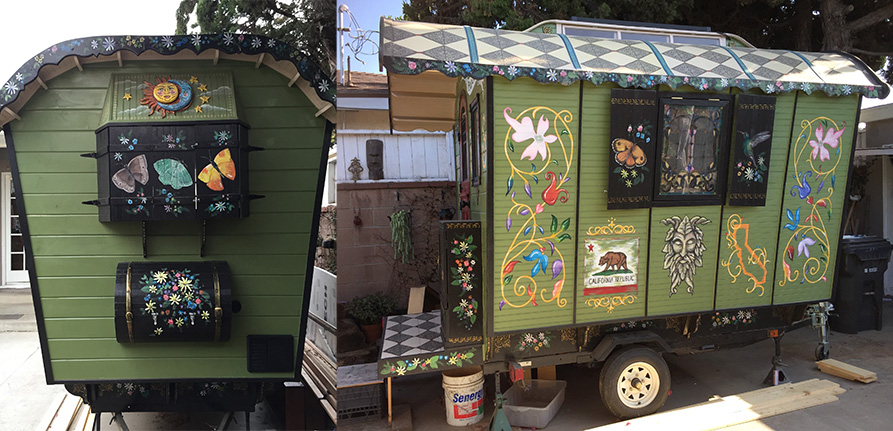
I added two storage boxes this week -- one on each end. A battery box that I wanted to look like a half-barrel. Image Image
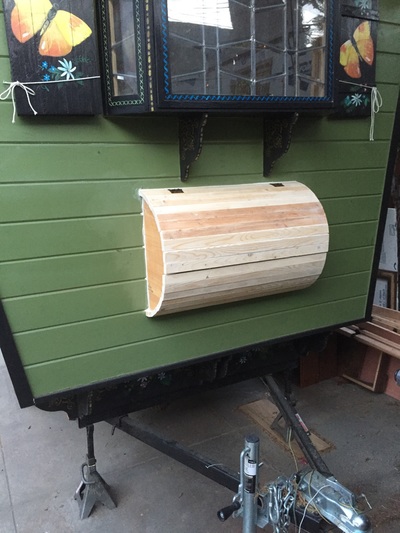
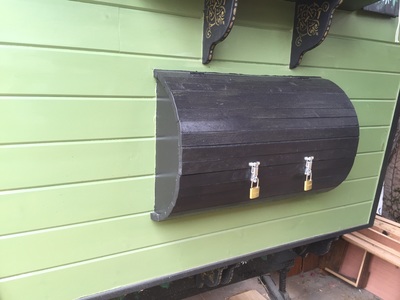
This is before I painted. Here it is with latches and a coat of black paint. I'm looking for a couple of old leather belts to go around the ends and this week, I'll get some decorative paint on it.
Image

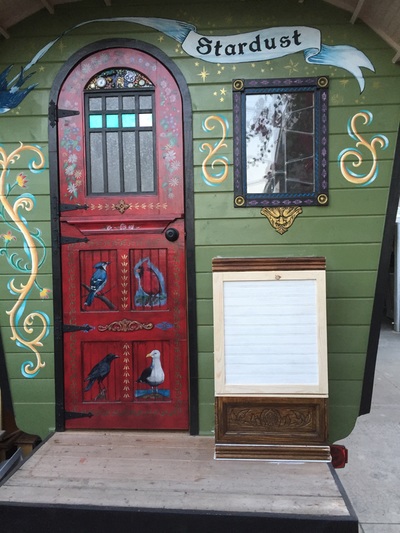
Then I built a box on the deck, pieced together from old furniture parts. This is before the paint job.
Image
This is to hold our cookstove, small bottles of propane, and a cast iron skillet and cooking implements. Here it is all painted out:
Image
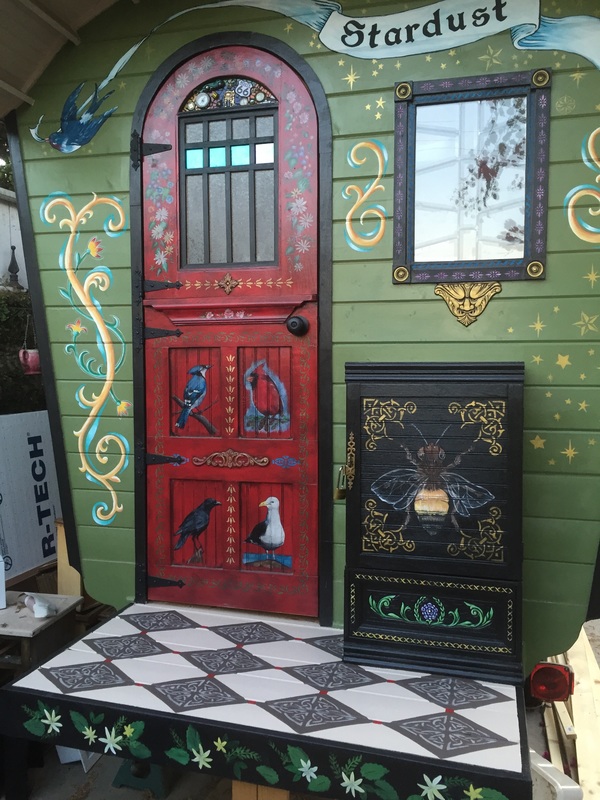
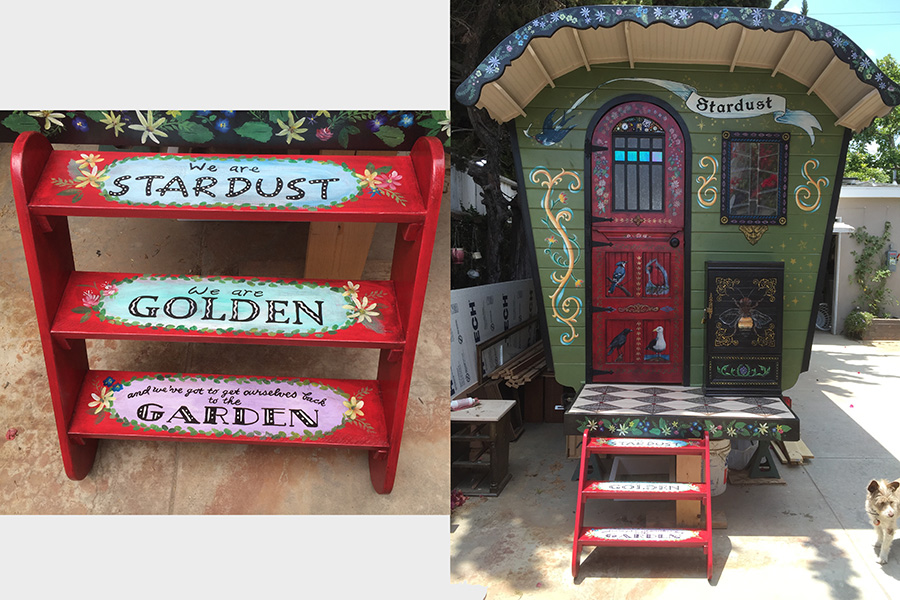
While I was at it, I painted the deck. Still have a few flowers to add to the black border on the bottom, then a good couple of coats of varnish over the whole thing. I've also made a ladder but it's only half painted.

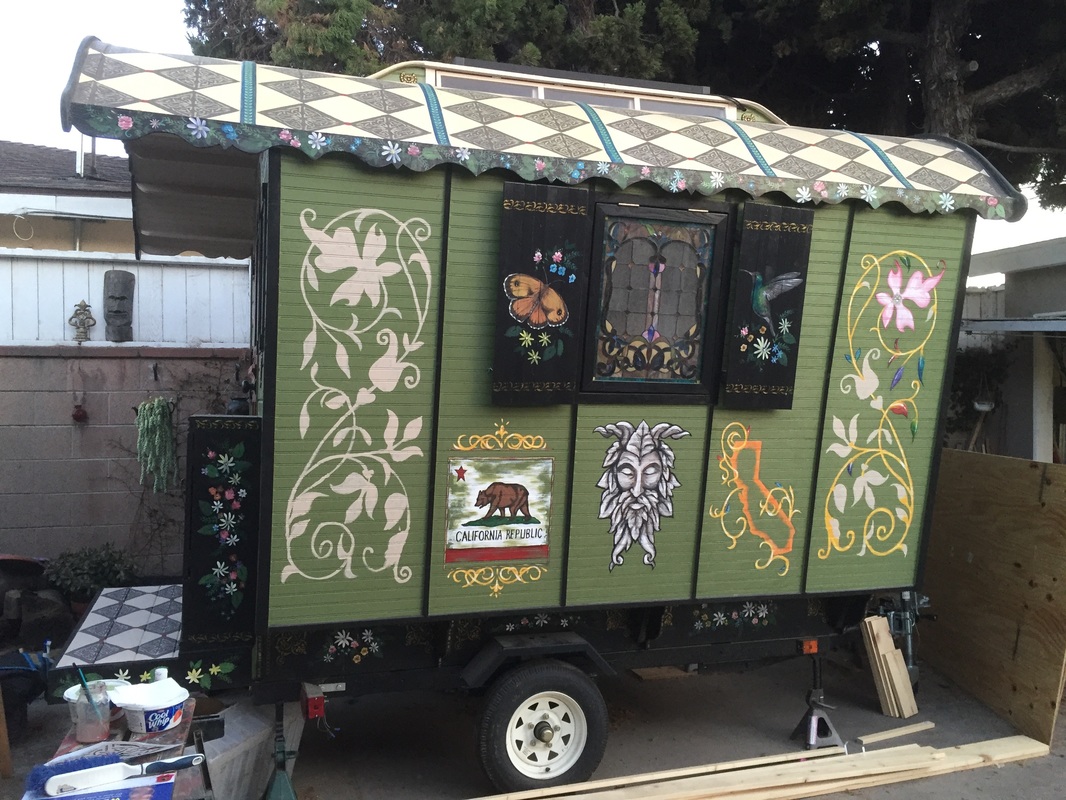
I also got a good start on the last side -- got the California flag and state done, after I took this picture, I thought I needed to tone down the center green man, so I gave it a glaze of green to tint it. I should get the large panels done in the next day or two.
Image

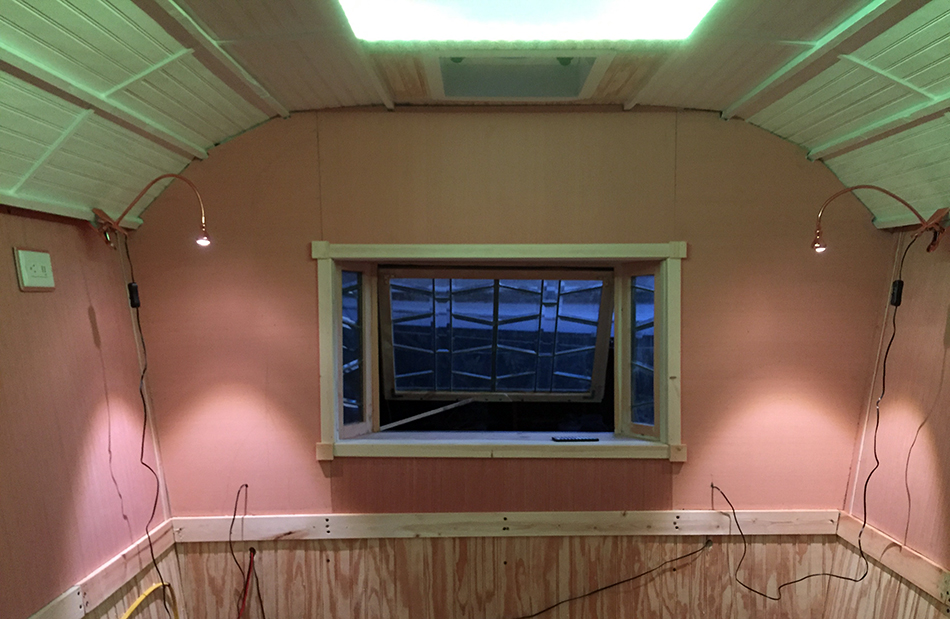
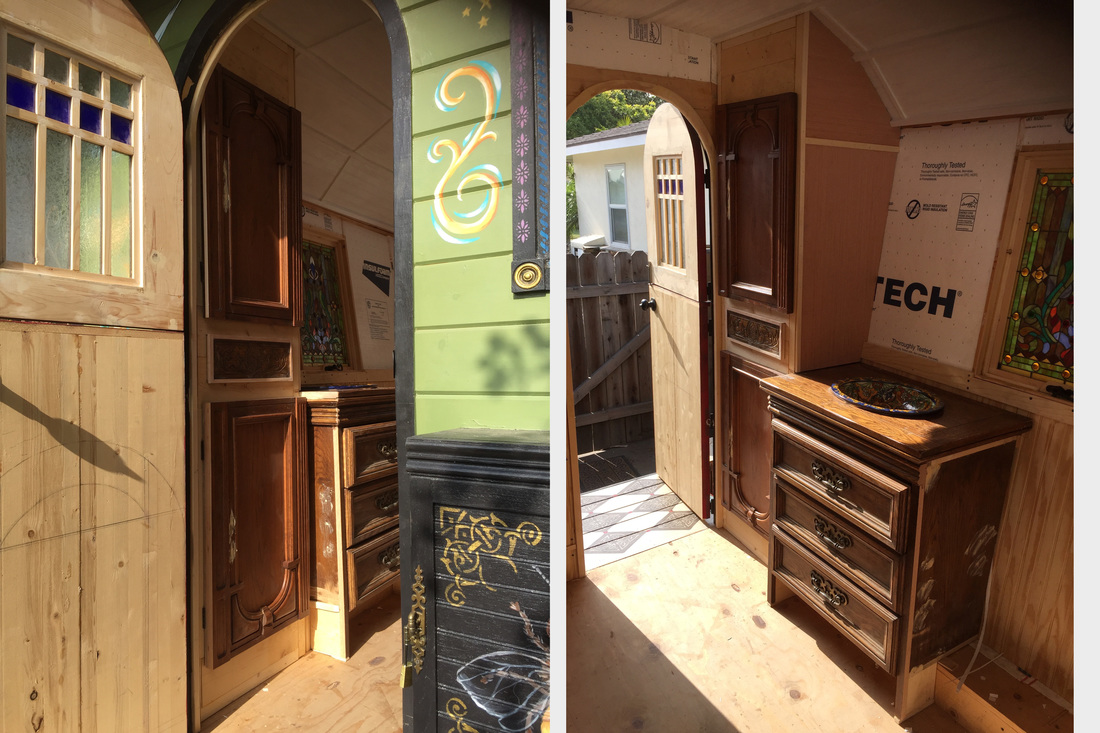
Tomorrow, we start on the interior. We've got a lot of parts ready, just need to kick into gear. Gosh, it's great to have a couple weeks off work!
User avatar
lgatlin
Teardrop Advisor
 
Posts: 63
Images: 27
Joined: Mon Jun 29, 2015 3:29 pm
Location: Long Beach, CA

Re: Our first build - a vardo

Postby S. Heisley » Mon May 30, 2016 7:24 pm

It's a joy to watch all your efforts come to life. Thanks very much for sharing! It's all beautifully done. :applause:

PS. Whenever you update your thread, I send the address to my sister in Maine (She's an artist/tole painter) so she can watch too!
User avatar
S. Heisley
Super Lifetime Member
 
Posts: 8772
Images: 495
Joined: Mon Sep 17, 2007 10:02 am
Location: No. California
Top

Re: Our first build - a vardo

Postby Falcongirl » Wed Jun 01, 2016 3:54 pm

I love reading this thread. Someday, I will have a Vardo. First we have to finish the practical camper, but possibly next year I'd like to build something to use at SCA events as a towable merchant booth. Dare to dream..
User avatar
Falcongirl
Teardrop Builder
 
Posts: 38
Images: 61
Joined: Wed May 25, 2016 5:41 pm
Top

Interiors

Postby lgatlin » Thu Jun 02, 2016 5:33 pm

While my husband is working with getting the electrical in place, I've been working on the interior fittings. I built a nice storage cabinet just inside the door, and the sink cabinet is right next to it. Next will be a short seat before the bed - I'm waiting until he gets all the electrical figured before I go with that half of the floor plan. Across from the storage cabinet is our small mini-fridge, then a long bench before the bed. You can see how I've pieced all this together from discards of the furniture I picked up free off Craigslist, and some lumber scraps. Just finished running the plumbing -- I'll add pics later to show the convolutions to get the sink set in.

Image

I also finished painting the decoration on the sides - and the barrel battery box. Found some leather belts at a garage sale to add to the look - they unbuckle to open. I probably have more swirls to add on this end to match the other end, but I'm going to wait until we get all the hookups installed so I don't interfere with them. You can see the electric on the bottom right of the back end.

Image

And of course, using that milk carton as a step just isn't going to cut it, so I made a little ladder to get in/out. I added the lyrics from a Joni Mitchell song - "Woodstock" - which is one of the two reasons we named this little vardo "Stardust".

Image

So we have to hustle over the weekend to get it habitable - we have friends coming next week and we want to take it out for a spin. I got insurance last night so we're covered, although I need to get it plated, too! Oops, details. Gotta get hustling!
User avatar
lgatlin
Teardrop Advisor
 
Posts: 63
Images: 27
Joined: Mon Jun 29, 2015 3:29 pm
Location: Long Beach, CA
Top

Re: Our first build - a vardo

Postby S. Heisley » Thu Jun 02, 2016 6:24 pm

:applause: As usual, it's looking more and more beautiful! Can't wait to get a closer look at that sink! :o

:thinking: I assume that you are using an AGM style battery as I don't see any venting for an acid style battery. It that correct?
User avatar
S. Heisley
Super Lifetime Member
 
Posts: 8772
Images: 495
Joined: Mon Sep 17, 2007 10:02 am
Location: No. California
Top

Re: Our first build - a vardo

Postby OP827 » Thu Jun 02, 2016 9:23 pm

What is the other reason? Amazing work, wow.
User avatar
OP827
Donating Member
 
Posts: 1553
Images: 405
Joined: Fri Apr 25, 2014 7:27 pm
Location: Bruce County Ontario
Top

Re: Our first build - a vardo

Postby lgatlin » Thu Jun 02, 2016 9:34 pm

OP827 wrote:What is the other reason? Amazing work, wow.

Stardust by Hoagy Carmichael. Who was born in Indiana, same as my husband. So, hippie meets Hoosier.

The nightingale
Tells his fairytale
Of paradise, where roses grew
Though I dream in vain
In my heart, it will remain
My stardust melody
The memory of love's refrain
User avatar
lgatlin
Teardrop Advisor
 
Posts: 63
Images: 27
Joined: Mon Jun 29, 2015 3:29 pm
Location: Long Beach, CA
Top

More interior

Postby lgatlin » Sat Jun 04, 2016 11:18 pm

We are getting a lot done this week. We have run the electrical, built in most of the furniture, but still have a ways to go on getting the interior ready to use. Of course, I'll add LOTS of detail after the basics are installed, but right now we're focusing on getting it usable since we have some friends coming out and we'd like to take it a trip!

I spent the week getting the interior paneled and we've got that laid in, but lots of caulking and trim to go. We have our shore power working with 4 outlets, but most of the time we'd like to depend on our solar panel and the 12v, so the lights and fan are running on that. We installed the fantastic van, and because we installed it on a curved part of the roof (talked about that here: http://www.tnttt.com/viewtopic.php?f=50&t=63977&start=60#p1162546) we had to modify the interior fitting. As it turned out, the thin ply we were using for the walls fit neatly into the channel, and so we made a quick extension with that. A little white paint and you'd never even notice it. Still could use a little caulk --
Image

But it's working fine. I also got almost all the plumbing for the drain done, although I haven't gotten the sink permanently installed yet - I am waiting for the faucet I ordered to arrive, it'll be easier to install that before I get the sink in, but here's how it's looking:

Image

saw dust all over the place --

and here's a view of the plumbing under the counter:

Image

Now that I look at it, I might need to slant that pipe across the back downwards a little more. I ran the drain to the rear of the cabinet and out the side, then cut down the top drawer to go around the pipes.

Image

The bottom of the drawer is still there so it will slide in and out easily, but I cut down the sides so it doesn't hit the pipe in the back. The drain line runs along the left side of the sink in a space between the sink cabinet and the storage cabinet. This is the cool little faucet I'm waiting on - it'll go in the corner on the top left, with the water line running in from the same space that the drain is located in. I'll get pictures when it's all in.

Image

On the other side is the mini-fridge box, and there will be a bench next to it, but we're going to get the bed section in first, and fit the bench in between. I've got the ledger there for the bench seat, and we left open the bottom part of the fridge box to allow air circulation (there's also dead space on the outside wall for circulation).

We got a couple of these small clip on lights at IKEA, they're 12v but come with an adapter for 110v, we just threw that out and hard wired them into the panel. I've got shelves and all kinds of storage to go here, but that'll get there. We also added a 110 outlet that has a couple of USB lines. We're also adding some USB ports but they haven't gotten here yet.

Image

We also ran a string of LEDs around the skylight. My husband likes these, they're programmable and have color effects and stuff. The wiring is still all over the place, tomorrow we'll get it all reigned in and tacked down neatly. We could use a nice long shelf over the window, that'll come later. The walls will just be plywood until I get back from going out of state in July - then I'll start adding all the details, wallpaper and decorative paint.

Tomorrow, we've got to get that bed cabinet done!
User avatar
lgatlin
Teardrop Advisor
 
Posts: 63
Images: 27
Joined: Mon Jun 29, 2015 3:29 pm
Location: Long Beach, CA
Top

Re: Our first build - a vardo

Postby S. Heisley » Sun Jun 05, 2016 5:38 pm

Amazing! ...Love the sink and it is perfect, sitting next to that stained glass window.
:o ...Never saw a faucet like that one. :o
I am grateful that you graced us with your build thread. I think your skills are way above what many of us do.
User avatar
S. Heisley
Super Lifetime Member
 
Posts: 8772
Images: 495
Joined: Mon Sep 17, 2007 10:02 am
Location: No. California
Top

maiden voyage

Postby lgatlin » Sun Jun 05, 2016 11:53 pm

S. Heisley wrote:Amazing! ...Love the sink and it is perfect, sitting next to that stained glass window.
:o ...Never saw a faucet like that one. :o


I know, it's cool, isn't it? I got it on amazon.
I actually bought another little faucet that I might put on the back next to the cook box --
Image
it was only $11 on amazon. I think it might be nice to have water outside for washing off feet, cooking stuff. I was hoping to use it at the sink, but it's too short. I like the sink next to the window, too - the colors go nicely!

Today, we took ol' Stardust out for her first spin --
Image
we have a DMV appt in the morning to get plates. I'm hoping we can get some black/gold CA plates for it. Anyway, we thought we'd be sure all the lights are working and all -- so we hooked it all up and drove around the neighborhood. Drives just fine and we're almost ready to take off for a little trip.

Still getting the interior ready, I have the bed frame 75% done but I'll get it completed in the morning and take some pics. I painted the ceiling (again!) today, and we picked up a mattress and cut most of the parts to finish up the bed. Pressure's on - we want to get it ready to go. Last week I made a new cover for a pop-up canopy:

Image
I need to get some better legs for it, I'm going to pick up some pvc pipe and sew covers for them so they look a little more cohesive with the fabric choices. I can also put it up a little higher to meet the roof line, which would look nice, too.

More pics to come tomorrow!
User avatar
lgatlin
Teardrop Advisor
 
Posts: 63
Images: 27
Joined: Mon Jun 29, 2015 3:29 pm
Location: Long Beach, CA
Top

Re: Our first build - a vardo

Postby noseoil » Mon Jun 06, 2016 7:47 am

Do they require a weight slip in your state for the license plate, just wondering about the rolling weight at this point? Great build & attention to detail on this one guys. Looks like a small rolling palace!
Build log: viewtopic.php?f=50&t=60248
The time you spend planning is more important than the time you spend building.........

137905
User avatar
noseoil
1000 Club
1000 Club
 
Posts: 1820
Images: 669
Joined: Sun Apr 27, 2014 8:46 am
Location: Raton, New Mexico, living the good life!
Top

Weight and the first trip

Postby lgatlin » Thu Jun 16, 2016 2:12 pm

noseoil wrote:Do they require a weight slip in your state for the license plate, just wondering about the rolling weight at this point? Great build & attention to detail on this one guys. Looks like a small rolling palace!


California did not require a weight slip, although we did get one for our own knowledge - 1510 pounds, more than I wanted by about 200#, so we may have to make a few interior changes. Our trailer is rated for 1750#, so no problem really there, but it would be nice to be a little lighter. I don't know how other states do it, but we drove it over to the DMV where they did a VIN # check and asked us various questions. Mostly they were really curious and the inspector wanted to know if he could take pictures :). It was $40 for a permanent plate, meaning we don't have to renew or anything, one plate for life, so that's nice.

Our first outing actually ended up being quite a trip - we had friends from the midwest come out, and they wanted to go to Sequoia Natl Park, Yosemite, and Muir Woods. A total of 1064 miles round trip. Handled just fine on the back roads and freeway, no problems there. Sure did draw a lot of attention at the gas stations and stops along the way.
Image
Image

The interior is just serviceable right now - the walls, bed, sink, cabinets are in and have a coat of paint (only one!) - not the walls, they'll be getting wallpaper, so I don't have pics just yet - our friends came and we still had some last minute adjustments to make it ready to roll, so I didn't take time to snap photos yet, but this is one from our trip that I sent to my daughter, of us playing cards on the bed one night:
Image
my husband Dale on the left, me on the right, unfinished walls and trim all over. We alternated sleeping in the tent and vardo, although the vardo is MUCH nicer and the mattress is fabulous and the fan and the fresh breeze is just great. our friends are not really campers, so they opted for a hotel on our last night in San Rafael so they could get a hot shower, a little pampering and sleeping in before our last hike in Muir Woods.

We have a lot to do on the inside - screens are a must (we forget that there are bugs, because we live in Long Beach and we almost never have any kind of bugs outside in our area), and we need a few more upper shelves and hooks and curtains and things like that. I look forward to more travels in it, and I'll post as I get the interior looking a little more interesting.

I leave tomorrow for the midwest, so I won't get back to work on the interior for another few weeks, but I am looking forward to getting it looking better (rather, more to my taste which is kind of over the top!).

Here's a picture of us crossing over the San Francisco bay on the Richmond Bridge:
Image
User avatar
lgatlin
Teardrop Advisor
 
Posts: 63
Images: 27
Joined: Mon Jun 29, 2015 3:29 pm
Location: Long Beach, CA
Top

Re: Our first build - a vardo

Postby me&z » Thu Jun 16, 2016 6:41 pm

Wow! :applause: Been watching your build and enjoying your talent and creativity!

1000+ miles is quite the shake down trip. Looks as if you were having fun.
me&z
Teardrop Master
 
Posts: 128
Joined: Sat Apr 23, 2016 4:46 am
Top

Floor

Postby lgatlin » Sun Jul 10, 2016 3:27 pm

Got back from my trip back to the midwest to see my newest grandson -- he's a cutie, think we'll keep him. I drove back/forth, and got home on Friday night - Saturday we got busy and laid the floor for the vardo. We used stick-on vinyl planks, they seem to hold up well in different places, and they'll keep clean pretty easily. It took a couple of hours, and this morning I cut the shoe molding and went around the edges.

The floor was pretty grubby from our shake-down trip, so we wiped it down, sanded a little and looked for nail heads, etc, before using the air compressor to blow it off.
Image

We decided to run the planks back and forth instead of the long way, which was my choice. This as a result the heated text discussion I had with my husband while I was on the road back and he laid out different versions and sent me pictures. I grudgingly agreed the back-and-forth layout looked better. Score one for the husband. I have to let him win sometimes, I guess.

Image

Still needs a threshold and paint around the doorframe. And doors for under the bed.


Image

We still have doors to put on some nooks/crannies - under the sink cabinet for example, it needs a little cover for the bottom cubby. Originally I was also going to put a door under the fridge area, but we found it was a great place to put our shoes, so I think I'll leave that open for now. We also picked up a piece of foam last night so I can make cushions for the benches. Free from Craigslist, it's a king-sized mattress sans cover, so I am also going to make some new cushions for our patio furniture.

I never did post a pic of the sink/faucet - still need lots of finishing here, but I really like the sink area.

Image

I have to prime/size the plywood walls so I can hang the wallpaper this week. On my trip back from Indiana, I stopped at a bunch of thrift stores and picked up miscellaneous things for the interior - mostly shelves and a nice carriage lamp for the back. I look forward to getting the inside looking on a par with the outside!
User avatar
lgatlin
Teardrop Advisor
 
Posts: 63
Images: 27
Joined: Mon Jun 29, 2015 3:29 pm
Location: Long Beach, CA
Top

PreviousNext

Return to Build Journals

Who is online

Users browsing this forum: No registered users and 24 guests