Re: Wandering First Build - Finally Going Again

...ask your questions in the appropriate forums BUT document your build here...preferably in a single thread...dates for updates, are appreciated....

Re: Wandering First Build - Doors!

Postby Prototear » Mon Jan 25, 2016 2:04 am

Thanks for the encouragement, Noseoil!

I made progress on the second door (actually a couple weeks ago but fell behind in the journal).

I made some more hinge spacers....this shows the rough cut that led to lots of bench grinding...
Image

Tapping the screw holes for hinges in the brackets that were installed within steel frame long long ago (in a garage far far away)....
Image

The second door fit right on the first attempt! 8)
Image

I have ordered some strike plates now that I know how the doors will lay into the opening so I am waiting for them to arrive.

Meanwhile my friend Brian welded my aluminum frame for the the roof vent. I've made some progress on it (both good and not so good) and will have more on that posted soon but I haven't really started to assemble the main bedroom doors yet.
Steve
First Build: viewtopic.php?f=50&t=57021
User avatar
Prototear
Silver Donating Member
 
Posts: 161
Images: 412
Joined: Wed May 15, 2013 3:13 pm
Location: Lake Forest Park, Washington

Re: Wandering First Build - Doors!

Postby Prototear » Sun Feb 07, 2016 5:22 am

My latch plates arrived from eTrailer and I installed them last weekend. With my new phone I had to set stuff up to transfer pictures to my computer again so I didn't make a journal entry right away.

The latch plate worked better than I anticipated. :shock:
I set it back from the outside edge of the frame about 1/8" so that the door would close firmly and had to add a shim behind the conveniently placed lip on the plate. This picture is taken from the inside looking aft and toward the right side.
Image

I also captured a little video of the door working that I thought share, and also as a test as this is the first video I've posted.
https://drive.google.com/file/d/0B5uhvqhVZIamSmkxbzFxUXhJWTA/view?usp=sharing

I'm making progress on the main front doors and will post more on that soon.
Steve
First Build: viewtopic.php?f=50&t=57021
User avatar
Prototear
Silver Donating Member
 
Posts: 161
Images: 412
Joined: Wed May 15, 2013 3:13 pm
Location: Lake Forest Park, Washington

Re: Wandering First Build - Doors!

Postby KCStudly » Sun Feb 07, 2016 10:14 am

That has a nice solid sound to it! :thumbsup:
KC
My Build: The Poet Creek Express Hybrid Foamie

Poet Creek Or Bust
Engineering the TLAR way - "That Looks About Right"
TnTTT ORIGINAL 200A LANTERN CLUB = "The 200A Gang"
Green Lantern Corpsmen
User avatar
KCStudly
Donating Member
 
Posts: 9611
Images: 8169
Joined: Mon Feb 06, 2012 10:18 pm
Location: Southeastern CT, USA
Top

Re: Wandering First Build - Doors!

Postby Prototear » Sat Feb 13, 2016 1:33 am

Before I started to work the door installations I had also been working on a frame to support the Fantastic Fan (curved roof but need a flat surface) as shown in my mid-August entries. Yes, 6 months ago! :shock:

My friend welded the frame segments for me and I was preparing it for installation by grinding down some of the welds to keep the surface flat and to also drill holes for fasteners and the third brake light. After grinding the welds (probably more than I should) I used the router to cut a slot for the wiring and even with the frame clamped to a workstand, the router bucked and jolted the frame a bit and the shock cracked a weld. :x At least I saw one crack then it became more evident there and on other joints too. The welds were actually well done but all in the same plane and with the slight racking forces in that plane was more than they could handle.

I figured I might as well continue with the wiring and fastener holes so I wouldn't have to do them after it is repaired again and also made some gussets to maybe use in the corners to bridge the joint when fixing the welds.
Image

Here it is test-fit with the fan and light in place (later a trimloc seal will be used along the bottom edge of the frame with plenty of caulk or sealant along the inside edge).
Image

Image
Steve
First Build: viewtopic.php?f=50&t=57021
User avatar
Prototear
Silver Donating Member
 
Posts: 161
Images: 412
Joined: Wed May 15, 2013 3:13 pm
Location: Lake Forest Park, Washington
Top

Re: Wandering First Build - Doors!

Postby Prototear » Sat Feb 13, 2016 1:45 am

Now back to the doors, the main ones!

The outer skin will be glued to the honeycomb core using the same method as the smaller doors. Before doing so, I made adjustments for the fit, both to fit in the doorway and to look similar to the smaller doors with their cut off corners rather than the curved corners I originally planned. Fortunately, I have just enough spare room to make this work.

Before:
Image

After:
Image

Then glued and clamped:
Image

One door was glued up on Saturday and the other on Saturday. This weekend's mission will be to install at least one, maybe both.
Steve
First Build: viewtopic.php?f=50&t=57021
User avatar
Prototear
Silver Donating Member
 
Posts: 161
Images: 412
Joined: Wed May 15, 2013 3:13 pm
Location: Lake Forest Park, Washington
Top

Re: Wandering First Build - Doors!

Postby Prototear » Mon Apr 25, 2016 2:36 am

I've been busy building up the main side doors and it has (of course) taken much longer than planned. I've got 27 new pictures in my gallery to post here from the last ~10 weeks and it will take a few journal entries to get caught up.
:pictures:

The door skins ended up being an inch or too short with the top contour changes I made but this was no big deal since I had to add a band of tread plate along the bottom to trim the whole thing. I got some 5" bands of it and determined just how much overlap it needed for the left door and riveted it to the bottom of the door.

Since the doors will have an edge band with a bulb seal overlay, I had to feather the edges of both the tread plate and door skin to make the edge band fit with minimal lumps. I also ground down the raised tread pattern along the edge to reduce lumps under the edge band.
Image

Here's the back lower corner of the door skin (with the honeycomb panel glued to it).
Image

I cut out a notch in the tread plate to smooth out the lump in the feathered overlap and got some fender welting to add an accent above the tread plate. I already figured I'd need to welting on the fender mount so I figured I'd use it all along the sides too.
Image

I used a scrap of the edge band seal to make sure it lays well on the door edge.
Image

I then placed the partly built door in the doorway to see how it fit before going too far in case I overlooked something.
Image

This work was in mid-late February and I have been making progress when able and taking pictures, figuring I'd make entries here eventually but didn't think it would be 2 months later. :roll:
Steve
First Build: viewtopic.php?f=50&t=57021
User avatar
Prototear
Silver Donating Member
 
Posts: 161
Images: 412
Joined: Wed May 15, 2013 3:13 pm
Location: Lake Forest Park, Washington
Top

Re: Wandering First Build - Doors!

Postby Prototear » Wed Apr 27, 2016 1:34 am

With the outside of the door built up it was time to work on the inside of the door. The layers of the door (from outside in) are the 1/16" aluminum skin, the 1/2" honeycomb, a 1/2" wood perimeter frame with foam insert, a 1/4" layer of foam and the 1/4" (5mm actually) birch plywood skin. The thickness ended up as 1.51" total (probably one of the thickest teardrop doors around). The thickness was more than I originally planned but was driven by the need to get the door latch to align to the inside steel frame and because of the door edge bulb seal it stands out more that originally planned.

Here is the layout of the wood perimeter frame:
Image

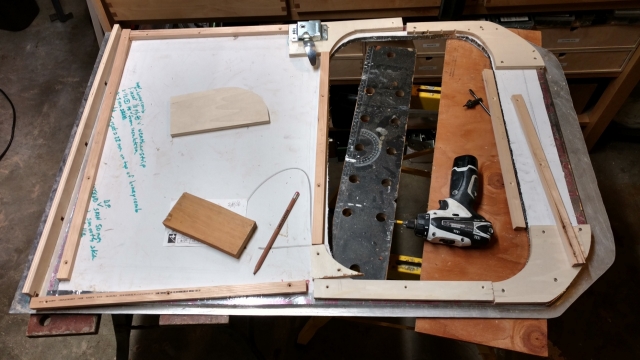
I had two reasons for the wood perimeter frame. First was to have a place to fasten the trim band around the door (its not easy to get fasteners into the edge of honeycomb or the edge of the door skin). I was also getting anxious about how well the bulb seal might hold up and keep water out. The door is extremely stiff and will lay against the wall having a steel frame so warpage or deflection will be minimal but I wondered about road spray and whether the seal might wear or dry out over the years. This lead to the second reason for the wood perimeter - I included a kerf cut in the edge of the frame to insert another door seal to fit inside the door jamb. Maybe I'm just being paranoid (and this thinking may be why it is taking so long to build this trailer). :frightened:

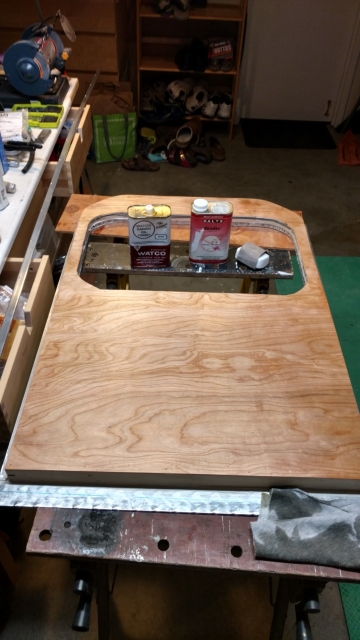
I left a larger area in the frame where the door latch will be mounted so it has a solid footing (just below the window on the far side in the picture). Here's the door with the 1/2" insulation in place after the wood frame was screwed to the aluminum honeycomb panel.
Image

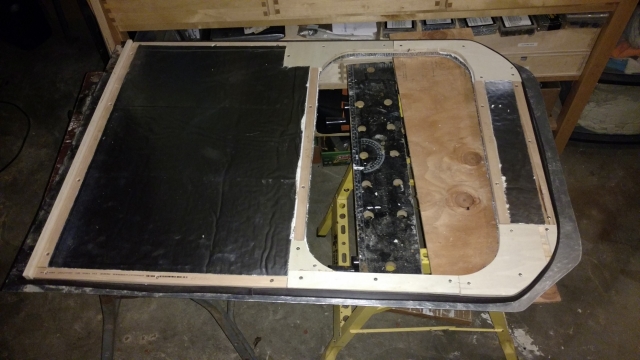
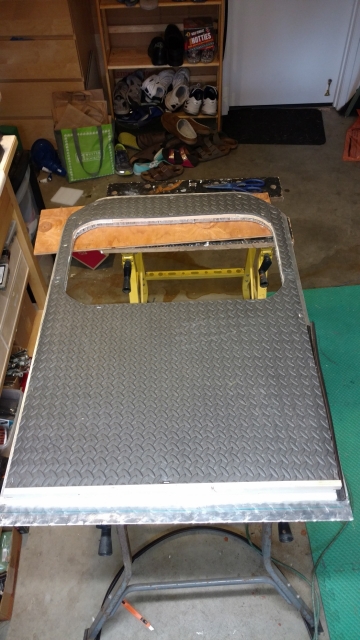
To get the door thickness just right for the latch alignment, I needed a light weight 1/4" something and settled on a cheap floor mat from Harbor Freight. One package provided just enough material for both doors and provides a little extra insulation over the wood perimeter frame, and it is just stapled in place to keep it from moving.
Image

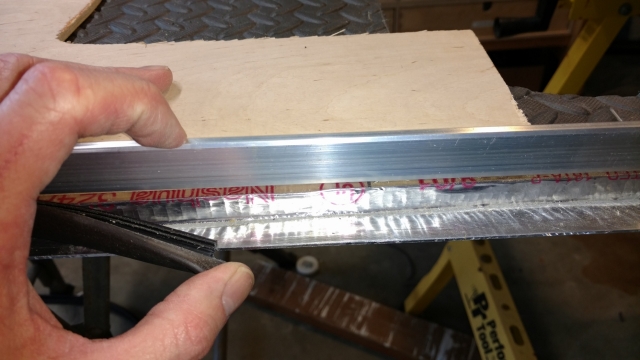
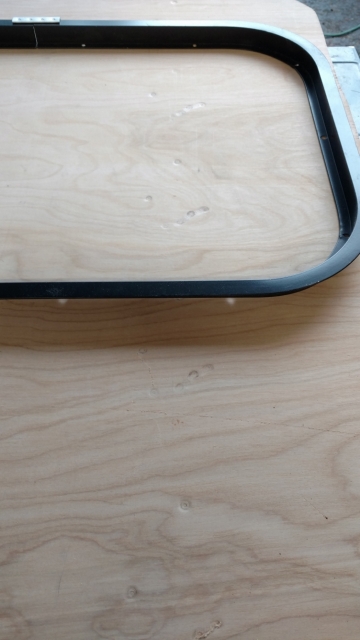
I checked the thickness with a scrap of the 1/4" birch plywood and the aluminum edging from Vintage Technologies I've had for almost 2 years. The saw kerf in the wood frame is exposed just below the aluminum edging but hard to see with all the shiny surfaces in this picture.
Image

The next layer is the plywood interior skin. I had cut out the whole interior side skins about 2 YEARS AGO and they have since been laying face down on the trailer floor, the right skin on top of the left skin. The backsides got scraped and even a few brown scorch dots from the little welding I did last year but the fronts were still clear. I had to clean out the inside of the trailer to move out materials, scraps, and parts to get to the skins so I could cut the door skin.
Image

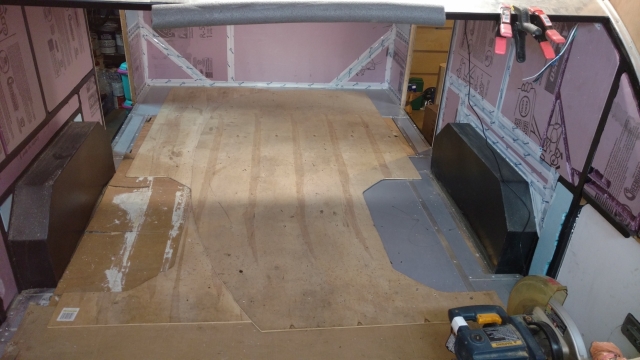
I propped the left skin up inside the trailer and outlined the doorway then cut it out with a jigsaw.

Since the skin was laying face down on the trailer floor build with rivets so there are dimples in the wood skin. They can be seen here within the window trim ring. Although these dimples will be cut out for the window, there were others that in areas that will remain.
Image

I was able to restore the flat surface almost completely using a trick I learned many years ago from a cabinet maker, using a hot steam iron to pump up the wood with steam blasting it until smooth. I did this on bare wood rather than stained to penetrate better and to avoid getting into trouble for possibly ruining the main household iron. 8)
This picture is actually from the right door done a couple weeks later but its the only picture I have of what I did. The ironing took only 10-15 minutes for all the areas on each door skin - I probably could have stopped sooner but I wanted to keep going until I couldn't get it to flatten any more and the last few minutes didn't make much difference.
Image

Here is the door skin with a natural stain installed trimmed.
Image

then placed in the doorway with the edge band seal installed to check fit. <edited to correct this last picture link>
Image


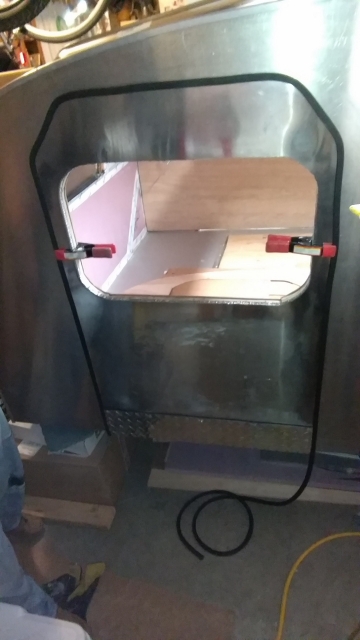
So far, so good (and so slow). My next entry will describe the "fun" I had with the windows in the door. :shock:
Last edited by Prototear on Wed Apr 27, 2016 6:30 pm, edited 1 time in total.
Steve
First Build: viewtopic.php?f=50&t=57021
User avatar
Prototear
Silver Donating Member
 
Posts: 161
Images: 412
Joined: Wed May 15, 2013 3:13 pm
Location: Lake Forest Park, Washington
Top

Re: Wandering First Build - Doors!

Postby KCStudly » Wed Apr 27, 2016 1:13 pm

Cool.

As I was reading about your dimples I was thinking I should suggest the steam iron trick, but then you beat me to it! :lol:

For future reference, I have my doors laying down inside the cabin good face to good face, protecting both from damage.
KC
My Build: The Poet Creek Express Hybrid Foamie

Poet Creek Or Bust
Engineering the TLAR way - "That Looks About Right"
TnTTT ORIGINAL 200A LANTERN CLUB = "The 200A Gang"
Green Lantern Corpsmen
User avatar
KCStudly
Donating Member
 
Posts: 9611
Images: 8169
Joined: Mon Feb 06, 2012 10:18 pm
Location: Southeastern CT, USA
Top

Re: Wandering First Build - Doors!

Postby Prototear » Wed Apr 27, 2016 6:32 pm

Thanks for the suggestion KC. :thumbsup:
Next time I'm in the trailer I'll put the 2 skins face-to-face and perhaps hold them together with a few pieces of tape to keep them sliding off one another.
Steve
First Build: viewtopic.php?f=50&t=57021
User avatar
Prototear
Silver Donating Member
 
Posts: 161
Images: 412
Joined: Wed May 15, 2013 3:13 pm
Location: Lake Forest Park, Washington
Top

Re: Wandering First Build - Doors!

Postby Prototear » Sun May 01, 2016 3:18 am

With the door placed in the doorway I checked my inner seal for clearance and it looked good on the left and right sides but a little irregular along top corners but maybe this can be improved with the trim I'll wrap around the doorway, and its a secondary seal (and I even have a contingency plan for a tertiary seal for the top edge of the door). This is the top rear corner of the left door looking from inside out.
Image

I installed the hinges on the door and discovered that I had an interference where I thought the hinge would barely fit. I searched for some other good looking hinge that didn't go as far across the door face and couldn't find anything I liked so I tried to cut out a curved notch in the hinge to accommodate the window frame and it worked pretty well. I cut back the corner of the hinge with an abrasive disk on an old beater chop saw then ground it on a wheel to curve it slightly and smooth it.
Image

The next step was to install the window in the door but I ran into a problem! :x The hole in the door was about 3/8" too tall so that I could seal either the top of the window or the bottom but not both, or a very lousy seal most (but not all) of the way around the window. I was puzzled how this could have happened and I even dug out my old OSB door templates to see if they matched and the template had the same error! Its hard to see the details in this picture but with the window along the bottom of the opening the top seal is visible from the inside (which is not laying against the outer door skin) and even leaves a gap in the corners.
Image

At this point I either need to plug the 3/8" gap in the opening or get a taller window and I figured it would be difficult to find standard windows that are just a little taller but the same width. The first attempt was to make the window opening shorter so I cut out a shaped plug to put along the bottom and jam it into the honeycomb. I cut the honeycomb back along the bottom and around the lower corners with my Dremel and a small cutting wheel. This cut out easily and I put a shaped piece of 1/2" plywood into the cutout with a taper to tap it into the honeycomb gap. Even with this new plug to fill the space the exterior skin still had a gap and I wasn't sure if I could get a decent seal against it since it left a 3/32" valley along the bottom edge of the window.
:?
Image

I wasn't really satisfied with the fit so I looked for windows slightly taller and got lucky! The windows I had were 24" w x 14" h and it seems that a more common size is just 1" taller at 24"x15". I also wasn't as excited about the silver window frame as I was 2 years ago so I ordered a pair of black windows from Frank at Vintage Technologies along with a pair of window trim rings of the right thickness for my thicker doors. They arrived just over a week later and I cut out my 3/8" plug plus about another 5/8" on the lower edge of the window opening. After triple-checking the measurements I used a piece of my older door template to lay on the door as a router guide and trimmed it back with a trim bit. With the pressure applied while trimming the template moved slightly but not so much that the window wouldn't fit yet again! This shows the trim from the left and right toward the bottom center of the window. My template was starting to move so I had to change the clamp arrangement.
Image

The new black window looks better that the silver one since there is now other black trim on the door. With the new black window extending down the door an inch more than originally planned it now interfered with the middle hinge so my options were to either cut out a similar notch in the hinge or move the hinge down slightly (moving the upper hinge away from the window opening was not an option but moving away from it here is an option). I was able to move it down about 1/4", just enough to drill a new set of clean mounting holes while hiding the original plugged holes within the boundary of the hinge so it is not visible. This shows how close it was before the new hinge holes were drilled, and it also shows some house window flexible flashing in the lower corners of the window to improve the overlap slightly for the seal (this was later trimmed with a knife after windows were tightened.
Image

Here's the door assembled with the new window and it won't be evident what the problems were and how much re-work it took do it. I am holding off installing the door knob & latch in case I need to place it in a spot slightly off from where I think it will go now - I'll figure that out when I install the door and it will simply be a hole for the shaft and not a complex cutout fortunately.
Image

I've also got a nice unused pair of 24" w x 14" h slider windows with silver trim available that I'll eventually post for sale.
Steve
First Build: viewtopic.php?f=50&t=57021
User avatar
Prototear
Silver Donating Member
 
Posts: 161
Images: 412
Joined: Wed May 15, 2013 3:13 pm
Location: Lake Forest Park, Washington
Top

Re: Wandering First Build - Doors!

Postby Prototear » Mon May 02, 2016 12:55 am

After getting the left door (mostly) done I started the right one and it went much more smoothly once I figured it out building the left one. I started by trimming the outer door skin & honeycomb panel (previously glued up) for the slightly taller window. This door skin/panel had suffered the same 3/8" error in the window cutout as the last one so it was easier cutting out the door skin/panel before building up all the other layers. I then cut out the right interior door skin from the larger wall panel (this all took place a couple weeks ago and I'm getting caught up here).
Image

I also had to steam iron out the dimples in the interior skin.
Image

Added the wood perimeter frame:
Image

Added the lower 5" tread plate trim band with the black welting as on the other door:
Image

After including the internal insulation layers, finishing the interior skin and wrapping the perimeter with the aluminum band from Vintage Technologies, I then inserted the secondary door seal in the kerf in the wood perimeter frame.
Image

Near the top corner of the door I apparently made the kerf too narrow and the seal would not go in with the gap too tight.
Image

So I cleaned out the kerf with a vibrating saw then wrapped the rest of the secondary seal around the door.
Image

Then checked it for fit in the right door opening.
Image

It fit wall along the forward and top edges but didn't go in along the aft edge as the secondary seal would not compress enough.
Image

But fortunately I built in a 1/4" spacer along both forward and aft edges that I can remove one or both to get plenty of room back.
Image

I decided to claim success and move on to building the hatch and deal with this door seal and clearance when I'm ready to install them. :P
I've got some other metal work and a little spot welding to do to get ready for that so I'll stay with simpler for now (since I am not ready to move the trailer out of the garage with all the sheet goods I have stored underneath it).
Steve
First Build: viewtopic.php?f=50&t=57021
User avatar
Prototear
Silver Donating Member
 
Posts: 161
Images: 412
Joined: Wed May 15, 2013 3:13 pm
Location: Lake Forest Park, Washington
Top

Re: Wandering First Build - Hatch!

Postby Prototear » Mon May 02, 2016 1:24 am

While waiting for the windows to arrive from Vintage Technologies I started work on the hatch frame. This shows a template rib to match the curve of the wall with just enough clearance to allow the cooler to fit underneath it to slide out the side doors.
Image

Image

Although the length of the curve of the outer side of the hatch is slightly over 48" the straight-line length is under 48" so I traced this frame on a 2'x4' piece of 5/8" birch plywood and there was enough room to make 8 ribs; I plan to use 2 ribs along the outer edges and 3 spaced along in between for a total of 7 so this will leave one extra in case I need it.
Image

My experience making multiple curved pieces consistent has been poor despite being very careful on a band saw and sanding, so my strategy was to cut only rough shapes to be finished later with a router tracing the template. :thinking:
Image

After making the template as close to perfect as I could with sanding and filling irregularities I attached it with screws to a rough rib and traced it using a trim bit on a router table (this actually happened today, so I'm getting my journal entries caught up!).
Image

Image

Here are the 8 new ribs along with the template. They will all need the ends trimmed for the top and bottom plates in the hatch frame but since I'm not sure exactly how much yet they are all a little long. I also managed to install the window on the right front door yesterday so this made a nice table for laying out everything. [fixed picture link 5/3/16]
Image

With the router table setup, I used a different bit to try to make some 3/8" aluminum spacers for the main door hinges. I find them difficult to make on a band saw and grinder due to their thickness and getting the aluminum hot when grinding it an fouling the grinding wheels. Using one of my best 1/4" door spacers that I had to give up for the rear side doors (as too thin) as a template to make my new spacers for the front doors, I countersunk 2 of the holes to fasten it to a piece of hardwood with the blank for the new spacer in-between. I also used the band saw to lop off the corners of the blank spacers to reduce the cutting burden on the router bit.
Image

Here is a trimmed spacer with my rig flipped upside down and the screws on their way out.
Image

I made 3 of these spacers with the stock I had at home and I still need to get a bar of 3/8" stock to make 3 more for the other front door. They still need some smoothing and polishing but they are coming along much better than the crude sawing and grinding I did for the other spacers. 8)
Last edited by Prototear on Tue May 03, 2016 11:05 pm, edited 1 time in total.
Steve
First Build: viewtopic.php?f=50&t=57021
User avatar
Prototear
Silver Donating Member
 
Posts: 161
Images: 412
Joined: Wed May 15, 2013 3:13 pm
Location: Lake Forest Park, Washington
Top

Re: Wandering First Build - Hatch!

Postby KCStudly » Mon May 02, 2016 8:42 am

Nice. The devil is in the details! :thumbsup:
KC
My Build: The Poet Creek Express Hybrid Foamie

Poet Creek Or Bust
Engineering the TLAR way - "That Looks About Right"
TnTTT ORIGINAL 200A LANTERN CLUB = "The 200A Gang"
Green Lantern Corpsmen
User avatar
KCStudly
Donating Member
 
Posts: 9611
Images: 8169
Joined: Mon Feb 06, 2012 10:18 pm
Location: Southeastern CT, USA
Top

Re: Wandering First Build - Hatch!

Postby Prototear » Sat May 07, 2016 3:38 am

To get ready for building the rear hatch I cleaned up my work area to make some room. I am also selling my windows that ended up being too small (or actually my window opening was too big). http://www.tnttt.com/viewtopic.php?f=18&t=66057

I also had to move my whiteboard out of a crowded spot and find a new spot but had no wall space so I removed the aluminum frame around it and cut it into 3 equal width pieces to fit into the panel doors on the old kitchen cabinets on the garage wall. I'll add a dry erase pen holder on the bottom of the right door; this spot is bare because I tore the corner of the whiteboard when pulling off the frame and had to cut it square, so I'll put the pens there in a way that they won't fall on the floor when we open/close the door. It would have been a perfect fit using the entire whiteboard (aside from 2 saw kerfs) if I hadn't torn the corner of it in the process. I'll update it with my to-do list and a list of materials I may need to buy.
Image
Steve
First Build: viewtopic.php?f=50&t=57021
User avatar
Prototear
Silver Donating Member
 
Posts: 161
Images: 412
Joined: Wed May 15, 2013 3:13 pm
Location: Lake Forest Park, Washington
Top

Re: Wandering First Build - Hatch!

Postby Prototear » Mon May 09, 2016 2:31 am

I started building the hatch frame by trimming the first rib ends square with the top and bottom pieces I temporarily placed in the hatch opening but I discovered that I needed a solidly attached board at least at the top to really get good lines for trimming the ribs. Because of this and reading other build advice to have the hinge first (obviously to do something with it) I decided to prepare the hinge first.

Since the trailer frame, walls and roof cross members are all made of welded steel tubing, there is a good strong 1x2" tube cross member for the hinge attachment. the only problem is that the welder I hired to install it (in summer 2013) installed it slightly un-square it had to be addressed before I could go any further. :x

Last summer I thought it might be only about 1/4" but I realize now that the end of the cross member is almost 5/8" further forward at the top of the left wall of where it attaches on the right wall, and the hinge attach surface is about 1" wide. I suppose I could have the hinge not perpendicular to wall but it leaves me wondering how reliably would my hatch open and close smoothly and would the 5/8" offset cause a lower corner to very noticeably poke over the side of the very flat lines of the trailer when opened all the way? I remember noticing a slight offset last year when installing the roof skin and figured I'd have to deal with it eventually - well, today was Eventually! Unfortunately, problems like this don't go away just because I put off dealing with it for several months.

I figured I'd get the hinge as close to square as I could by shimming it with a wedge and attaching it to the steel tube with rivets because they hold very tightly (and just need to have their heads drilled off if removal is necessary). When laying the hinge almost square across the trailer (as square as I figured I could make it) I'll need a shim about 0.4" wide at the left end. This left about 60% of the hinge surface over the steel tube with enough room to drill through the steel tube to hold the 3/16" rivets and get the heads inside the space between the ridges for the vinyl insert.

Here is the left end of the hinge showing the gap that I'll shim (the steel tube is half covered by the Tyvek tape):
Image

This shows that I got the hinge pretty close to square with the trailer wall:
Image

I held the right end tight against the steel tube with a cleco then added a few more clecos and kept checking that the hinge line was remaining straight by sliding the other half of the hinge. I ended up with about 4 clecos holding the hinge so I could get started on trimming the hatch ribs and building the frame.
Image

Here is a shim wedge. This will all be permanently attached later with sealant and rivets.
Image

I think I even have the option to put longer rivets through the vertical face of the hinge through the wedge into the 1" edge of the steel tube but I will have to check on the clearance for the rivet heads first (I think it will work so long as I don't have it coincident with the heads of the fasteners in the top of the hatch frame attachments. :thinking:
Steve
First Build: viewtopic.php?f=50&t=57021
User avatar
Prototear
Silver Donating Member
 
Posts: 161
Images: 412
Joined: Wed May 15, 2013 3:13 pm
Location: Lake Forest Park, Washington
Top

PreviousNext

Return to Build Journals

Who is online

Users browsing this forum: No registered users and 22 guests