The Poet Creek Express - Foamie Hybrid

Canvas covered foamies (Thrifty Alternatives...)

Moderator: eaglesdare

Re: The Poet Creek Express - Foamie Hybrid

Postby KCStudly » Fri Jun 24, 2016 11:08 pm

Thanks again Ned. :D

Well, family obligations have drastically hindered my plan to get a jump start on the next week of marathon build time. I spent this evening hoeing out my little corner of the attic in the house I grew up in. I won’t bore you with the details here, but suffice to say that it has been a long time coming.

The upshot is that it was like a ‘blast from the past’ going thru the toys, doodads, baubles and ephemera that one collects, and the memories that they evoke.

The best part was that I have been reunited with the single most highly valued possession that I own… and it happens to be a timeless piece of vintage camping equipment. See the details here: My Most Valued Possession.

Tomorrow will be more rummaging, and the family “estate” yard sale. If I survive that, Yvette and I have to go shopping for electronics, probably Sunday. Then I might be able to get back to working on the camper.
KC
My Build: The Poet Creek Express Hybrid Foamie

Poet Creek Or Bust
Engineering the TLAR way - "That Looks About Right"
TnTTT ORIGINAL 200A LANTERN CLUB = "The 200A Gang"
Green Lantern Corpsmen
User avatar
KCStudly
Donating Member
 
Posts: 9613
Images: 8169
Joined: Mon Feb 06, 2012 10:18 pm
Location: Southeastern CT, USA

Re: The Poet Creek Express - Foamie Hybrid

Postby KCStudly » Tue Jun 28, 2016 5:33 pm

Back to working on the camper and another small milestone achieved.

Yesterday was the first day of my vacation that I was able to dedicated to me, so I slept in a little and hung out some before heading off to Mecca. Between that and some more tripping down memory lane, going thru more relics from the attic that I had hauled home with me, I didn’t get much done on the camper.

I did sand those filled areas on the galley walls, and am leaning back toward routing the seal rabbets.

Today I got an earlier start and laid up the door skins. It didn’t go exactly as I had planned, but I think it will turn out okay. There were a few dings, and rough areas that wanted more filler, but rather than going back with more spackle, I decided to do a fairing coat with the 410 filler and epoxy. It isn’t intended for laminating, per se, but I figured it was certainly more stable and sturdy than the raw foam or spackle, so it should be fine.

I did both doors more or less at the same time. Once I had the skim coat on there and pretty well flat, I let that start to tack up some (for about 1-1/2 hrs using the slow hardener) before rewetting and laying the first ply of FG cloth dry on wet. Not having a second set of hands to stretch the cloth out at all four corners while placing it made things a lot more tedious, and not all of the fibers lined up perfectly, but I was at least able to get it to lie down flat.

This is where I deviated from the plan. Rather than wet each layer and let it set up some before moving to the next layer, I went straight ahead and laid the second plies on before the first ply had much of a chance to soak up thru. That made it a lot easier to position by myself because there was not much tack yet. Then I just wet thru both plies like I have done before, and being in the flat, everything seemed to go okay.

I wasn’t going to have time to wait around for it to tack up so that I could do the weave fill fairing, like I would have liked to, but that is the same situation as everywhere else, so no big deal. I was thinking I might get away with doing the filler in the AM, but we had a big front come in and it got more humid than I would have liked, so I am expecting plenty of amine blush.

Here they are after rough trimming the excess cloth and going back around with the cut down brush making sure all of the edges that I lifted during the cutting operation had laid back down properly.
Image
Image

Unlike the cloth draped over the edges, in the window openings and over the door latch pockets the cloth had enough tension in it that I was less concerned about it sluffing down and causing the adjacent threads to bend up (causing the dreaded bubble edge); so rather than upsetting everything by trying to trim these out, I left that for after the cure (hope it stays nice like I left it).

Tomorrow I’ll trim these up and probably route the galley wall edges, plus whatever else I can get done. Maybe work on the door latch hardware some more.
KC
My Build: The Poet Creek Express Hybrid Foamie

Poet Creek Or Bust
Engineering the TLAR way - "That Looks About Right"
TnTTT ORIGINAL 200A LANTERN CLUB = "The 200A Gang"
Green Lantern Corpsmen
User avatar
KCStudly
Donating Member
 
Posts: 9613
Images: 8169
Joined: Mon Feb 06, 2012 10:18 pm
Location: Southeastern CT, USA

Re: The Poet Creek Express - Foamie Hybrid

Postby GPW » Wed Jun 29, 2016 5:15 am

Nice !!! :thumbsup: 8)
There’s no place like Foam !
User avatar
GPW
Gold Donating Member
 
Posts: 14912
Images: 546
Joined: Thu Feb 09, 2006 7:58 pm
Location: New Orleans
Top

Re: The Poet Creek Express - Foamie Hybrid

Postby Lou.Catozzi » Wed Jun 29, 2016 2:16 pm

Hi KC. I'm fairly new to TNTTT and about a month ago as I wandered around I discovered the build forums and then your build and that has kept me entertained and informed for many hours. Such attention to detail! Wow!

My TD plans are still very soft and fluid but I am leaning towards custom trailer and hybrid walls and roof very similar to your design. I'm about 4 years from retirement :thumbsup: so hopefully I will get my TD designed and built by then.

we had a big front come in and it got more humid than I would have liked, so I am expecting plenty of amine blush


I was wondering about the amine blush you keep talking about as I have done a lot of fiberglass work in the past (high powered model rocketry) using the same West System products and do not remember anything that needed to be scrubbed off. Maybe it's just the dry conditions here in Texas or maybe I just didn't know any better.

Lou
User avatar
Lou.Catozzi
Teardrop Builder
 
Posts: 41
Images: 41
Joined: Wed Apr 20, 2016 3:54 am
Location: Round Rock, Tx
Top

Re: The Poet Creek Express - Foamie Hybrid

Postby KCStudly » Wed Jun 29, 2016 8:00 pm

Thanks for the nice words of encouragement! They are always appreciated. :D

West System User Manual (go to pg 30 of the .pdf / labelled pg 28 of the manual)

I have seen many people make the same claim about not having any issues with amine blush. However, for the most part I have always had some. Next time you do a lay up wash part of it and leave part. When you run your rubber gloved finger over the unwashed part it will feel slick. When you do the same over the washed and dried section it will drag.

In the past I would go over everything twice, washing with overlapping rows of circular scrubbing using the recommended greenie pad. For the door skins that I did today, I really flooded them good and went over them well before wiping.

As I understand it, the epoxy will continue to push amine out until fully cured, several days, so it is important to wash again before moving on to the next stage of finish.
Last edited by KCStudly on Sat Jul 09, 2016 10:44 pm, edited 1 time in total.
KC
My Build: The Poet Creek Express Hybrid Foamie

Poet Creek Or Bust
Engineering the TLAR way - "That Looks About Right"
TnTTT ORIGINAL 200A LANTERN CLUB = "The 200A Gang"
Green Lantern Corpsmen
User avatar
KCStudly
Donating Member
 
Posts: 9613
Images: 8169
Joined: Mon Feb 06, 2012 10:18 pm
Location: Southeastern CT, USA
Top

Re: The Poet Creek Express - Foamie Hybrid

Postby KCStudly » Thu Jun 30, 2016 12:14 am

Here is the curb side door after cleaning and trimming the outer skin layup, followed by the same thing done to the street side door.
Image
Image

Detail shot of the street side door latch pocket. Still have to epoxy coat the raw wood inside the pocket.
Image

A detail shot of the window recess after trimming and removing the masking tape. Still have to wet the ledge.
Image

On one of the doors (the first one I trimmed) I trimmed out the window opening roughly at first and then came back and did a detail trim. I guess I got a little loose with the rough trimming, and you can see the slight oopsie here where the crisp line of the FG edge is interrupted and will likely stand out grossly since it will be parallel to the dead straight edge of the window. On the second door I took a different approach and did the trimming all in one much more careful operation. I can probably fix this with flox if I cut a bit more away and build it back up.
Image

Next I dug out the windows from their storage crate and double checked fit.
Image

This is when I was reminded that the two “identical” windows aren’t so identical. The glass is not adhered to the frame the same on both windows. Fortunately I had fit each window to each door and offset the router jig to suit when I cut the recesses. I did, however, have a brief moment of near panic when the first window I tried didn’t even come close to dropping in. The glass is shifted at least 1/4 inch between the two windows. These pics show the curb side door with the correct match fit window.
Image

I was pleased that after adding the fiber glass skin the window glass is now actually just a hair below flush with the face of the door; whereas before the window glass was just slightly proud. This allows something (not much) for the planned RV putty. (In the previous pic it looks like the near corner of the glass is high, but that is an optical illusion due to the angle of the shot and the gap between the window glass and the edge of the recess.)

On the inside of the door it is a different story. The window unit is thicker than the door.
Image

In that shot you can also clearly see the slot, or groove that is formed into the thin sheet material. This is where the screws for the trim ring are supposed to go. That way the tips of the screws end up outside of the window “chassis”, in the void space of the RO, and the threads have a little more thickness to bite into because the groove is so narrow.

I forgot to take a pic of the supplied trim rings. They have a ‘Z’ profile and would only work with a much thicker door (was not specified in the flea-bay ad). They could also fit a much thinner door if inverted, but not my door.

So the plan is to make wooden shim rings to screw and glue to the inner door skins and pad the doors out so that flat trim rings can be used to secure the windows. Here I just laid the inner door pull/handle on to make sure that I don’t make the shims and trim rings too wide.
Image

I folded up a piece of the crepe foam packing sheet from the windows and put that between the window and table, that way I knew that the window was pressed up into the recess when the door was laid over the top of it. Then I used this little scrap with two pieces of the 5mm plywood to gauge how thick the shim would need to be. One isn’t enough and two is too much.
Image

What I need is about 5/16 inch thick. I considered resawing or planing a piece of poplar or maple into strips and then making radius blocks for the corners, but that quickly started to look tedious. I’ll swing by the ho-de-po on the way up tomorrow and see what I can make work easier; perhaps laminating 1/8 thk birch to the 5mm Okoume, since it will all be finished in black trim paint.

Next I used the OEM trim ring and copious measurements to come up with this sketch for the flat trim rings. Karl has a recurring job that requires 1/16 SS sheet to be laser cut into small intricate bits, and we figure those could be laid out inside of these rings, bundling the job, conserving stock usage and making the cost to have these laser cut much more reasonable.
Image

Train is rolling again.
Last edited by KCStudly on Sat Jul 09, 2016 10:54 pm, edited 2 times in total.
KC
My Build: The Poet Creek Express Hybrid Foamie

Poet Creek Or Bust
Engineering the TLAR way - "That Looks About Right"
TnTTT ORIGINAL 200A LANTERN CLUB = "The 200A Gang"
Green Lantern Corpsmen
User avatar
KCStudly
Donating Member
 
Posts: 9613
Images: 8169
Joined: Mon Feb 06, 2012 10:18 pm
Location: Southeastern CT, USA
Top

Re: The Poet Creek Express - Foamie Hybrid

Postby Ned B » Thu Jun 30, 2016 4:54 am

User avatar
Ned B
1000 Club
1000 Club
 
Posts: 1036
Joined: Sat Apr 16, 2011 10:25 am
Location: Syracuse NY (ish)
Top

Re: The Poet Creek Express - Foamie Hybrid

Postby KCStudly » Thu Jun 30, 2016 9:18 pm

One of the reasons I was reluctant to do the hatch seal rabbet on the galley walls was the fact that I thought I would need to use the bigger router for the relatively large rabbeting bit. When I mocked that up and did a dry run it was awkward to hold the router to the face of the wall and I didn’t have confidence that I wouldn’t screw up and have a major boo-boo (even though major boo-boo's can be fixed if need be).

However, I thought twice and tried the cutter on the small trim router using the homemade base and the slowest speed, and it worked great.

Because I already have the full 1/4 inch gap (or more on the curb side :roll: ) between the hinge spars, I needed to use a temporary stop to prevent cutting into the spar, and yet still have a nice transition at the tangent point of the radius block. Since my ultimate depth on the rabbet would be 1/8 inch that would have been the ideal stop thickness, but I hedged my bet and used a piece of the 5mm trimmed to fit the existing corner block. Here you can see how that worked on the first of four passes.
Image

At the bottom I had planned to end the cut short so that it blended into the back edge of the floor, but since I had not left enough of a gap between the bumper and back edge of the floor when fitting the hatch, eventually I decided to continue the rabbet across the lower back edge of the floor; so I let the side rabbets run right to the bottom edge here, being careful not to accidentally round it off (sanding the last little bit by hand as needed).
Image

The four passes were intended to make things easier on the small router and hopefully prevent splintering of the bent fir. First (shown above) I used a bearing that was 1/8 inch smaller in diameter than the cutter (1/16 inch depth of cut) and set the cutter extension to 3/8 inch. Then I switched bearings for a 1/8 inch depth of cut at the same plunge (if I had extended the bearing first I would have wiped out the stop shims and messed up the following passes). Then I switched the bearing back and extended the plunge to 3/4 inch, and finally switched the bearing back again and made the final passes.

Here you can see that the tangent was pretty close after the first 1/8 deep cut. Just a little hand sanding will blend this in fine.
Image
Image
Image
Image

The temporary stop shims are just held on with double backed tape.

Here, after all of the passes, I have removed the stops and sanded the sharp edges to break them over a bit. You can see how the feather edge of the radius block opened up. After this pic I trimmed that back a bit with the utility knife and did a little touch up with some of the 3min epoxy and 410 fairing filler.
Image

Like this on the other side.
Image

I must have had a little wobble with the router on the street side wall at some point, resulting in a shallow divot. A little epoxy filler (shown after application) will fix that, too.
Image

This is a slightly different angled view of the same area after the filler had cured enough to sand it back fair.
Image

At this point I still hadn’t committed to running the rabbet across the back of the floor, so I worked ahead a little on my to-do list and glued the face plates onto the foam blanks for the hatch clearance light nacelles. Since these are small in area and it was hot and relatively dry, I just used TB2 smeared thinly on to both surfaces.
Image

Back to the floor edge, I wasn’t sure I liked the idea of breaking up this flat surface, but the alternative of cutting the already glassed bumper was a non-starter. I decided to go for it. I had to jack the rear of the cabin up so that the router could fit between the bottom edge of the floor and the floor of the loft. These temporary pine pieces taped onto the end of the side rabbets and sanded flat to the back edge kept the guide bearing from falling into the vertical cuts. Also note that I scuffed the previously applied poly here before making the cuts. This will eventually get a black trim paint and it was easier to sand the wider surface than it would have been to try and sand a narrow strip.
Image

Here I have made the cuts, removed the temporary guide blocks, chiseled a small radius on the corner, and done a little detail sanding including easing the edges. There are some temporary screw holes there from prior operations that will need to be filled before wetting out all of this raw wood with epoxy.
Image

I guess it doesn’t look like much work, but I was at it all day, maybe 7 hrs, and it sure feels like a mini milestone of achievement to me.
KC
My Build: The Poet Creek Express Hybrid Foamie

Poet Creek Or Bust
Engineering the TLAR way - "That Looks About Right"
TnTTT ORIGINAL 200A LANTERN CLUB = "The 200A Gang"
Green Lantern Corpsmen
User avatar
KCStudly
Donating Member
 
Posts: 9613
Images: 8169
Joined: Mon Feb 06, 2012 10:18 pm
Location: Southeastern CT, USA
Top

Re: The Poet Creek Express - Foamie Hybrid

Postby bonnie » Fri Jul 01, 2016 7:26 am

I love watching you get things accomplished. I know what you mean about small things taking a lot of time. :)
Remember, the turtle won. :)
User avatar
bonnie
Donating Member
 
Posts: 1390
Images: 107
Joined: Sun Jul 24, 2011 4:14 pm
Location: Roxana, IL
Top

Re: The Poet Creek Express - Foamie Hybrid

Postby GPW » Fri Jul 01, 2016 7:35 am

Nice seeing all those parts KC has fitted together so perfectly ... :thumbsup: 8) That’s SKILL !!! ;)
There’s no place like Foam !
User avatar
GPW
Gold Donating Member
 
Posts: 14912
Images: 546
Joined: Thu Feb 09, 2006 7:58 pm
Location: New Orleans
Top

Re: The Poet Creek Express - Foamie Hybrid

Postby KCStudly » Fri Jul 01, 2016 9:34 pm

Thank you Bonnie, I like seeing your remodel moving along nicely, too!

GPW, funny that, while you're complementing my skills at making things fit, I'm looking at the pics that seem to show gaps at all of the seams! Not to worry, "putty and paint make it what it ain't".

Today's update is "on deck", so stay tuned. Coming right up.
Last edited by KCStudly on Sat Jul 09, 2016 11:10 pm, edited 1 time in total.
KC
My Build: The Poet Creek Express Hybrid Foamie

Poet Creek Or Bust
Engineering the TLAR way - "That Looks About Right"
TnTTT ORIGINAL 200A LANTERN CLUB = "The 200A Gang"
Green Lantern Corpsmen
User avatar
KCStudly
Donating Member
 
Posts: 9613
Images: 8169
Joined: Mon Feb 06, 2012 10:18 pm
Location: Southeastern CT, USA
Top

Re: The Poet Creek Express - Foamie Hybrid

Postby KCStudly » Fri Jul 01, 2016 9:47 pm

It felt like another productive day today; about 6 hrs more.

I started by doing a few more little touchups on the galley wall edges and transition areas between walls and floor using the 3min epoxy and 410 fairing filler (no pics).

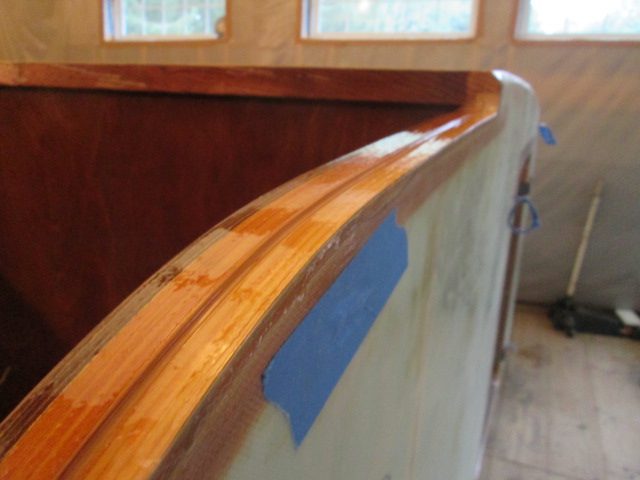
While that was kicking off I masked the insides of the galley wall and the back of the floor hard edge trim.

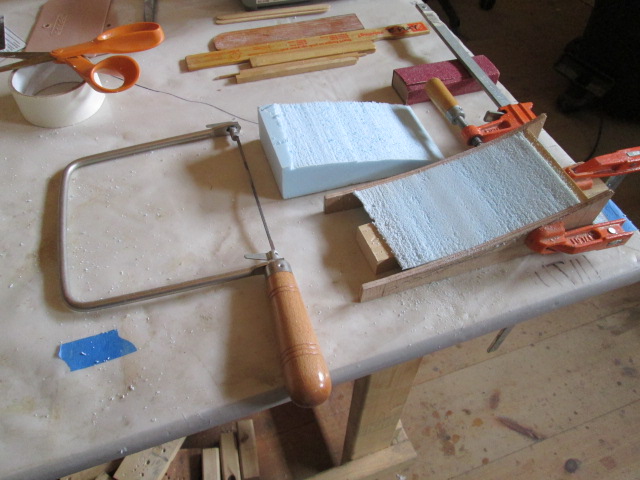
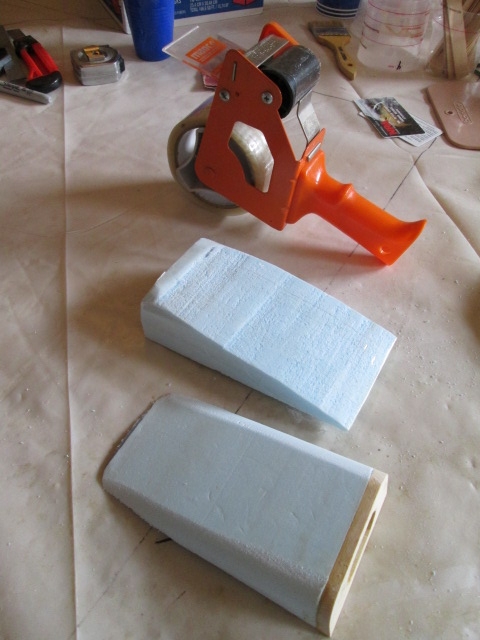
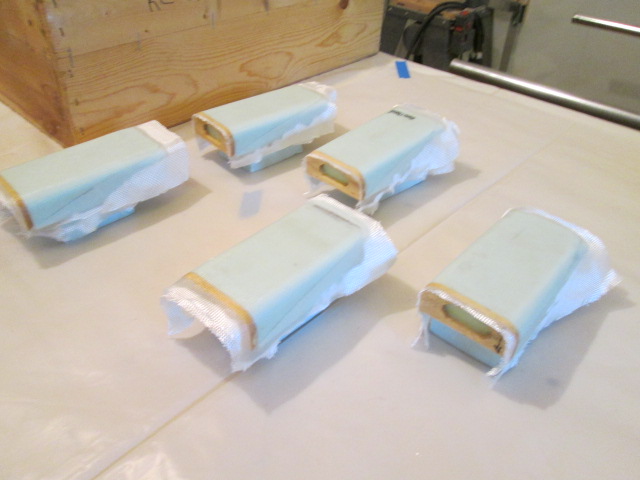
Then I worked on the hatch clearance light nacelles. Just a reminder, the hatch clearance light nacelles will be mounted across the hatch near the top of the upper radius; one near either side and the three light grouping near the middle.

Sometime back I had made small templates for the hatch radius profile that would be used to cut the bottoms of the foam blocks for these nacelles. The nacelles streamline the “blisters” for the surface mount lights and give the lights a rearward facing vertical surface so that the lens is oriented with the light beam facing rearward, not up.

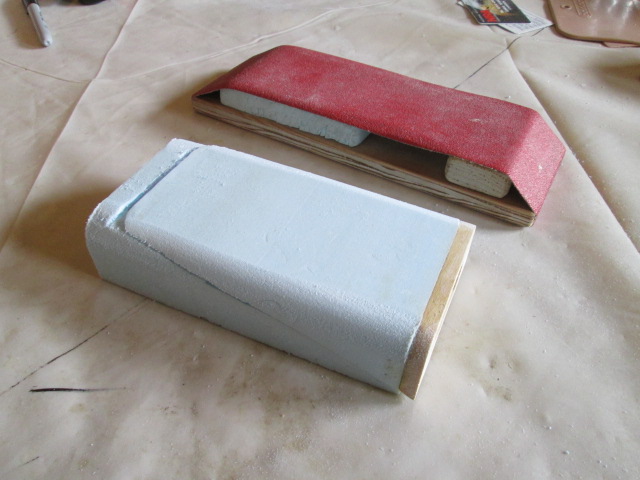
Since I have had some trouble with the hot wire knife blowing out or dragging thru feathered edges strangely, I decided to use the templates as a guide for a coping saw instead. This little fixture worked pretty well once I dialed it in (i.e. the first one shown here was the worst of the lot, and the last of five came out the nicest… as is typical with a learning curve). The blank is the part in the clamps, upside down, shown here with the cut off flipped upright.
Image

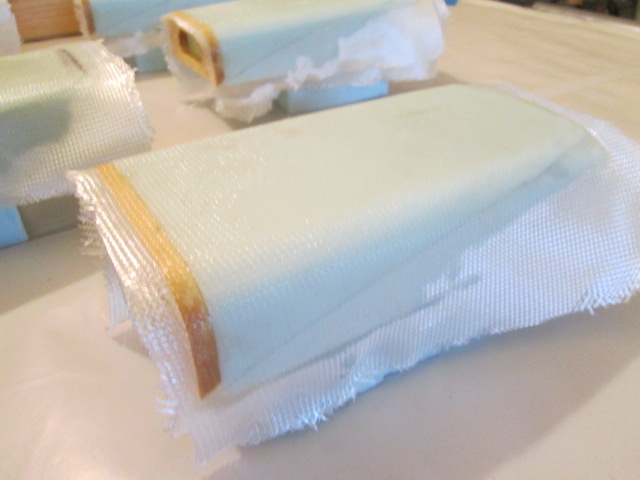
Before removing the nacelle blank from the fixture I used the sanding block a bit to knock down any of the high stuff where the saw may have strayed.

The cut away piece became a work buck to support the blank while sanding the corner radii to match the rear facing mounting block.
Image

Here’s the finished blank. Top.
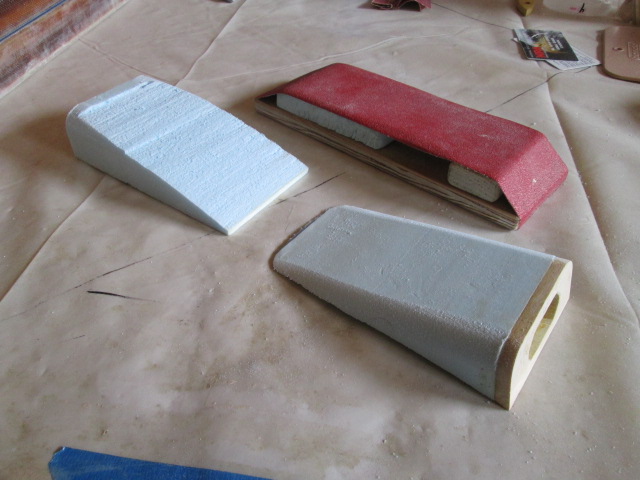
Image

Bottom.
Image

You can’t really see it here in the pic, but I covered the buck with packing tape to act as a release agent so that the buck could be used to support the thin flap of foam during FG lay up.
Image

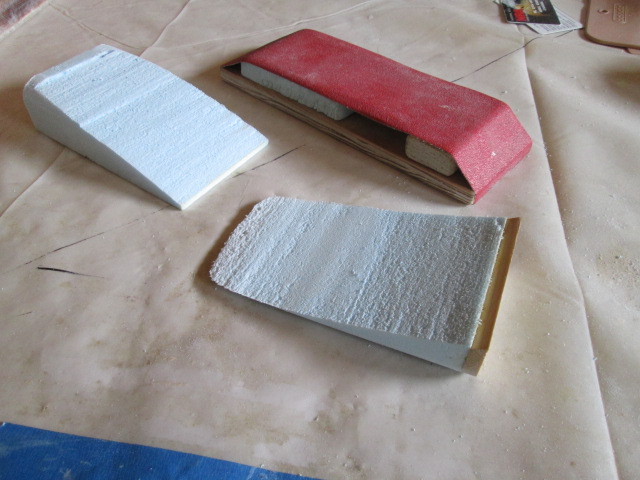
Then I used double sticky tape to pair the blanks up with their bucks. In the end they all came out similar enough that when I bond them to the hatch and fillet around their perimeters they should all look about the same without too much scrutiny.

Next it was time to start mixing epoxy. I mixed up and applied several small one pump batches of epoxy using the fast hardener and brushed it onto the wall edges. I took care to wet the edge at the step well without allowing too much of a drippy buildup; as well as trying to make sure that all plywood edges were well soaked. I used the fast hardener because I wanted to try and get two coats and, despite the heat, it seemed like I could work quickly enough with the small batches. First coat.
Image
Image
Image

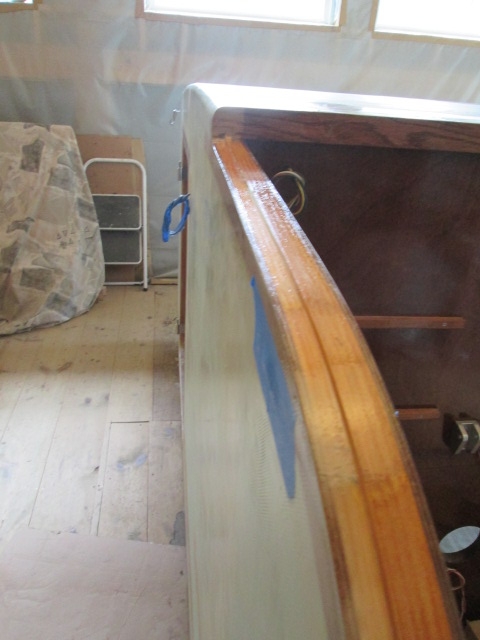
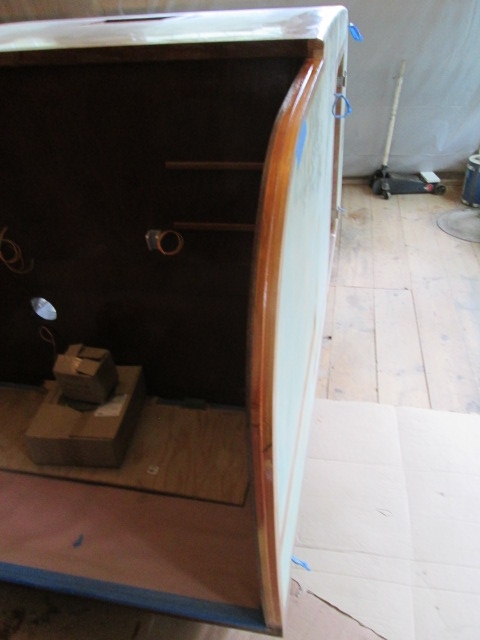
The area along the floor looks kind of ka-ka due to all of the motely colors and previous operations, but I promise this will look really nice once the black trim paint ties everything back into the color scheme. This is all about water proofing at the moment. (I wish I had listened to the early advisers and just started using epoxy from the beginning. As it is now I am sanding some areas that I had previously finished with poly. Not ideal, but should be well sealed despite.)

I had a little wet left over, so I thickened it with the 410 and smeared it along the glass seam on the front roof to front wall overlap.

While the walls were flashing off I dug into the bag of scrape glass cloth and cut enough bias swatches to do 2 plies on each of the nacelles, and just kept mixing small batches of neat epoxy. I brushed a wet coat on the wood and foam; did the first ply dry on wet; added some more wet as I daubed the first ply down; added the second ply dry; and then daubed it down without adding much more wet. It seemed to work out really well with just the right amount of wet.
Image
Image

That worked out well timing wise as the wall edges had tacked up nicely by this time. So I went back to the second coat there starting with the tailings from the nacelle wet out; and just kept mixing small one pump batches. Second coat.
Image
Image
Image

Once this cures, gets washed and sanded I’ll decide if it needs another coat before paint.

I had about a foot or 18 inches left to do when I ran out of wet, so I did one more one pump batch. That left enough over that I thickened it with the 410 and smeared it all over the rear of the roof, filling the weave over most of that spar bay from the area by the hinge spar that I had already started to fair all the way to the roof fan opening.

Then I (…finely wised up and…) peeled the masking tape back off of the galley walls and floor edge while the epoxy was still just tacky; no poly finish was injured in the making of this post.
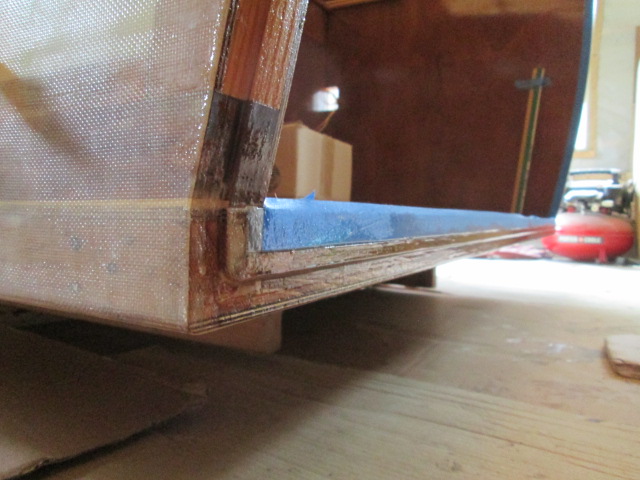
 :D
Last edited by KCStudly on Fri Apr 08, 2022 7:21 pm, edited 1 time in total.
KC
My Build: The Poet Creek Express Hybrid Foamie

Poet Creek Or Bust
Engineering the TLAR way - "That Looks About Right"
TnTTT ORIGINAL 200A LANTERN CLUB = "The 200A Gang"
Green Lantern Corpsmen
User avatar
KCStudly
Donating Member
 
Posts: 9613
Images: 8169
Joined: Mon Feb 06, 2012 10:18 pm
Location: Southeastern CT, USA
Top

Re: The Poet Creek Express - Foamie Hybrid

Postby Rick Tyler » Sat Jul 02, 2016 12:11 am

KCStudly wrote:(...)
I wasn’t going to have time to wait around for it to tack up so that I could do the weave fill fairing, like I would have liked to, but that is the same situation as everywhere else, so no big deal. I was thinking I might get away with doing the filler in the AM, but we had a big front come in and it got more humid than I would have liked, so I am expecting plenty of amine blush.


If you have issues with amine blush, try System Three's SilverTip epoxy resins, especially for wetting out glass. It is amazing, amine-free stuff, but it, of course, costs more. I've used 4-5 different epoxies and SilverTip is the best I've used to apply cloth to a substrate. Jacques Mertens at Bateau told me that 5:1 epoxies generally have a lot more blush than 2:1 epoxies. The last canoe I built (an 8-panel boat of glass over 6mm ply) was all Silver Tip, and I never had to clean off blush.

I've done quite a bit of wet-on-wet glass and it usually goes fine. What I will NEVER do again is wait for the first layer to cure before adding the second. Life is too short for that much sanding. Good luck!

Rick
Rick Tyler
Teardrop Builder
 
Posts: 48
Images: 1
Joined: Wed Jun 29, 2016 3:34 am
Location: Western Washington
Top

Re: The Poet Creek Express - Foamie Hybrid

Postby KCStudly » Sat Jul 02, 2016 12:41 am

Thanks for the pointers, Rick.

To clarify, I haven't had any problems that I am aware of with the amine blush, probably because I am always careful to wash it off. It is not a difficult task but does take some time.

Also, I always do the laminating portion of a lay up in a single session, I just never seem to have enough time to hang around and do the weave fill and subsequent barrier coats all in one (can't figure how you can do the fairing and barrier coats without having to do at least some sanding on the fill/fair coat anyway).

Some boat builders swear that you should always do the weave fill with a chemical bond (i.e. after the laminating lay up has kicked but before it has cured) because, as they say, you may not be able to get the amine washed out of all of the little pockets, and you can't scuff down in them either; at least not w/o sanding down thru the glass fibers.

So far I haven't seen any issues like that and am happy with the results. Though this is a learning experience for me from the get go.

All of my exposed finished wood is either in the cabin or galley and is done with polyurethane, not epoxy, so the added expense of a clear curing and/or low amine epoxy probably would not be justified; or am I missing your point somehow?
KC
My Build: The Poet Creek Express Hybrid Foamie

Poet Creek Or Bust
Engineering the TLAR way - "That Looks About Right"
TnTTT ORIGINAL 200A LANTERN CLUB = "The 200A Gang"
Green Lantern Corpsmen
User avatar
KCStudly
Donating Member
 
Posts: 9613
Images: 8169
Joined: Mon Feb 06, 2012 10:18 pm
Location: Southeastern CT, USA
Top

Re: The Poet Creek Express - Foamie Hybrid

Postby GPW » Sat Jul 02, 2016 5:06 am

KC , you really should try vacuum bagging .... it’s really easy and the finish you get is like glass ... :thumbsup: Everything comes out SOLID !!! :thumbsup:
There’s no place like Foam !
User avatar
GPW
Gold Donating Member
 
Posts: 14912
Images: 546
Joined: Thu Feb 09, 2006 7:58 pm
Location: New Orleans
Top

PreviousNext

Return to Foamies

Who is online

Users browsing this forum: No registered users and 15 guests