The Poet Creek Express - Foamie Hybrid

Canvas covered foamies (Thrifty Alternatives...)

Moderator: eaglesdare

Re: The Poet Creek Express - Foamie Hybrid

Postby KCStudly » Sat Jul 02, 2016 10:19 am

That may (or may not) have saved some time on these parts, doing one at a time vs. 2 stage finishing. I suppose I may have been able to get them all in one bag set up, or multiple bags off the same pump (?), but I don't have a proper pump (although we do still have some of the perforated peel ply, breather membrane, rubber sheet and vacuum port fitting from when Karl used to make custom Corvette parts).

You make a point tho, they would have come out nearly finished if bagged.

These went quickly enough and should finish up fine; I have so much more body work to do just to fill the weave and make it semi presentable (let aside trying for a smooth finish) that these little parts are just a drop in the bucket.
KC
My Build: The Poet Creek Express Hybrid Foamie

Poet Creek Or Bust
Engineering the TLAR way - "That Looks About Right"
TnTTT ORIGINAL 200A LANTERN CLUB = "The 200A Gang"
Green Lantern Corpsmen
User avatar
KCStudly
Donating Member
 
Posts: 9611
Images: 8169
Joined: Mon Feb 06, 2012 10:18 pm
Location: Southeastern CT, USA

Re: The Poet Creek Express - Foamie Hybrid

Postby KCStudly » Sat Jul 02, 2016 9:09 pm

Not too much time today, just a couple three hours or so, but still made some progress.

I started by trimming out the hatch clearance light nacelles from the bucks, sanding the rear faces flush, fairing the cut edges to the foam/hatch profile, knocking the sharp edges off of the rear light face perimeters, and washing amine.
Image

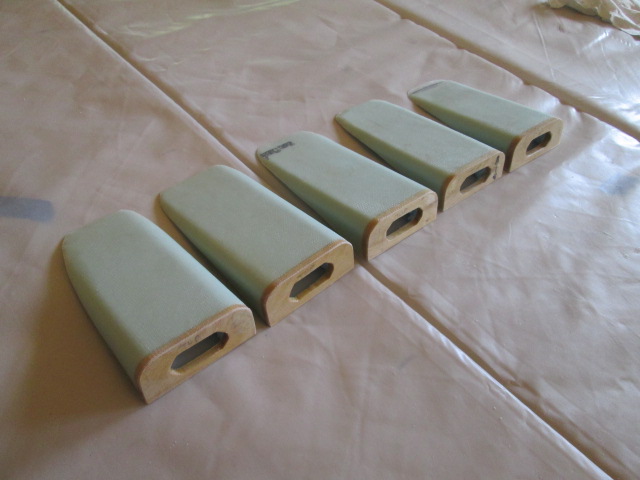
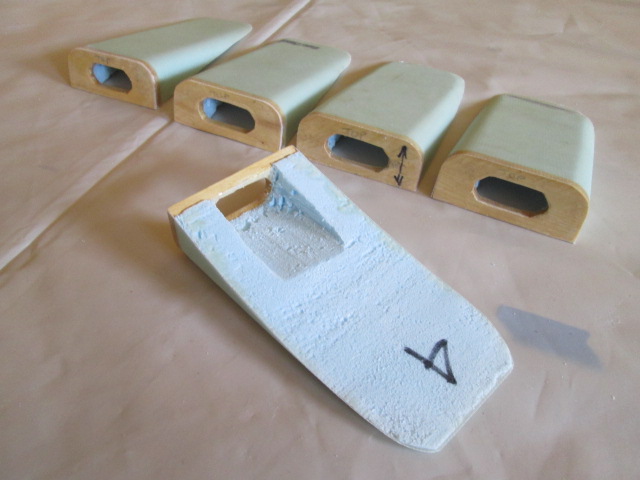
From there I trimmed the wire openings out using the cheap steak knife, sanded the wire spaces a bit to remove loose foam bits, and trimmed any sharp edges of the epoxy that might otherwise chafe the wires. (I match labelled the nacelles and bucks 1 thru 5 just in case I find a need to pair them back up with the bucks for future operations… though I can’t think of any reason I might need to at the moment.)
Image

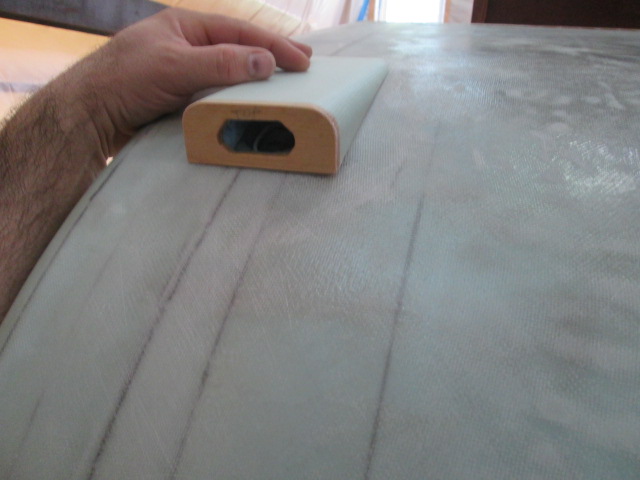
This kind of gives you an idea of how the nacelles will look on the hatch. (Kind of a wonky picture turned for perspective and with me holding on, as the hatch is currently standing on edge on the loft floor.)
Image

Also washed amine on the galley wall edges, rear of floor, and other filled areas; scrapped and sanded some epoxy drips off of the underside of the floor; and sanded some of the filled/faired areas of the roof.

Rollin’.

The stars are aligning. My boat friend Dale and wife Tina are cruising into town tomorrow afternoon and my Punkin Chunkin buddy Dave and wife Andrea will be in town as well, so with Karl and wife Chris, all mutual friends, we are planning to get together for a nice dinner out… and maybe a boat ride.

Peace.

p.s. Take some time to look up an old friend that you haven’t had contact with in years; someone that you were close to, but for one reason or another lost contact with. It can be… I don’t know… it can be so many things… exciting, fun, settling, fulfilling, relaxing, and so much more. Just do it.
KC
My Build: The Poet Creek Express Hybrid Foamie

Poet Creek Or Bust
Engineering the TLAR way - "That Looks About Right"
TnTTT ORIGINAL 200A LANTERN CLUB = "The 200A Gang"
Green Lantern Corpsmen
User avatar
KCStudly
Donating Member
 
Posts: 9611
Images: 8169
Joined: Mon Feb 06, 2012 10:18 pm
Location: Southeastern CT, USA

Re: The Poet Creek Express - Foamie Hybrid

Postby GPW » Sun Jul 03, 2016 6:28 am

Those nacelles look really COOL !!! :thumbsup: 8) Streamline !!! :applause:
There’s no place like Foam !
User avatar
GPW
Gold Donating Member
 
Posts: 14911
Images: 546
Joined: Thu Feb 09, 2006 7:58 pm
Location: New Orleans
Top

Re: The Poet Creek Express - Foamie Hybrid

Postby KCStudly » Sun Jul 03, 2016 8:25 am

Thanks GPW. At times while working on them it felt like I was working on a hobby model (airplane/rocket/boat... whichever). They are a fun little aspect of the camper that will add character and a custom touch, while also serving a practical function.
KC
My Build: The Poet Creek Express Hybrid Foamie

Poet Creek Or Bust
Engineering the TLAR way - "That Looks About Right"
TnTTT ORIGINAL 200A LANTERN CLUB = "The 200A Gang"
Green Lantern Corpsmen
User avatar
KCStudly
Donating Member
 
Posts: 9611
Images: 8169
Joined: Mon Feb 06, 2012 10:18 pm
Location: Southeastern CT, USA
Top

Re: The Poet Creek Express - Foamie Hybrid

Postby GPW » Sun Jul 03, 2016 8:35 am

In reality it’s just like a BIG model eh ... Done , because you Enjoy it !!! :thumbsup: 8) ;)

You know a little Bigger nacelle might make a Nice aerodynamic vent too ... :thinking:
There’s no place like Foam !
User avatar
GPW
Gold Donating Member
 
Posts: 14911
Images: 546
Joined: Thu Feb 09, 2006 7:58 pm
Location: New Orleans
Top

Re: The Poet Creek Express - Foamie Hybrid

Postby KCStudly » Sun Jul 03, 2016 9:04 am

Compared to these the shrouded Maxxair vent (still in box) is massive!

I had no idea when I bought it that it was going to be so big, but que sera sera. Without A/C I want to make sure I stand a chance of being comfortable inside.

(I know you have been on a kick lately denouncing roof vents, so consider this fair warning! :lol: )
KC
My Build: The Poet Creek Express Hybrid Foamie

Poet Creek Or Bust
Engineering the TLAR way - "That Looks About Right"
TnTTT ORIGINAL 200A LANTERN CLUB = "The 200A Gang"
Green Lantern Corpsmen
User avatar
KCStudly
Donating Member
 
Posts: 9611
Images: 8169
Joined: Mon Feb 06, 2012 10:18 pm
Location: Southeastern CT, USA
Top

Re: The Poet Creek Express - Foamie Hybrid

Postby GPW » Sun Jul 03, 2016 9:34 am

Roof vents Only a problem when it rains .... Nothing new eh ? ....
All a matter of “perspective “ ... here it rains almost every day and more than makes up for it for when it doesn’t ... :rainy: Maybe where you live, not so much ... ;)
There’s no place like Foam !
User avatar
GPW
Gold Donating Member
 
Posts: 14911
Images: 546
Joined: Thu Feb 09, 2006 7:58 pm
Location: New Orleans
Top

Re: The Poet Creek Express - Foamie Hybrid

Postby KCStudly » Tue Jul 05, 2016 6:31 pm

:lol: :lol: Roof only leaks when it rains. :lol: :lol: :lol:

Here’s a current selfie for the benefit of any distant friends that may be looking in for the first time. I'm happy with the work I have gotten done this past week of vacation.
Image

Okay, progress for the 4th was about 5 hrs. I decided that I have plenty of scraps of the 5mm ply, so it just made sense to build the window trim shims out of the Okoume. If I laminate two pieces (total 10 individual plies) and plane back two plies for a total of 8 plies, I will get the needed 5/16 inch shim thickness (… actually only 0.300 inch, but close enough).

So, after running the shop vac under the bench where a bunch of dust had collected and where I keep my ply off cuts lying flat; and suffering a coughing fit despite; I dragged a few choice pieces up; and cleared the bench and table saw off (first time I have seen the top of the saw in a long time).

Using measurements I took for the window trim, and measuring twice, I was able to do some math (with surprising uncertainty as I am usually good at math), and was able to figure out cut dimensions to make the shim frames from overlapping half lap laminated segments (if that makes any sense at all ).

Pics being worth a thousand words, basically I cut strips of ply the correct width to overlap the existing window openings by 1/8 inch inside (to be trimmed flush with the router later) and to extend past the SS trim piece by 1/8 inch for round over allowance and a shadow line, if that makes any sense at all (clear as mud, right?). Once I had the strips cut to width and length I marked and laminated them together to form side blanks with built in lap joints. I made the vertical sides wide enough that I can cut the inside radii (first rough and then using the router once the shim frames are attached to the doors) and outside radii, so most of the wide part will be cut away.
Image

It might all make more sense once I mock it up over the door with the pieces overlapping each other.
Image

My departed father in law’s planer is with my brother/sister in law (or I could try to use the one at work… that may or may not have been abused/dull). Had a nice conversation with my BIL tonight and he is just up the road from Mecca, so will try that route first before gluing the frames together.

Progress is progress.

:wine:

:( :o :cry: Today I had to go back to the real world of the daily grind. :cry: Yes, work boots, long pants, an early rise, sobriety, drudgery and limited progress on the camper. :cry:

Oh well, progress is progress.
KC
My Build: The Poet Creek Express Hybrid Foamie

Poet Creek Or Bust
Engineering the TLAR way - "That Looks About Right"
TnTTT ORIGINAL 200A LANTERN CLUB = "The 200A Gang"
Green Lantern Corpsmen
User avatar
KCStudly
Donating Member
 
Posts: 9611
Images: 8169
Joined: Mon Feb 06, 2012 10:18 pm
Location: Southeastern CT, USA
Top

Re: The Poet Creek Express - Foamie Hybrid

Postby GPW » Wed Jul 06, 2016 6:17 am

KC, you lost some weight ???

Now you can say Noah’s ark was finished before TPCE ... :lol:
There’s no place like Foam !
User avatar
GPW
Gold Donating Member
 
Posts: 14911
Images: 546
Joined: Thu Feb 09, 2006 7:58 pm
Location: New Orleans
Top

Re: The Poet Creek Express - Foamie Hybrid

Postby KCStudly » Wed Jul 06, 2016 6:57 am

GPW wrote:KC, you lost some weight ??? Now you can say Noah’s ark was finished before TPCE ... :lol:

Lose weight? Unfortunately, no. I just sucked it in for the pic! :lol:

Let's not get into a contest of who takes longer to work on their camper. Sure, you have built two in less time than it has taken me to build one, but need I remind you how long it takes to work on the details (e.g. your marathon drip edge install). :lol: :lol: :lol: ... and some of us don't have the luxury of being retired.

The Noah's ark reference might be appropriate. Karl and I were discussing the fact that TPCE may be so well sealed that it should float! After all of this hard work I really don't want to have rot set in.

There is still a good amount to do to get it to where I am comfortable leaving the work friendly environment of the loft. Soon I want to start fabricating the rock guards and TB lid so that those items are all pre-fit before the paint (...or vinyl wrap) work gets started.
KC
My Build: The Poet Creek Express Hybrid Foamie

Poet Creek Or Bust
Engineering the TLAR way - "That Looks About Right"
TnTTT ORIGINAL 200A LANTERN CLUB = "The 200A Gang"
Green Lantern Corpsmen
User avatar
KCStudly
Donating Member
 
Posts: 9611
Images: 8169
Joined: Mon Feb 06, 2012 10:18 pm
Location: Southeastern CT, USA
Top

Re: The Poet Creek Express - Foamie Hybrid

Postby GPW » Wed Jul 06, 2016 9:23 am

I was just taking the opportunity to give you “the business” :R ( apparently something common to the NE corridor, and most prominently displayed in New Jersey ... ) ... with a silly comparison to something topical ... :lol: Naturally, no offense ever implied or intended ... :beer:

Retired really means everything takes ten times Longer for something only half as complicated... But is Enjoyed so much More !!! hahahaha :lol:
There’s no place like Foam !
User avatar
GPW
Gold Donating Member
 
Posts: 14911
Images: 546
Joined: Thu Feb 09, 2006 7:58 pm
Location: New Orleans
Top

Re: The Poet Creek Express - Foamie Hybrid

Postby KCStudly » Wed Jul 06, 2016 10:25 am

Just rollin' with the punches, GPW. Poking a little fun right back at ya'. :thumbsup:
KC
My Build: The Poet Creek Express Hybrid Foamie

Poet Creek Or Bust
Engineering the TLAR way - "That Looks About Right"
TnTTT ORIGINAL 200A LANTERN CLUB = "The 200A Gang"
Green Lantern Corpsmen
User avatar
KCStudly
Donating Member
 
Posts: 9611
Images: 8169
Joined: Mon Feb 06, 2012 10:18 pm
Location: Southeastern CT, USA
Top

Re: The Poet Creek Express - Foamie Hybrid

Postby KCStudly » Thu Jul 07, 2016 5:24 pm

Tonight I took the window shim pieces over to my BIL’s and we tried to plane them down. That didn’t work; not sure why, but they were narrow enough that we managed to get them close on the joiner. I took advantage of the wide 6 inch belt sander that had a nice long platen, and did some sanding to bring them closer.

It was pretty easy to read the sanding progress as the glue layer between plies was a nice dark rusty red color and contrasted with the wood nicely.

I just have a little hand sanding to do to dial them in a little better. Since we took 2 plies off all of the short faces I will have to skim cut the laps on the wider pieces (since they are shorter and stiffer and won’t flex as much during the cutting operation) so that once I flip-flop and mate the parts all of the faces will still be in the same planes. I’ll do that with the miter fence on the router table.

No pics tonight.
KC
My Build: The Poet Creek Express Hybrid Foamie

Poet Creek Or Bust
Engineering the TLAR way - "That Looks About Right"
TnTTT ORIGINAL 200A LANTERN CLUB = "The 200A Gang"
Green Lantern Corpsmen
User avatar
KCStudly
Donating Member
 
Posts: 9611
Images: 8169
Joined: Mon Feb 06, 2012 10:18 pm
Location: Southeastern CT, USA
Top

Re: The Poet Creek Express - Foamie Hybrid

Postby KCStudly » Fri Jul 08, 2016 9:49 pm

So after using the joiner and belt sander to skim cut the window shim pieces they needed some hand sanding with the medium blocks. One of the wider pieces had a good sized section that didn’t actually get cut, so that one took a great deal more effort. I suppose I could have gotten out the palm or hand held belt sander, but I was enjoying Karl’s company, so just worked it down by hand until it was done. Here they are with just 3 plies left on the shorter portions of each piece.
Image

Here’s what I was saying about just planing one side and how, when flipped around for the half lap joint, the surfaces are no longer flush because the longer remaining 5 ply pieces stack up again.
Image

Using the router table with a 3/4 diameter straight cutting bit, half the guide fence as a gauge stop, and the miter fence as the guide I was able to precisely cut the short stiff lap of the wider pieces using this setup. Basically I made a few passes moving the piece closer and closer to the fence for each pass nibbling away. This had the added benefit of cleaning the glue squeeze out from the lap corner.
Image
Image

That did the trick.
Image

Tomorrow I will rough cut the inside waste from the wider pieces, glue the laps, and perhaps cut and sand the outside corner radii.

Once that is done I need to prep the area around the window, sanding the polyurethane back… I have a plan to do this with a guided sanding block so that I don’t mar the rest of the door skin that has already been finished.

Then I need to decide if I want to pre-finish the shims in black trim paint before gluing them on. Another option would be to just screw them down w/ no glue using FH screws that will be covered over by the window trim flange. Hmm, that sounds like the most expedient thing, no sanding on the door, can pre-finish the shims (so no masking tape), and the shims will get clamped by the window trim flange anyway.

Something else that I did the other day, but forgot to mention, was figuring out what I needed for screws to hold the door latch assemblies together. The latch assemblies have untapped screw bosses cast in and the screws pass thru the inner latch handle to sandwich the two parts thru the latch pocket in the door. The screws that came with the latches, despite having specified for thicker doors, were not long enough to join the halves. Rather than going thru the hassle of contacting the supplier and trying to get the right thing; or contacting the manufacturer of the Taptite Trilobular screws (they roll form their own threads and are specifically designed for use with cast white metal in assembly line scenarios using power drivers), I have decided to upgrade to readily available SS machine screws and will just bottom tap the castings by hand. For the record they need an 82 deg flat or oval head screw with 8-32UNC threads. My particular door thickness requires screws about 1-1/8 inch in length; I will start with more available 1-1/4 inch long screws and shorten them if need be. The original screws were Torx drive oval heads. Since the screws are only accessible from the inside, tamper proof security isn’t such a concern, so I will just use Phillips FH’s. I looked on McMaster-Carr but they didn’t list these in SS in a black finish, so I might just touch the heads with a sharpie or something after they are installed.
KC
My Build: The Poet Creek Express Hybrid Foamie

Poet Creek Or Bust
Engineering the TLAR way - "That Looks About Right"
TnTTT ORIGINAL 200A LANTERN CLUB = "The 200A Gang"
Green Lantern Corpsmen
User avatar
KCStudly
Donating Member
 
Posts: 9611
Images: 8169
Joined: Mon Feb 06, 2012 10:18 pm
Location: Southeastern CT, USA
Top

Re: The Poet Creek Express - Foamie Hybrid

Postby KCStudly » Sat Jul 09, 2016 8:12 pm

You know, it’s true what they say about self-made doors; they are a lot of work!

Today I laid the window shim pieces in a dry fit on top of one of the doors and traced the window RO onto the wide side pieces. From there I stepped the line off for a rough cut, then transferred those cuts to the remaining two pieces. Here’s the first one after rough cutting the inside waste out on the bandsaw.
Image

Here’s a dry fit after the cutting.
Image

Next I glued and clamped those up, making sure to check diagonals.

While those were setting up, I turned to the door latch hardware. Here’s one of the supplied oval head Torx drive screws on the right in dull zinc, compared to the longer flat head #2 Phillips in stainless steel on the left.
Image

Flip flopped now with the Torx on the left and the #2 on the right, shown mocked up on the inner latch paddle. I think the FH’s will do fine.
Image
Image
Image

Here’s the back side of one of the door latch assemblies. You can see a couple of the unthreaded screw bosses.
Image

I put a few drops of kerosene in a bottle cap to use as a cutting lubricant; kerosene works really well for tapping aluminum.
Image

Tapping the bosses with an 8-32UNC starter tap.
Image
Image
Image

I didn’t have a bottoming tap handy, and I’m not sure it would have made a difference, but when checked the 1-1/8 inch long screws will do fine. I managed to find 6 of them, so will only have to cut down 2 from 1-1/4 long.

That task gave the window shims enough time to set up to where I could take the clamps off and gingerly continue working on them. Scraped the glue squeeze out and there was a little sanding on the faces of the joints to get that last little bit of fairness.

I used one of the cut away sections, held in tight, to help lay out the outside radii; then cut outside the lines on the bandsaw.
Image

After sanding the edges to the lines we get this. They look all over the place because the inside was just rough cut and is still undersize to the RO.
Image

The corners aren’t all exact so I’m going to stop here for now until I get the window trim rings. They will be laser cut and exact, so I can use them to make sure that the offset is correct before attaching these to the doors.

Did a little dry fit so you can see where I’m heading with this.
Image
Image

About 4 hrs in today; tomorrow we are going to in laws for a b-day celebration, so won’t be working on the camper.

There are starting to be fewer and fewer things that need doing before I get back into the final body work, but I am enjoying the change of pace for now working on fabricating and fitting parts instead. Still need to do the door latch bolt and strike plates, and the rock guards, but that’s about all that I can think of at the moment.
KC
My Build: The Poet Creek Express Hybrid Foamie

Poet Creek Or Bust
Engineering the TLAR way - "That Looks About Right"
TnTTT ORIGINAL 200A LANTERN CLUB = "The 200A Gang"
Green Lantern Corpsmen
User avatar
KCStudly
Donating Member
 
Posts: 9611
Images: 8169
Joined: Mon Feb 06, 2012 10:18 pm
Location: Southeastern CT, USA
Top

PreviousNext

Return to Foamies

Who is online

Users browsing this forum: No registered users and 5 guests