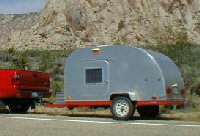
Foamie damage

Canvas covered foamies (Thrifty Alternatives...)

Moderator: eaglesdare

Re: Foamie damage

Postby tony.latham » Sun Sep 08, 2019 10:52 am

We did have a grand adventure! Fiberglass over the lifting points on the inside would probably help, does it stick to paint or would that have to be done before painting?


I missed that question.

I didn't make it clear. I wasn't answering from a repair standpoint but from a how-to-build-it next-time viewpoint. PMF has its place but it's not fiberglass.

One could add layers of glass to the stress points during the build. Epoxy resin plays well with foam. It's a common method in aviation.

The strength of fiberglass/epoxy over paint would be limited by the paint's adhesion strength. I wouldn't put it in the box labeled "good idea."

I'm still blown away by the adventure you guys had with that camper.

Tony
User avatar
tony.latham
Gold Donating Member
 
Posts: 6899
Images: 17
Joined: Mon Jul 08, 2013 4:03 pm
Location: Middle of Idaho on the edge of nowhere

Re: Foamie damage

Postby RJ Howell » Sun Sep 08, 2019 3:20 pm

I did reach out to a ME friend to ask ask if my theory was correct. I just had to know..

If you have a singular line run around the trailer and tapped into each piston, then you are not equalized. The first piston inline would active and stop/fail then the second, with the first and so on. Jam up.

This is where regulators on each would help. Pressure would start to build on the first, and not active till the others build up enough. With being off-weighted.. it's the adjustment of the regulators to achieve the desired lift. This is tuning of such.

Of course any leaks need to be fixed..
Last edited by RJ Howell on Mon Sep 09, 2019 6:02 am, edited 1 time in total.
RJ Howell
1000 Club
1000 Club
 
Posts: 1161
Images: 36
Joined: Sat Jul 27, 2019 6:08 am

Re: Foamie damage

Postby GPW » Mon Sep 09, 2019 4:41 am

What about “ Armstrong lifters “ ??? It’s Foam eh ??? :thinking:
There’s no place like Foam !
User avatar
GPW
Gold Donating Member
 
Posts: 14911
Images: 546
Joined: Thu Feb 09, 2006 7:58 pm
Location: New Orleans
Top

Re: Foamie damage

Postby Tyrtill » Fri Sep 13, 2019 8:35 pm

To me it looks like the cracks are mostly from lifts. Are they supporting the upper section even when going down the road??

On mine the roof is supported all the way around by the bottom section.


I've always liked your pneumatic lift system and I feel like you probably just need to fix your leaky cylinders somehow and it will be good to go. Maybe since you'll have to redo your cylinders anyway you might be able to add more spreader area at the top.


Here is my lift system to maybe spark some ideas.
Some of the pictures/videos are not the current setup but the concept is the same.

Video:


This is the best video I have of the inside.
Video:


A video of it operating underneath.
Video:


The parts of the system are:

It has a front "crank axle" made out of 3/4" galvanized pipe. It has a handle on one end and is supported with eye bolts under the trailer that work as bushings. It has four holes drilled through it that the 4 lift cables pass through and are cable clamped once in proper adjustment. Since everything is driven by the same crank everything stays synced once adjusted properly.
The crank handle is a round stake used for concrete forms that fits perfectly in the 3/4" pipe. Its removable for going down the road but when you finish cranking it up you can "kickstand" it while you put in your inside supports. Yours having wood to support the pulleys you might even be able to just leave it hanging on the cables.
Image

A rear "pulley axle" that just redirects the wire in the back.


The cables pass through the floor of the camper into the living space through homemade pipe cable bushings.


Then the cables run through pulleys supported in the wall. I used large metal spreader plates which weren't quite big enough for this hamfisted guerrilla and I squished my foam (when the top jammed and I didn't realize that is what was going on). It still works fine but looks terrible. You luckily have wood so you could attach the pulleys to the bottom of that.


Once the cable goes through the pulley it travels down to an attachment point on the top half. Two large through bolts on each side.

This is a picture of the cable run through the wall pulley and then to the attachment point with upper section sitting on the lower section.
Tyrtill
Teardrop Advisor
 
Posts: 83
Images: 14
Joined: Tue Mar 19, 2019 4:36 pm
Top

Re: Foamie damage

Postby RJ Howell » Sat Sep 14, 2019 7:59 am

Tyrtill wrote:Here is my lift system to maybe spark some ideas.
Some of the pictures/videos are not the current setup but the concept is the same.


Man, if you could gear than and use a battery operated drill.. That would be sweet!
RJ Howell
1000 Club
1000 Club
 
Posts: 1161
Images: 36
Joined: Sat Jul 27, 2019 6:08 am
Top

Re: Foamie damage

Postby Tyrtill » Sat Sep 14, 2019 1:37 pm

I added a hand winch to make it easy enough for a child to lift but it made you lose any “feel” for the lift. Since my camper is prone to jamming on the way up and down I removed it so I wouldn’t cause additional damage to my pulley supports.

Adding a drill drive would be possible but I would want to add some kind of pawl to prevent the camper from falling if your drill came off
Tyrtill
Teardrop Advisor
 
Posts: 83
Images: 14
Joined: Tue Mar 19, 2019 4:36 pm
Top

Previous

Return to Foamies

Who is online

Users browsing this forum: No registered users and 4 guests