NEW CONTEST WINNER!

General Discussion about almost anything Teardrop or camping related

Postby Gaelen » Sun Apr 22, 2007 6:49 pm

catrinka wrote:Where are you stacking the dutch ovens? In a fire pit? What do you do if there is no fire pit?


If no firepit, you can stack them directly on the same support where you put the bottom coals for the oven on the bottom of the stack.

Check out the picture on the bottom of the page...
http://www.bevscountrycottage.com/prepa ... ooking.htm
Gaelen
2006-2011: '79 SunLine Sun Spot
now: '05 Finntec homebuilt teardrop
My blogs: Life Out Loud, Kitchen Jam and Dog Trainer's Log.
Syracuse Dog Training and @gaelen2 on Twitter
User avatar
Gaelen
500 Club
 
Posts: 595
Images: 38
Joined: Sun Oct 08, 2006 3:09 pm
Location: Central NY

Postby Joanne » Sun Apr 22, 2007 10:20 pm

catrinka wrote:Where are you stacking the dutch ovens? In a fire pit? What do you do if there is no fire pit?


Hi Kathy,

There are a lot of different ways to make your own "fire pit". One of the simplest is a metal pan used for changing oil or feeding chickens. I got mine at a local auto parts store, but others find them a feed stores. Sometimes I cook where there are restrictions against cooking directly on the ground. In those cases I usually use 3 bricks to lift the pan off the ground.

Image


Of course my favorite is this one I made. It keeps my back from hurting as I cook. Of course it's so heavy that my back hurts from lugging it around. :lol:
Image

Joanne
New! My Camp Cooking Forum

Project Desert Dawg website


Universal Health Care
Health care with the efficiency of the Department of Motor Vehicles
and the compassion of the Internal Revenue Service.
User avatar
Joanne
Queen of Cast Iron
 
Posts: 2111
Joined: Thu Jul 01, 2004 9:43 pm
Location: Las Vegas, NV

Postby cherokeegeorge » Sun Apr 22, 2007 10:34 pm

Dean, we will not be able to make it this year, and I don't use anything on the top of the DO I just lift very carefully. give it a try.
George

For info on hitch covers
Teardrophitchcovers.com
User avatar
cherokeegeorge
A Merkin Indian
 
Posts: 1116
Images: 37
Joined: Wed Aug 31, 2005 8:40 pm
Location: la crescenta calif
Top

Postby jdarkoregon » Mon Apr 23, 2007 1:02 am

Geezzzz, Now I know why you all worry so much about the wieght of your trailers, You are all hauling 5 to 10 Dutch Ovens, 3 bricks to keep it off the ground, and whole metal closets so you can cook with them. Not to mention the food to fill them all with.

all this weight you carry is causing your trailer tongues to bend

I guess I will have to redesign for more cast iron storage on my trailer, No I know what the extra axle is for on my tear

John
Innovation is essential
The world can be better
ImageImage
User avatar
jdarkoregon
Donating Member
 
Posts: 1236
Images: 47
Joined: Mon Aug 22, 2005 7:07 pm
Location: Oregon, Sublimity
Top

Postby Dean in Eureka, CA » Mon Apr 23, 2007 1:54 am

Barbara,
I promise I'll post something for the contest right after the Dam Gathering, but I gotta interupt one more time, 'cause I was just told something that really excites me!!!
cherokeegeorge wrote:Dean, we will not be able to make it this year, and I don't use anything on the top of the DO I just lift very carefully. give it a try.

George,
I'm sorry you guys won't be able to make it, But!!!
I was just told of a slick way to do pizzas!!!!
Check this out!!!
You take a metal ring and place it in between two D.O. lids!!!
Your top heat will be right down on the pizza!!!
No more checker boarded lids from too many briquettes to get the right baking temperature!!!

... Yaa, hello, I'd like to buy an 1 1/2" of your 16" steel pipe... Yaa, the stuff that has 1/4" wall... :lol:
User avatar
Dean in Eureka, CA
The Fogcrawler
 
Posts: 4997
Images: 69
Joined: Thu May 11, 2006 8:44 pm
Top

Postby WarPony » Sat Apr 28, 2007 7:34 pm

Alright, I'm in! Either very few are interested in this contest or everybody is keeping their recipes secret.

I'll post the pics for my "Stuffed Green Peppers" either on Sunday or Monday........or maybe Saturday :oops: (it rained here all week).

:twisted:

Jeff
1lb. ground beef
4 medium peppers
1 medium onion
1/4 cup uncooked rice
3 tbsp ketchup
salt and pepper
crushed oregano
SAUCE:
1 14.5 oz italian-style stewed tomatoes
1 tbsp ketchup
1/2 tsp crushed oregano leaves
Cut the tops off the peppers and remove the seeds. Combine first 7 ingredients and mix thourghly then put mixture into each pepper. Combine the sauce ingredients and pour over peppers. Cook for about an hour with whatever coals are needed to get the oven to around 350 degrees. I ended up with about 1 1/2 hours just to make sure the meat is cooked all the way through.

I used a 2 lb. chub of burger and whatever was left over was mooshed into a patty and stuck it in the bottom of the DO before the peppers were put in. The juices from the tomatos combined with the patty made a tasty dish itself.

BTW, I got this recipe from the KS Beef Council and have made it several times. I can't take credit for it.
Image
Image
Image
Image
Image

That's it homies!!! What cha' got?!?!?!

Jeff[/b]
Last edited by WarPony on Sun May 06, 2007 2:30 pm, edited 1 time in total.
ImageImage

Still a million dollars away from being a millionaire!!
User avatar
WarPony
Donating Member
 
Posts: 2089
Images: 289
Joined: Tue Sep 14, 2004 12:10 pm
Location: Kansas, Topeka
Top

Postby WarPony » Sat May 05, 2007 9:41 pm

BUMP!
ImageImage

Still a million dollars away from being a millionaire!!
User avatar
WarPony
Donating Member
 
Posts: 2089
Images: 289
Joined: Tue Sep 14, 2004 12:10 pm
Location: Kansas, Topeka
Top

Postby DRYVEM » Sat May 05, 2007 11:10 pm

YUM!
Barbara
Proud owner of a 2010 Martin Built Teardrop
DRYVEM
Lifetime member
 
Posts: 247
Images: 8
Joined: Wed Nov 16, 2005 8:47 pm
Top

Postby wolfix » Sat May 05, 2007 11:13 pm

If I had discovered DO cooking more then just a few weeks ago, I would enter something. I'm hoping I get some Lodge stuff for my birthday next month. :thumbsup:
"I am the guy our parents warned us about."
User avatar
wolfix
Teardrop Master
 
Posts: 298
Joined: Tue Sep 26, 2006 11:21 am
Location: Iowa
Top

Postby Ma3tt » Sun May 06, 2007 2:04 pm

Carefully choose your cooking tools.....
Image
10" Dutch Oven well oiled
Dump one 16 oz can of Peaches
Dump one box Vanilla cake mix
Dump one 12 oz Sierra Mist
Dump one cube sliced butter
Lightly fluff top layer with a fork

Stack with main course and apetizers

Image
8 coals under 14 on top 40minutes
adjust as necessary
Send Me some....
Image
substitute Cherrie pie mix, Dark Chocolate cake, Berry Dr. Pepper, for a SLIGHTLY different taste.

Repeat 14 times if you want to make it for 285 people
Image
Be Good
1967 Siesta del Sobrino "Standy"
If you lived here... you would be home by now.
http://www.Camp-Cook.com
User avatar
Ma3tt
Dutch Oven GURU
 
Posts: 1140
Images: 179
Joined: Tue Apr 19, 2005 10:19 am
Location: Noodleberry Park. Ca.
Top

Postby WarPony » Sun May 06, 2007 2:33 pm

Geez, Matt!! Be careful with all that iron or you'll cause Noodleberry to break off and fall into the Pacific Ocean!!! :lol: :lol:

Jeff
ImageImage

Still a million dollars away from being a millionaire!!
User avatar
WarPony
Donating Member
 
Posts: 2089
Images: 289
Joined: Tue Sep 14, 2004 12:10 pm
Location: Kansas, Topeka
Top

Postby Loader » Sun May 06, 2007 8:08 pm

Ok, thought I'd submit a recipe I came up with. It is based off wife's green chile stew. First attempt was today, turned out pretty good.

Enjoy!

Pork Tenderloin with Green Chiles and Potatoes


1 pork tenderloin
1 medium onion cut into wedges
1 lb. Hatch green chiles, roasted and cleaned
3 garlic cloves, coarsely chopped
10 small red potatoes, halved.
1 14.5 oz can of diced tomatoes, drained
1/3 cup chicken broth
cornstarch
Olive Oil
Seasoning rub (recipe to follow)

Seasoning Rub
1/8 tsp. salt
1/8 tsp. pepper
1 tsp. garlic powder
1/2 tsp. chipotle chile pepper
1/2 tsp. onion powder
1/2 tsp. ground cumin
1/4 tsp. ground cinnamon
1/4 tsp. ground nutmeg
1 tsp. cilantro

Coat tenderloin in olive oil add seasoning rub and thoroughly coat tenderloin.
Add oil to dutch oven, when hot, add tenderloin and brown.
Add onions and garlic and saute, then add chiles and tomatoes, chicken broth and potatoes.
Cook 45 minutes rotating DO quarter turn every 15 minutes. Remove lid and add a cornstarch/water mixture to thicken broth. Serve.


Ingredients

Image

Seared; Add Potatoes and Chiles

Image

Simmering

Image

Served

Image
Earl & Kerry

"Loader"

Blue Yonder Build Thread - viewtopic.php?f=50&t=42611

ImageImage
User avatar
Loader
Platinum Donating Member
 
Posts: 1584
Images: 245
Joined: Tue Apr 26, 2005 2:33 pm
Location: Fort Worth, Texas
Top

Postby DRYVEM » Sun May 06, 2007 10:25 pm

YUM!

Barbara
Barbara
Proud owner of a 2010 Martin Built Teardrop
DRYVEM
Lifetime member
 
Posts: 247
Images: 8
Joined: Wed Nov 16, 2005 8:47 pm
Top

Postby Ma3tt » Sun May 06, 2007 10:38 pm

Send me some!
Be Good
1967 Siesta del Sobrino "Standy"
If you lived here... you would be home by now.
http://www.Camp-Cook.com
User avatar
Ma3tt
Dutch Oven GURU
 
Posts: 1140
Images: 179
Joined: Tue Apr 19, 2005 10:19 am
Location: Noodleberry Park. Ca.
Top

Postby Dean in Eureka, CA » Mon May 07, 2007 12:40 pm

Rock Salt Encased 23 lb. Prime Rib in 20" Cabela's Dutch Oven

1. Buy biggest prime rib you can find... Dry aged prefered.

2. Beg and plead your case for someone to bring you an oven big enough for the roast... THANK YOU NUTMEGJOE!!!

3. Forty pound bag of rock salt and a big bag of briquettes.

4. Buy a remote braided cable probe food thermometer instead of the six dollar cheapy I used. Trust me... You won't grind the cable in two when rotating lid, 'cause you don't need to rotate it... It's too damned big.

5. Cook until thermometer reads 135F (More on this later) and remove... Tent with foil and let roast rest for 15 minutes. Expect about a 10 degree rise during resting time

6. Carve and feed about 50 friends.

Image
Meet Major Shell... My new 20" Cabela's DO, named after the wonderful lady who picked it up in Utah and brought it to me.
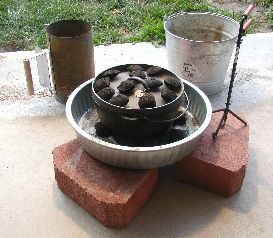
Place a one inch layer of rock salt into the oven.

Image
Coat the roast with your favorite DRY seasonings and place cheap thermometer in the center of the roast. Don't use wet marinates or add any liquids!!!

Image
Place the dry seasoned roast into the oven and bury it with rock salt, leaving only the dial of said cheap thermometer exposed.

Image
Cook it!!!
OK... My butcher said to bake it at 325F for three and a half hours or remove it when the dial read 140F.
Experts at the 14th Dam Gathering advised me to remove it when the dial read 130-135F...
Well... I couldn't find briquette info on this oven prior to leaving from home, so I started out with the simple rule... Double the oven size for total briquettes, (40) using 15 on the bottom and 25 on top.
Afterall, I had a thermometer in the meat, so I wasn't too concerned...
Well... Count the briquettes on the lid. As you can tell, I did develope concerns 'cause dinner had a set time.

Image
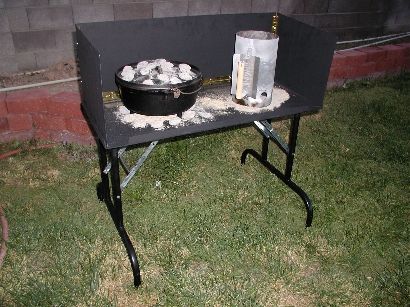
OK... I was getting ready to start another batch of briquetts, but decided to take a peek at the thermometer first.
140F.... Panic insued!!!
Don't use those anti cootie latex gloves to dig the roast outta the salt... Use your leather gloves!!! (Ask me how I know this one)
As I said... panic set in.
Should I carve it up right now?... No you gotta let it rest for 15 minutes.
All the darned juice would run out if carved at this point in time... Yaa Dummy!!!

Image
Well... Here's the roast prior to tenting and resting.
Uhhh... The temp. did go up another 10 degrees, so no... We didn't get the medium rare center like I had hoped for... I needed a moment by myself.

Image
We ended up with quite a feast as lots of folks brought other dutch oven dishes!!! I think we ended up with around 45 people at dinner time Friday night. There were a few slivers of meat left, but Guy finally made it, so he got those last tid bits.

I'd like to thank Ross Bessom for brushing the remaining rock slat off and taking on the carving duties... giving me that "moment" I needed...

So here's the deal if anyone wants to try this...
The rock salt does two things...
1. Seals the meat keeping the juices inside.
2. Cooks the roast evenly for that cut it with a fork tenderness.
Do buy the braided cable meat thermometer for best results.
Tell your butcher not seperate the rack of ribs from the roast at least three times... Two isn't enough. (Although it did make it easy to hide the rack of ribs for later when it came outta the oven)
Oh... And if I win this contest, I want the prize to go to Shelly.
Without Shelly's Dutch Oven Delivery Service I'd been toast.
She's gonna email me a picture of the delivery, but the contest will be long over, so I had to post now.
I'm gonna go pick one up the braided cable remote thermometer today and order another roast... Anyone wanna join me???
User avatar
Dean in Eureka, CA
The Fogcrawler
 
Posts: 4997
Images: 69
Joined: Thu May 11, 2006 8:44 pm
Top

PreviousNext

Return to General Discussion

Who is online

Users browsing this forum: No registered users and 25 guests