Not sure what to call it?

...ask your questions in the appropriate forums BUT document your build here...preferably in a single thread...dates for updates, are appreciated....

Not sure what to call it?

Postby Chris00WJ » Tue Jun 01, 2010 11:06 pm

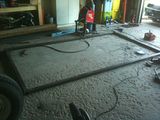
I officially started building today. It was a pretty lazy day for me but I still managed to make a trip to the dump with the utility trailer and then on the way home I stopped to pick up the steel for the frame.

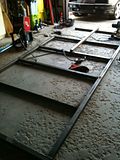
Im using 2x2x.125" for the basic frame, 2x2x.250 for the tongue and using 2x2x.250" angle for a couple cross-members within the frame.

I dont really have much of a plan yet, just kinda winging it. The outside dimensions of the frame are 114"x64". The width was chosen by the axle I happened to find cheap. This build is most DEFINITELY a budget build. I'll spend where I have to or where I think it's important, but anything I can do for free or cheap is great.

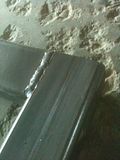
Squaring up the frame took a little bit of effort but wasnt too bad. It's within a 1/16th or so. I still have some welding on the inside corners to do, but it's sturdy as it is.

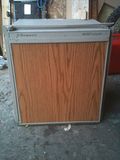
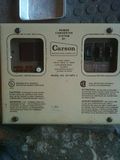
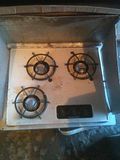
I've picked up a Dometic RM2201 (free) that works pretty good but it has issues with staying lit with gas. Im sure a good cleaning will fix it. Also grabbed a wedgewood 3 burner stove (free) that should work pretty well in the galley. So far the fridge and 120-12v converter(free) have been tested. I have a hydro-flame furnace (free) that I picked up also but havent been able to test it thus far.

Im hoping to have a SAWTOOTH type design, but obviously larger.

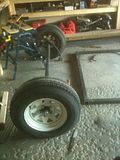
Here's a few pictures of the progress so far. I need to buy some spring perches to get the axle ready to mount up and get the cross-members in and she'll be ready for some tongue work.
Image

Image

Image

Image

Image


Anyone have any tips?
Chris00WJ
Teardrop Builder
 
Posts: 34
Images: 6
Joined: Mon Oct 19, 2009 3:22 pm

Postby teardrop_focus » Wed Jun 02, 2010 1:09 am

Welcome to T&TTT! :shake hands:


Anyone have any tips?


Tell us where you're from?

I guess, based on your stated budget, keep scrounging for freebies and deals!

Read, read, read! Here's absolutely the best way to get directly to any info you might need here, alphabetized to subject matter:

sdtripper2's Index (ongoing)

Of course, browsing the forum index can be done too, but Steve's Index is fast and convenient.

:thumbsup:
.
Image

"There is something about these little trailers that brings out the best in people." - BigAl, Scotland, 2010

"Climb the mountains and get their good tidings. Nature's peace will flow into you as sunshine flows into the trees...
The winds will blow their own freshness into you and the storms their energy, while cares will drop away like autumn leaves..." - John Muir, 1898


Chris Squier / teardrop_focus :-)~
User avatar
teardrop_focus
Donating Member
 
Posts: 5975
Images: 127
Joined: Sat Apr 11, 2009 3:18 pm
Location: SoCal

Postby Chris00WJ » Wed Jun 02, 2010 6:58 am

Im from Calgary, Alberta. Land of the most random weather ever.
Chris00WJ
Teardrop Builder
 
Posts: 34
Images: 6
Joined: Mon Oct 19, 2009 3:22 pm
Top

Postby stomperxj » Wed Jun 02, 2010 4:00 pm

Cool Chris :) You are getting after it. I didnt get a chance to CAD your frame for you yet. Looks like you are on your way now though. Let me know if i can answer any more questions-

Jess
User avatar
stomperxj
The 300 Club
 
Posts: 395
Images: 1
Joined: Tue Jul 29, 2008 12:25 am
Location: Kuna ID
Top

Postby starleen2 » Wed Jun 02, 2010 4:02 pm

No suggestions as to "what" to call it, but you sure got a good beginning :thumbsup:
User avatar
starleen2
5th Teardrop Club
 
Posts: 16272
Images: 224
Joined: Sat May 12, 2007 8:26 pm
Location: Pea Ridge ,AR
Top

Postby Chris00WJ » Wed Jun 02, 2010 8:31 pm

Thanks for the kind words guys/gals. I'll need them more and more as I really get into this.

I've worked with metal and have a fair bit of automotive experience but wood and I dont get along quite as well. Infact Im pretty new to working with wood PERIOD. It's going to be quite a learning experience. Never used a router before in my life :worship:

I have kind of an odd schedule because I work shift work so I never work more than 3 days in a row and get random days off it seems. Update should be fairly frequent but at weird times.

The next update will be a little bit I think. I need to figure out what Im going to do for supports/legs for the rear of the trailer so I can get the frame all outfitted while im at that stage.

Is there anything else I need to be thinking about at this stage? Im thinking about running wiring through the wooden section of the floor to avoid large gaps in the wall insulation for wiring.

How did everyone run their propane lines? Hard lines to the rear galley area and then flexible?
Chris00WJ
Teardrop Builder
 
Posts: 34
Images: 6
Joined: Mon Oct 19, 2009 3:22 pm
Top

Postby grizz » Thu Jun 03, 2010 1:46 am

As mentioned. READ.

I built my trailer mostly out of my head after drawing the profile and cutting it.

There is so much info here, and also helpfull people.

Keep a record on camera of what you do.

Helps with all of us learning from each other.

Oh, and enjoy it. Laugh at your mistakes, but learn from them.
Greetings from England.

Rian.


Hoping to get it all done in time.
User avatar
grizz
1000 Club
1000 Club
 
Posts: 1210
Images: 29
Joined: Mon Sep 21, 2009 2:37 pm
Location: Rochester, Kent, UK
Top

Postby Rigsby » Thu Jun 03, 2010 5:42 pm

Great to see another Budget build starting, i love the way you are building it to the size of the cheap axle and winging it as you go along
If you have a look at my first build, you will see that building on the cheap can be done. Mine came in at under £250
Here is a link to my build http://tnttt.com/viewto ... =scavenger
There is also my Scavenger 2 build, This one os going to be bigger and better, but the plan is to keep the budget to the same as the last.


This is one build i will keep an eye on
Steve
DOOIN IT THE YAARKSHA WAY--FA NOWT, THA NUS !!
User avatar
Rigsby
500 Club
 
Posts: 587
Joined: Sun Aug 31, 2008 12:21 pm
Location: Doncaster, England
Top

Postby Chris00WJ » Thu Jun 03, 2010 9:52 pm

I know my budget will be larger than I want it to be and Im prepared for that (slowly purchasing items). But the cheaper the better. I dont really have a set cost in mind but if I can do it for under $1500 cdn I'll be happy. So far I have around $400 in it with steel, axle, wheels etc. The rest has been free.

I worked on it for an hour or so after my 12hr shift at work today. Got the cross-members welded in. Spacing is approx 27-28". Front two cross members are the 2x2x.125 while the rear cross member is the 1/4 angle.

Also welded on the tongue, but was rushing and didnt double check my measurements after tacking it in place. It's off a bit so I'll have to do some grinding tomorrow and make it right. Live and learn! Atleast it's a mistake that's easily fixed. Wont do that again.

Now that I've got the cross members in place I really need to go buy the stabilizers so I know how to weld up the mounts. I've also got a few ideas for using 2" long pieces of 2x2x1/4 angle to brace the the tongue for additional strength. I dont like relying on just a few welds for the tongue and I want to avoid an A-Frame tongue if at all possible (except maybe a SMALL A for bracing.

Image

Image

Got 3 days off work now so I should have some decent progress as long as I dont need to purchase any big items. I'd like to atleast get it rolling and towable.
Chris00WJ
Teardrop Builder
 
Posts: 34
Images: 6
Joined: Mon Oct 19, 2009 3:22 pm
Top

Postby Chris00WJ » Fri Jun 04, 2010 7:40 pm

I've now got a rolling frame. I've gotta tighten up the suspension bolts and run a couple more welds, but it's insanely sturdy. Unfortunately it also weighs a bloody ton, haha.

Image

Image

Gonna do some bracket and gusset work tomorrow.

Im curious, most people add two stabilizers on the rear of their teardrops. One on each corner. Wouldnt the same thing essentially be accomplished with one centrally mounted stabilizer? You'd still have 4 contact points. Two tires, the front jack and the rear stabilizer. It would cut down on weight and save me from having to buy two stabilizers. It would also lend to easier setup's. Any thoughts?
Chris00WJ
Teardrop Builder
 
Posts: 34
Images: 6
Joined: Mon Oct 19, 2009 3:22 pm
Top

Postby Chris00WJ » Wed Jun 09, 2010 3:12 pm

Picked up a couple windows for the tear this morning after I got off work. One is approximately 50x23" for the very front of the tear. It's a crank window with 3 panes that open up in the center. The two smaller side sections of the window are fixed and dont open. Total cost, $40 cdn. Not bad.

Second one is roughly 20x20 and is a slider. Not sure if it's supposed to slide sideways or up and down. Is there any way to tell? Cost for that was $40 cdn also. I plan on using this one for the door.

And the guy threw in a cargo access door from an RV for free. :twisted:

I was hoping he would have a larger selection of windows and have some smaller matching windows for the sides but he didnt. The search is still on for those.

I'd take and post pictures but it's raining like crazy outside right now so it will have to wait. They are used windows and filthy, but in great shape. Only problem is the smaller one doesnt have a trim ring. If I cant find one for it I'll make something I guess.

Just finalizing mounting brackets etc on the frame and then I can hopefully get started on the floor deck once the weather lets up.
Chris00WJ
Teardrop Builder
 
Posts: 34
Images: 6
Joined: Mon Oct 19, 2009 3:22 pm
Top

Postby Chris00WJ » Tue Jun 15, 2010 2:01 am

Frame is completely welded (minus frame plugs, tongue jack and stabilizers). Mounting holes are drilled in the brackets for the mounting of the floor.

Tomorrow I'll do some budgeting and likely start making sawdust.

I modified the tongue from what those pictures show. I made it a composite tongue with a short A-frame and a hitch receiver to make the tongue removable.

I plan on having a couple different tongues with differing lengths to adjust the distance from the tow vehicle. This will allow me to use a dual receiver hitch on the tow vehicle and strap the dirtbike down overtop of the trailer tongue and not have to worry about the trailer contacting the dirtbike on jackknife turns. You'll see when it's done, haha.

If it werent so late at night I'd go out and take pictures, but the frame is flipped upside down at the moment because I was welding the underside. Im afraid I'll wake my neighbours up if I try to flip it back over, so it will have to wait until tomorrow.
Chris00WJ
Teardrop Builder
 
Posts: 34
Images: 6
Joined: Mon Oct 19, 2009 3:22 pm
Top

Postby StPatron » Tue Jun 15, 2010 2:54 am

Chris00WJ wrote:Second one is roughly 20x20 and is a slider. Not sure if it's supposed to slide sideways or up and down. Is there any way to tell?

Look at the frame exterior surface closely for any tiny drain holes. If you locate some, install so those are at the bottom.
User avatar
StPatron
Donating Member
 
Posts: 748
Images: 297
Joined: Tue Dec 15, 2009 8:38 pm
Location: OK
Top

Postby Chris00WJ » Tue Jun 15, 2010 4:08 am

StPatrón wrote:
Chris00WJ wrote:Second one is roughly 20x20 and is a slider. Not sure if it's supposed to slide sideways or up and down. Is there any way to tell?

Look at the frame exterior surface closely for any tiny drain holes. If you locate some, install so those are at the bottom.


Ahh yes. Drain holes. I suppose that WOULD be pretty important wouldnt it? Haha. Thanks for the advice. That could have been an embarrassing mistake.

What did you guys use to clean up your bare steel frame before you painted or finished it? And what did you use to paint it?

The last thing I want is an ugly rusted eyesore of a frame under my nice teardrop.
Chris00WJ
Teardrop Builder
 
Posts: 34
Images: 6
Joined: Mon Oct 19, 2009 3:22 pm
Top

Postby StPatron » Tue Jun 15, 2010 1:22 pm

Chris00WJ wrote:What did you guys use to clean up your bare steel frame before you painted or finished it? And what did you use to paint it?


I started with a salvaged frame that I had to prep for re-painting. I then brush painted it with RustOleum enamel, hammered finish. I've been very pleased with both the durability of the paint and the appearance.

You'll find the answers to your many questions by doing a search. If I remember correctly, prep is covered in the tutorial on chassis building. As stated, build threads aren't the place to ask questions and you're likely to get few responses here. If you don't find what you're looking for during an archive search, a post in "Construction Tips and Techniques" is likely to get responses.
User avatar
StPatron
Donating Member
 
Posts: 748
Images: 297
Joined: Tue Dec 15, 2009 8:38 pm
Location: OK
Top


Return to Build Journals

Who is online

Users browsing this forum: No registered users and 42 guests