Hatch seal help

Anything to do with mechanical, construction etc

Hatch seal help

Postby JunkMan » Sat Apr 01, 2006 12:58 pm

I'm getting ready to build my hatch, and am trying to figure out the best way to make it. I am trying to follow the generic plans, using 3/4" Baltic Birch plywood for the ribs, but the plans are not for a sandwich wall, so I'm not sure how to do the seal. I plan to use the rubber hatch seal material from Grant.

My sides have 1/4" ply on the outside, 3/4" framing, and 1/4" ply on the inside. I'm thinking about making the hatch ribs the same shape as the sides of the trailer, but cutting a groove (dado? not sure what to call it) 5/8" wide (the width of the seal, and 3/8" deep (just a little bit smaller than the height of the seal) along the outer edge of the wall, to put the seal in. The Baltic Birch and Aluminum of the hatch will cover the seal when it is closed, and I will rivit an angle trim piece on the edge of the hatch, as the plans show.

This isn't a very good drawing, but it's the best I can do with Paint. The seal would be attached to the side wall, not the hatch as it appears in the drawing. I tried to post it as a image, but it wouldn't work (maybe this forum doesn't support bit maps).
http://rap.midco.net/grissop/Teardrops/hatch%20seal.bmp


I thought that someone had posted some pics or drawings of how they did their hatch seal, but I can't find them. Would I be better off putting the seal on the hatch itself? One of my concerns is the seal being on the side of the tear, not on the hatch itself. I think it might be damaged easier on the side than if it was on the hatch, and up out of the way when the hatch was open.

Any help would be appreciated.
Jeff & Odie
Black Hills of South Dakota
User avatar
JunkMan
500 Club
 
Posts: 974
Images: 50
Joined: Sun Oct 24, 2004 6:21 pm
Location: Rapid City, South Dakota

Postby toypusher » Sat Apr 01, 2006 1:32 pm

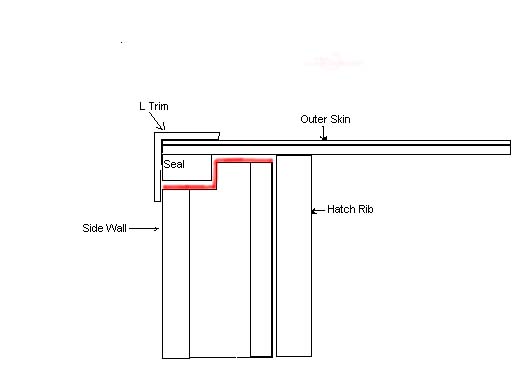
If I was doing this I would put the seal on the hatch not the sidewall. Is the sidewall wood or insulation between the outer and inner skins?? In the drawing below (modified yours) the seal is attached to the hatch and you should seal the areas in red really well. You may want to consider cutting out all the way from the outside skin to the inside skin (up to the inside skin and not cut the skin itself) then use a wider seal.

Image

Just how I would do it.
User avatar
toypusher
Site Admin
 
Posts: 43040
Images: 324
Joined: Fri Jan 28, 2005 12:21 pm
Location: York, PA Area

Postby Kevin A » Sat Apr 01, 2006 1:38 pm

Jeff, here's one thread on the subject of hatch seals
http://tnttt.com/viewto ... hatch+seal
I agree that you'd be better off attaching the seal to the hatch as opposed to the side wall. I put mine on the hatch, but I made the mistake of not leaving sufficient space between the hatch and side wall for the weatherstrip.
"Follow me, I'm right behind you"

ImageImage
User avatar
Kevin A
The other guy
 
Posts: 3222
Images: 289
Joined: Mon Jan 17, 2005 1:16 am
Location: California, Eureka
Top

Postby JunkMan » Sat Apr 01, 2006 3:23 pm

toypusher wrote: Is the sidewall wood or insulation between the outer and inner skins?? In the drawing below (modified yours) the seal is attached to the hatch and you should seal the areas in red really well. Image

Just how I would do it.


Kerry,

The areas outlined in red are all wood, so sealing them should not be a problem.

Another thought I had, was to center the seal (cut a groove in the center of the wall, instead of the edge), and attach the seal to the hatch.

I really wished that I had spent more time looking over how others had done their seals when I was at Minden last summer, but there were som many things to see there :wacky that my brain was on overload!
Jeff & Odie
Black Hills of South Dakota
User avatar
JunkMan
500 Club
 
Posts: 974
Images: 50
Joined: Sun Oct 24, 2004 6:21 pm
Location: Rapid City, South Dakota
Top

Postby JunkMan » Sat Apr 01, 2006 4:06 pm

OK, I re-drew it with the seal in the center, attached to the top.

Image

Everything yellow is wood, gray is aluminum (I forgot the outer skin on the wall), blue is the seal.
Jeff & Odie
Black Hills of South Dakota
User avatar
JunkMan
500 Club
 
Posts: 974
Images: 50
Joined: Sun Oct 24, 2004 6:21 pm
Location: Rapid City, South Dakota
Top

Postby toypusher » Sat Apr 01, 2006 8:18 pm

JunkMan wrote:OK, I re-drew it with the seal in the center, attached to the top.

Image

Everything yellow is wood, gray is aluminum (I forgot the outer skin on the wall), blue is the seal.


I would not recommend doing it that way. You are creating a space for water to set in. Now if you are very careful and make sure that the water can escape out the bottom then it would be OK. I just think that the original way is a better way to do things. I really would put the seal (gasket) on the hatch and not on the sidewall. Always try to create a path of least resistance to the outside of your teardrop for potential water problems.
User avatar
toypusher
Site Admin
 
Posts: 43040
Images: 324
Joined: Fri Jan 28, 2005 12:21 pm
Location: York, PA Area
Top

Hatch seal help

Postby rooster » Sun Apr 02, 2006 12:40 am

Reading this thread, I now find I have a big problem. I purchased a flat huricane hinge and was told that is the best one. In the back of my mind I knew there had to be room between the hatch and the sidewall for the seal. Now I don't have that room for a seal. Do I cut 3/8" off the sidewall for the seal or do I have another opption? :cry:

Jim, :x
Beware of what she wishes....especially with that twinkle in her eye and that mischievious smile....you know it's gonna cost....
User avatar
rooster
Donating Member
 
Posts: 459
Images: 42
Joined: Sat Jul 23, 2005 7:48 pm
Location: Soldotna, Alaska
Top

Re: Hatch seal help

Postby Kevin A » Sun Apr 02, 2006 1:02 am

rooster wrote:Reading this thread, I now find I have a big problem. I purchased a flat huricane hinge and was told that is the best one. In the back of my mind I knew there had to be room between the hatch and the sidewall for the seal. Now I don't have that room for a seal. Do I cut 3/8" off the sidewall for the seal or do I have another opption? :cry:

Jim, :x

Jim,
I made the same mistake a year ago while rushing to get the trailer ready for the Minden trip. I found some thin open cell foam tape to use temprarily until I figured out the best permanent solution. I still haven't made the changes to the seal and the trailer has spent most of the winter outside under the deck. I haven't seen any signs of leaks inside the trailer.
:worship:
"Follow me, I'm right behind you"

ImageImage
User avatar
Kevin A
The other guy
 
Posts: 3222
Images: 289
Joined: Mon Jan 17, 2005 1:16 am
Location: California, Eureka
Top

Postby asianflava » Sun Apr 02, 2006 2:02 am

Me too, I thought I got the offset hinge. I ended up having to cut a notch on my sidewall. It wasn't as bad as I feared.

I put the hatch on and closed it
Scribe a line for a 1/4in gap with my handy 3 legged compass
Cut the area away with a belt sander and jigsaw. I used the jigsaw where there was a lot of wood to remove and a belt sander for the rest.
Fine tune the cut with the sander
Use a top bearing router bit to square up the cut.
User avatar
asianflava
8000 Club
8000 Club
 
Posts: 8412
Images: 45
Joined: Mon Aug 02, 2004 5:11 am
Location: CO, Longmont
Top

Postby JunkMan » Sun Apr 02, 2006 9:37 am

Now you guys have me all screwed up again. I don't know what kind of hinge I am getting. :o

I just emailed Grant that I needed a hinge & weatherstripping, and sent him payment. I would assume that it's not the offset hinge, but I suppose I need to wait until it arrives to be sure? Of course, if I was going to cut a groove in the side for the weatherstripping, and the hinge I ordered was the offset one, I wouldn't have to cut the groove?

I plan to build the hatch frame today, guess I will wait to do anything with the sides until the hinge comes in (the hatch frame should be the same with either hinge shouldn't it?).
Jeff & Odie
Black Hills of South Dakota
User avatar
JunkMan
500 Club
 
Posts: 974
Images: 50
Joined: Sun Oct 24, 2004 6:21 pm
Location: Rapid City, South Dakota
Top

Re: Hatch seal help

Postby CariC » Thu Aug 24, 2017 9:12 pm

Well this thread ended a good solid 11 years ago!!! But I'm in the same pickle here...I have a flat hinge and have no clue how to install it...really didn't want to interrupt the side profile, but sounds like most of it can be hidden behind the trim?!? Any of you have and photos of your results and/or documentation on how you installed a flat hinge.
CariC
Teardrop Inspector
 
Posts: 4
Joined: Mon Aug 21, 2017 5:10 pm
Top

Re: Hatch seal help

Postby working on it » Fri Aug 25, 2017 11:41 am

CariC wrote:Well this thread ended a good solid 11 years ago!!! But I'm in the same pickle here...I have a flat hinge and have no clue how to install it...really didn't want to interrupt the side profile, but sounds like most of it can be hidden behind the trim?!? Any of you have and photos of your results and/or documentation on how you installed a flat hinge.
  • I used three separate gate hinges to mount my flat hatch on my squareback TTT. The way I covered it and waterproofed/shielded the gap between the body of the trailer, and the open hatch (now raised to 105-110 degrees from closed), could be used to cover and conceal any type of hinge being used, whether gate-flat-piano-hurricane-polyethelene/polyolefin plastic (living hinge) types.
  • working on it wrote: from an earlier, separate thread
    • ...I didn't try a hurricane hinge, or an engineered-to-be-waterproof hinge, but used a cover over my wide open hatch hinge. My squareback TTT has three gate hinges holding the vertical hatch (a 48"x 49" piece of 3/4" plywood, and when opened, there is a substantial gap. So, I used some 12" wide semi-stiff conveyor belting I salvaged from work, and attached it over the gap, with bolts, aluminum bar stock, and sealed with Loctite Premium Poly adhesive. Later, I realized that the belting had thousands of pinholes, allowing water thru, so I sprayed it thoroughly with some grey Plasti-Dip, and it has been waterproof since then. I sealed the hatch door with D-shaped weatherstrip, glued and screwed around the perimeter, and added a bulb seal up top, as extra sealing for monsoon-type storms (which seem to occur on every trip I take).
    • By using a cover sealing piece, like my conveyor belting (used because I had it, and wide sun-resistant rubber was expensive), you could rest assured that between using a hurricane type hinge in conjunction with it, there would be little chance of a leak. I believe others have done just that, already; mine was an attempt to re-purpose an item on hand, and to seal the gap, and also act as a "spoiler" for aero benefits. I'm sure you could use better materials, for better results and appearance. But, my seals are effective, anyway.
    • 123161 conveyor belting (shields gap,breaks up laminar airflow to decrease suction effect behind trailer
    • 123162 tight seals using D-shape weatherstripping
    • 111159 note the aluminum flat bar used to mount the cover over the hatch hinges (2 used, on roof and hatch)
  • Many others have used their own versions of a cover seal on their trailers. Common factors are : sealing ability, flexibility, and maybe just as important-concealing the hinge(s) used to mount the hatch. I really didn't have to use the three $6 gate hinges (powder-coated black), but could've used some old brass hinges I had salvaged years before, because they would not be visible from under the gap cover. I am glad I did, though, because the nylon bearings they have are noiseless and durable. But, the covering can also conceal an ugly attachment job, and make a botched effort look golden.
  • I don't know what body design you'll build, but this type of cover-over-hinge will apply to any. So, just use whatever hinge you wish, then cover it with waterproof material appropriate to your design/color scheme (mine is grey/black with aluminum holding strips...which matches my black-trimmed grey and aluminum paint). Hope this helps.
  • 111159
    2013 HHRv "squareback/squaredrop", rugged, 4x8 TTT, 2225 lbs
    • *3500 lb Dexter EZ-Lube braked axle, 3000 lb.springs, active-progressive bumpstop suspension
    • *27 x 8.5-14LT AT tires (x 3) *Weight Distribution system for single-beam tongue
    • *100% LED's & GFCI outlets, 3x fans, AM/FM/CD/Aux. *A/C & heat, Optima AGM, inverter & charger(s)
    • *extended-run, on-board, 2500w generator *Coleman dual-fuel stove & lantern, Ikea grill, vintage skillet
    • *zinc/stainless front & side racks *98"L x 6" diameter rod & reel carrier tube on roof
    173193172890148599
    User avatar
    working on it
    2000 Club
    2000 Club
     
    Posts: 2167
    Images: 457
    Joined: Tue Oct 04, 2011 9:05 pm
    Location: DFW Texas
    Top

    Re: Hatch seal help

    Postby tony.latham » Fri Aug 25, 2017 8:56 pm

    CariC wrote:Well this thread ended a good solid 11 years ago!!! But I'm in the same pickle here...I have a flat hinge and have no clue how to install it...really didn't want to interrupt the side profile, but sounds like most of it can be hidden behind the trim?!? Any of you have and photos of your results and/or documentation on how you installed a flat hinge.


    Is the problem, extending the hinge beyond the outside walls? If so you need to trim off the (downward) leg of the hinge... in order to get it past the walls.

    Or am I missing the question like I did so often in 9th grade grammar? :frightened:

    Tony
    User avatar
    tony.latham
    Gold Donating Member
     
    Posts: 6874
    Images: 17
    Joined: Mon Jul 08, 2013 4:03 pm
    Location: Middle of Idaho on the edge of nowhere
    Top


    Return to Teardrop Construction Tips & Techniques

    Who is online

    Users browsing this forum: No registered users and 1 guest