Front A/C Hatch

Anything to do with mechanical, construction etc

Front A/C Hatch

Postby Bandit » Fri Jun 16, 2006 2:07 pm

I decided that I wanted an A/C unit mounted in the front of my WeekEnder. But I did not like the fact that it would be sticking out the front during transport. So, I decided to find an RV Hatch that would allow me to mount the A/C Unit on a slider and secure it during transport and extend it while camping.
Here are some photos as I installed the hatch. I will update more as I complete the installation.

Image

Image

:thinking: :thinking:
First Metal Cut 02/11/06
Complete! (Almost) 08/22/06
Looking for a trip in the SPRING!!!!
Not Up to Testing the Heater!!!
Thanks for all the HELP!!!!
User avatar
Bandit
Donating Member
 
Posts: 207
Joined: Tue Dec 06, 2005 12:25 pm
Location: McMinnville, TN

Postby madjack » Fri Jun 16, 2006 2:23 pm

I like it, I think a front mounted A/C unit on slides, behind a door is and excellent way to doit...solves drainage and aesthetic problems in one solution......
madjack 8)
...I have come to believe that, conflict resolution, through violence, is never acceptable.....................mj
User avatar
madjack
Site Admin
 
Posts: 15128
Images: 177
Joined: Thu Dec 02, 2004 5:27 pm
Location: Central Louisiana

Re: Front A/C Hatch

Postby kirtsjc » Fri Jun 16, 2006 4:07 pm

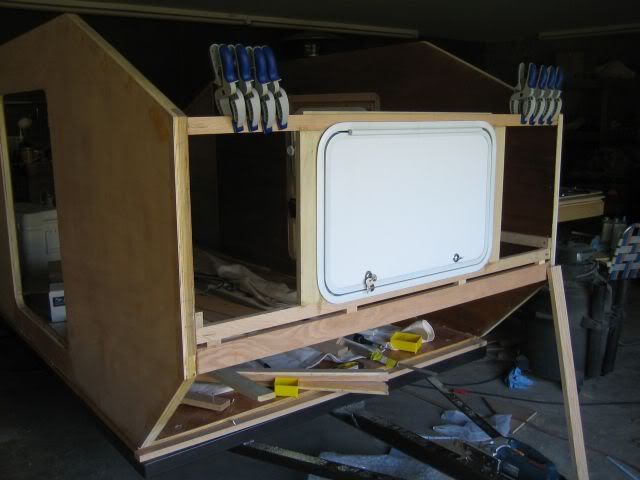
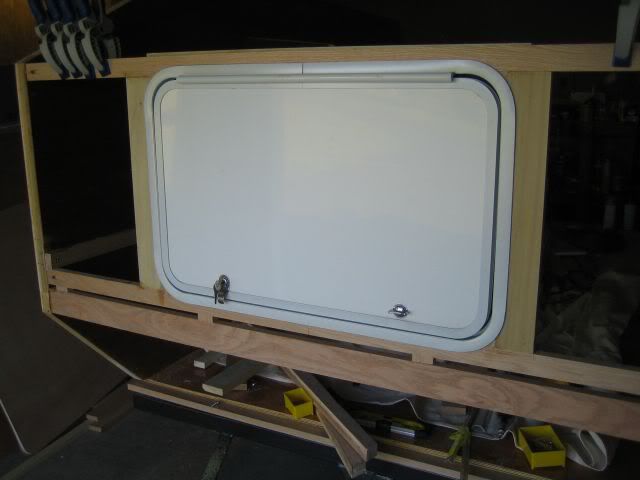
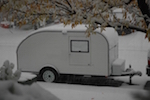
Bandit wrote:I decided that I wanted an A/C unit mounted in the front of my WeekEnder. But I did not like the fact that it would be sticking out the front during transport. So, I decided to find an RV Hatch that would allow me to mount the A/C Unit on a slider and secure it during transport and extend it while camping.
Here are some photos as I installed the hatch. I will update more as I complete the installation.


Great idea if you need some weight on the tongue! Please do keep the pictures flowing!
User avatar
kirtsjc
Silver Donating Member
 
Posts: 324
Images: 43
Joined: Sat Jan 07, 2006 8:56 am
Location: Cincinnati, Ohio
Top

Postby Gadget Man » Fri Jun 16, 2006 6:41 pm

Bandit;
Thats awsome...
One more idea for "My Next Tear Drop Trailer"
Just put it on some heavy duty sliders so you can pull it out and turn it on.
No extra venting needed or worry about condensate dripping.
How is it going to look from inside when you are not using it?

Go for it, and keep us all informed on your progress.

Gadget Man
My kids may be smarter than me,
But I know more.
User avatar
Gadget Man
Teardrop Master
 
Posts: 298
Images: 23
Joined: Tue May 10, 2005 4:41 pm
Location: Elk River MN
Top

Postby Bandit » Fri Jun 16, 2006 9:58 pm

It only needs to move out about 10", so it will still be recessed into the cabinet when it is in the stored position. It is the 6,000 btu version as I wanted the remote and the digital controls. It is not much heavier than the 5,000 btu unit, but it is a little larger.
When stored, there is still enough room to place my ceramic heater in front of it.
Tongue weight is still not that bad. If it gets bad, I've already installed my axle so that it is adjustable. Both my tow vehicle are rated for 500 lbs. Currently it is onyl about 100 lbs. I'm estimating between 150 and 175 when complete.
I should finish up the front in the next couple of weeks and have some near finish photo's.
:thumbsup: :thumbsup:
First Metal Cut 02/11/06
Complete! (Almost) 08/22/06
Looking for a trip in the SPRING!!!!
Not Up to Testing the Heater!!!
Thanks for all the HELP!!!!
User avatar
Bandit
Donating Member
 
Posts: 207
Joined: Tue Dec 06, 2005 12:25 pm
Location: McMinnville, TN
Top

Postby Miriam C. » Fri Jun 16, 2006 11:02 pm

Bandit
Where did you get that beautiful thang....? I could use one. One question, How do you support the weight with the weekender build?

Miriam
“Forgiveness means giving up all hope for a better past.â€
User avatar
Miriam C.
our Aunti M
 
Posts: 19675
Images: 148
Joined: Wed Feb 15, 2006 3:14 pm
Location: Southwest MO
Top

Postby Bandit » Sat Jun 17, 2006 8:02 am

It weighs approx. 40 lbs. I've cross braced it with 1X2 oak, the inside will have a center leg and the outside will be braced in a couple of places to the 1x3 spars and the 1/2" skin. Mounted only to the outside edges and with the 1x2 oak braces, I could sit on it with minimal deflection. (170lbs)
I will also use some 2x2x1/8 angle iron to mount the sliders. When the A/C unit is extended I will use a bolt and wing nut through the slider tray and the shelf. When it is retracted, the bolt and wing nut will also keep it stationary for travel so it does not beat against the door or rock back and forth.

I found the hatch from TRI STATE SURPLUS on Ebay for $40.00 including shipping.

:thumbsup: :thumbsup:
First Metal Cut 02/11/06
Complete! (Almost) 08/22/06
Looking for a trip in the SPRING!!!!
Not Up to Testing the Heater!!!
Thanks for all the HELP!!!!
User avatar
Bandit
Donating Member
 
Posts: 207
Joined: Tue Dec 06, 2005 12:25 pm
Location: McMinnville, TN
Top

Postby Miriam C. » Mon Jun 19, 2006 9:26 am

Thank you kindly.
I will keep a check on Ebay for one. That looks a lot easier than trying to seal wood.

Put the angle on my list too.
:? Miriam
“Forgiveness means giving up all hope for a better past.â€
User avatar
Miriam C.
our Aunti M
 
Posts: 19675
Images: 148
Joined: Wed Feb 15, 2006 3:14 pm
Location: Southwest MO
Top

Hatch

Postby jimb60 » Mon Jun 19, 2006 10:49 am

I believe that these type "deck" hatches are available from West Marine
They have an online catalog.
:roll:
jimb60
Teardrop Inspector
 
Posts: 1
Joined: Sun Jun 18, 2006 10:19 pm
Location: Thornton, TX
Top

Postby jo_tigger » Mon Jun 19, 2006 1:31 pm

In the army we had ac/heater sticking out the front of our communication van. Big box on a truck. They had a vinyl covering that snapped down over the coils to protect them during transport. Never had any problems. Envision Dodge truck with 440 magnum engine and duallies with 4 wheel drive on the autobahn in West Germany.
:thinking:
Richard
Austin, TX
jo_tigger
Donating Member
 
Posts: 17
Joined: Sun Mar 26, 2006 1:51 am
Location: Austin, TX
Top

Postby Gerdo » Wed Jun 21, 2006 10:11 am

I did the same thing but I made my own hatch. I mounted my AC on on drawer slides and a seal that is mounted to the AC unit.
Image
Image
Image
User avatar
Gerdo
1000 Club
1000 Club
 
Posts: 1361
Images: 156
Joined: Mon Apr 25, 2005 12:02 am
Location: Littleton, Colorado
Top

Postby Bandit » Thu Jun 22, 2006 12:14 pm

Gerdo,
How did you run your drain? I noticed that the catch area for the moisture is stepped and the drain position is on the upper step. This allows about 1 or 2 cups of water to accumulate before it reaches the drain.
I am thinking about cutting a new drain in the lower portion so that it drains immediately.
I also noticed that before the water reaches the upper step to start draining, the fan blade starts slapping the water and spraying it around in the unit. This is with the AC unit level. I would have to tilt the unit back in towards the cabin to get the water to drain any quicker.
I do not like the idea of having 1-2 cups of water contained in the bottom of the AC unit, because it would still be there when I close it up for traveling. It would then slosh out in the cabin.
Any suggestions would be greatly appreciated.
:thinking: :thinking:
First Metal Cut 02/11/06
Complete! (Almost) 08/22/06
Looking for a trip in the SPRING!!!!
Not Up to Testing the Heater!!!
Thanks for all the HELP!!!!
User avatar
Bandit
Donating Member
 
Posts: 207
Joined: Tue Dec 06, 2005 12:25 pm
Location: McMinnville, TN
Top

Postby Gerdo » Thu Jun 22, 2006 8:02 pm

Good thought. I am going to re-engineer the drain on mine. It is mounted on the slides on an angle to drain better but it should just drain out the bottom so no water is sitting in the bottom.
User avatar
Gerdo
1000 Club
1000 Club
 
Posts: 1361
Images: 156
Joined: Mon Apr 25, 2005 12:02 am
Location: Littleton, Colorado
Top

Postby madjack » Thu Jun 22, 2006 8:07 pm

...the A/C unit we are going to install is the same...no specific drain...we drilled a drain hole because of the problems mentioned...these units are meant to splash that water out of existence, so be sure to allow plenty of vent room for sufficient air flow to keep the coil cooled...I hope it works properly with that drain hole when we finally get it installed.....
madjack 8)
...I have come to believe that, conflict resolution, through violence, is never acceptable.....................mj
User avatar
madjack
Site Admin
 
Posts: 15128
Images: 177
Joined: Thu Dec 02, 2004 5:27 pm
Location: Central Louisiana
Top

Postby Todah Tear » Fri Jun 23, 2006 2:25 pm

I'm not trying to hi-jack the thread, but Gerdo, I noticed that your tow vehicle is lower than your tear. Does this present any issues in transit?

Todah
"It is not good to have zeal without knowledge, nor to be hasty and miss the way." Proverbs 19:2 Image
User avatar
Todah Tear
Platinum Donating Member
 
Posts: 1723
Images: 282
Joined: Mon Feb 13, 2006 3:30 pm
Location: Texas
Top

Next

Return to Teardrop Construction Tips & Techniques

Who is online

Users browsing this forum: No registered users and 19 guests

cron