46 kit rebuild updated 6-14-2010

...ask your questions in the appropriate forums BUT document your build here...preferably in a single thread...dates for updates, are appreciated....

46 kit rebuild updated 6-14-2010

Postby maud'Dib » Fri May 07, 2010 9:08 am

I'm currently rebuilding a 46 kit, and I haven't been very good about keeping a photo record of my progress so far but I hope to change that. I started with the destruction of the original camper back in August of 09. The below thread shows that.

http://tnttt.com/viewto ... highlight=

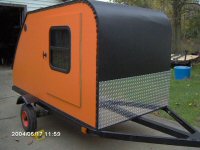
The actual rebuild began in march when I received the frame, axle, and wheels back from the sandblaster. I've accomplished quit a bit and I think I have cut my last piece of wood for this project. Below is a pic of the current state. All the wood was coated with CPES prior to assembly and now has 3-4 coats of helmsman. The exterior will be aluminum.

Image

The inside cabinets will have semi circular fronts that open downward like the original rear lower cabinet had all trimmed in t moulding. I even found a great site where you could get the original push button hardware.
http://www.historichouseparts.com/

Image


the rear is fairly straight forward. I'm keeping the ice box, and the rear cabinet door, I plan on hiding all the electrical in there. But I'm adding another small storage compartment in the upper right that will also have a door similar to the rest.

Image

Sorry for not taking more pics of the early build, but hopefully I will keep up and have a good photo journal of it all.

eric
Last edited by maud'Dib on Mon Jun 14, 2010 10:08 am, edited 5 times in total.
User avatar
maud'Dib
Teardrop Builder
 
Posts: 31
Images: 71
Joined: Wed Aug 26, 2009 9:51 am
Location: Columbus NE

xx

Postby Chuckles2153 » Fri May 07, 2010 9:20 am

Looking pretty good Eric.
Chuck
Chuckles2153
Teardrop Master
 
Posts: 154
Images: 74
Joined: Wed Mar 24, 2010 2:00 pm
Location: Franklin. Indiana

Postby jamwius » Fri May 07, 2010 10:13 am

Your rebuild looks great. You mentioned that you applied CPES before assembly...did you apply it before you glued the pieces together? Does the glue stick? I am trying to plan ahead but not sure when to apply the CPES and whether I can apply it to the areas that will receive the glue or not. Any help would be great. I hope mine will turn out as nice as yours is.

John
User avatar
jamwius
Teardrop Builder
 
Posts: 35
Images: 18
Joined: Mon Mar 22, 2010 5:56 am
Location: New Berlin, WI
Top

Postby grizz » Fri May 07, 2010 12:16 pm

That is lovely.
Greetings from England.

Rian.


Hoping to get it all done in time.
User avatar
grizz
1000 Club
1000 Club
 
Posts: 1210
Images: 29
Joined: Mon Sep 21, 2009 2:37 pm
Location: Rochester, Kent, UK
Top

Postby teardrop_focus » Fri May 07, 2010 12:32 pm

jamwuis

...not sure when to apply the CPES and whether I can apply it to the areas that will receive the glue or not.


Glue first, then CPES the structure... is how I've seen it done on quite a few 'drops 'round here.

Needs to glue raw wood.

:thumbsup:


maud'Dib

Image


Magnificent! :applause:

I envy you your crafstmanship! :thumbsup:
.
Image

"There is something about these little trailers that brings out the best in people." - BigAl, Scotland, 2010

"Climb the mountains and get their good tidings. Nature's peace will flow into you as sunshine flows into the trees...
The winds will blow their own freshness into you and the storms their energy, while cares will drop away like autumn leaves..." - John Muir, 1898


Chris Squier / teardrop_focus :-)~
User avatar
teardrop_focus
Donating Member
 
Posts: 5975
Images: 127
Joined: Sat Apr 11, 2009 3:18 pm
Location: SoCal
Top

Postby maud'Dib » Fri May 07, 2010 12:47 pm

did you apply it before you glued the pieces together? Does the glue stick?


John

The parts that I CPES ed before assembly were gorilla glued. Regular wood glue would not work, as I found out thanks to this forum. The gorilla glue does expand quit a bit, so a little goes a long way. Hope that helps.

Thanks for all the nice comments.

eric
User avatar
maud'Dib
Teardrop Builder
 
Posts: 31
Images: 71
Joined: Wed Aug 26, 2009 9:51 am
Location: Columbus NE
Top

Postby aggie79 » Fri May 07, 2010 1:48 pm

jamwius wrote:Your rebuild looks great. You mentioned that you applied CPES before assembly...did you apply it before you glued the pieces together? Does the glue stick? I am trying to plan ahead but not sure when to apply the CPES and whether I can apply it to the areas that will receive the glue or not. Any help would be great. I hope mine will turn out as nice as yours is.

John


PVA wood glues - Titebond II & III - don't adhere to CPES/epoxy. Polyurethane glues will adhere.
Tom (& Linda)
For build info on our former Silver Beatle teardrop:
Build Thread

93503
User avatar
aggie79
Super Duper Lifetime Member
 
Posts: 5405
Images: 686
Joined: Tue Aug 07, 2007 5:42 pm
Location: Watauga, Texas
Top

Postby prohandyman » Fri May 07, 2010 2:07 pm

Looking really good! :thumbsup: Do you need an ice box? I stock them for Kit rebuilds
Dan
155200 Facebook group 164774163701
User avatar
prohandyman
Super Lifetime Member
 
Posts: 1919
Images: 785
Joined: Fri Dec 22, 2006 3:21 pm
Location: Greenwood, IN
Top

Postby Gage » Fri May 07, 2010 3:17 pm

Doing some nice work there Eric and it's showing. :thumbsup: Except for paint, I should have mine finished Sunday (I hope). :thinking:
Image Image Image
Remember 'Teardrop Time'.......Take your time, you don't have to have it finished NOW.
User avatar
Gage
8000 Club
8000 Club
 
Posts: 8321
Images: 28
Joined: Sat Apr 17, 2004 9:14 pm
Location: Palmdale, CA
Top

Postby Rigsby » Fri May 07, 2010 5:11 pm

Great work there Eric :applause:

The sides look good to go as they are without an ally skin
DOOIN IT THE YAARKSHA WAY--FA NOWT, THA NUS !!
User avatar
Rigsby
500 Club
 
Posts: 587
Joined: Sun Aug 31, 2008 12:21 pm
Location: Doncaster, England
Top

Postby doug hodder » Fri May 07, 2010 7:25 pm

Eric...that's one well dressed out Kit. Congrats on a job very well done! Doug
doug hodder
*Snoop Dougie Doug
 
Posts: 12625
Images: 562
Joined: Tue Dec 14, 2004 11:20 pm
Top

Postby Classic Finn » Fri May 07, 2010 7:27 pm

Eric "Finntastic" work your doing. :thumbsup: :applause: :applause:

I have a question for you. I looked in your gallery and found this pic. Can you tell me what the pipe is for on the towbar? Is that for a wheel or?

Image

What size ball is that hitch for?
Royal Teardrop Society Scandinavian Bureau Chief of Staff

Image
User avatar
Classic Finn
Midnight Sun Voyager
 
Posts: 17488
Images: 146
Joined: Fri Apr 29, 2005 4:29 am
Location: Country of Finland
Top

Postby sagebrush » Fri May 07, 2010 8:08 pm

:thumbsup: :thumbsup: :applause: :applause: That looks VERY nice. GREAT JOB.. Will
We ain't skeer'd of the dark!

Living large in a small way!
User avatar
sagebrush
Platinum Donating Member
 
Posts: 608
Images: 161
Joined: Tue Feb 23, 2010 9:09 pm
Location: Casper, WY.
Top

Postby Juneaudave » Fri May 07, 2010 8:12 pm

I really like your work!! This is going to be exceptional!!!! :thumbsup: :thumbsup:
User avatar
Juneaudave
Super Duper Lifetime Member
 
Posts: 3237
Images: 380
Joined: Sun Jul 03, 2005 12:11 pm
Location: Juneau, Alaska
Top

Postby Gage » Fri May 07, 2010 8:26 pm

Classic Finn wrote:Eric "Finntastic" work your doing. :thumbsup: :applause: :applause:

I have a question for you. I looked in your gallery and found this pic. Can you tell me what the pipe is for on the towbar? Is that for a wheel or?

What size ball is that hitch for?

It's for holding down a jack stand Heikki. :lol:

Image

Oh, and my hitch ball receiver is 1 7/8" or is it? :thinking:
Image Image Image
Remember 'Teardrop Time'.......Take your time, you don't have to have it finished NOW.
User avatar
Gage
8000 Club
8000 Club
 
Posts: 8321
Images: 28
Joined: Sat Apr 17, 2004 9:14 pm
Location: Palmdale, CA
Top

Next

Return to Build Journals

Who is online

Users browsing this forum: No registered users and 17 guests